Overview
The Repeater field is essentially a way to organize and display data, specifically “repeating” content like slides, team member bios, and events. This is true, but it doesn’t really capture all the capabilities of this amazing field. In this article, we’ll show you how to unlock the real power of the Repeater field, register and set up your fields, and work with nested Repeater fields for even greater versatility.
The Repeater field is available in ACF PRO along with other complex field types, options page support, and ACF Blocks. This tutorial uses a restaurant menu as an example, but there’s almost no limit to the potential uses of the Repeater field.
How the Repeater Field Works
The Repeater field serves as a wrapper for a theoretically unlimited number of subfields, giving you incredible versatility when building WordPress sites. Any of the 30 fields currently available can be used in a Repeater field.
The only limits on the number of repeats are the ones defined by you in the field settings. However, there are performance implications on the edit screen (WP Admin) if a large number of Repeater rows are created. For Repeater fields with a very large number of rows that aren’t edited often, we recommend enabling pagination on your Repeater field to curb any performance impact.
Nested Repeater Fields
Your subfields can even include other Repeater fields, with their own sets of subfields, nested within the initial Repeater field. In practical terms, this means you can give your clients even more flexibility when it comes to laying out their content.
For example, say you’re designing a training or educational website and the client wants to display information on the courses they offer and the lessons within that course. The client also wants to be able to add new courses and update existing ones on a frequent basis, so static pages won’t work.
A single ACF Repeater field would do the job if all they wanted to do was show courses, add new ones, and update details. But remember, they also want to display the lessons within that course, and update them as needed, add new ones, and so on, just like they do with the courses.
The solution in this case is to use a nested Repeater. The first Repeater field (“Courses”) includes a second Repeater (“Lessons”) that’s called as needed, allowing your clients the flexibility to edit and update both courses and lessons whenever they feel the need.
Use Cases
The ability to include subfields and other Repeater fields means there is practically no limit to the applications of nested Repeaters. ACF users have used nested Repeaters to create custom invoicing systems, asset and brand guides, categorized lists of books, courses and lessons, and much more.
Used it to assist in adding custom placeable map pins and locations to an Apple Map for a Realestate Company. Works like a charm!
— SlickRemix (@SlickRemix) December 30, 2022
ACF’s Repeater field displays data in a consistent format, but that isn’t what makes it so useful. A static page will do as much…if the data never changes. Ah, but we know the data will change, don’t we? Team members come and go, the company adds new brand assets, and courses are added or deleted. Very soon our beautiful static page is out of date, and the client needs our personal attention to update it.
The real power of the Repeater field, especially when nested, is how it can give your clients the freedom to update their content to suit their needs, while also ensuring the new content fits within the existing design.
In the examples below, we’ll demonstrate how to create a dinner menu for a restaurant using the Repeater field. Of course, menus are just an example. By the end of this tutorial, you’ll be able to use a very similar solution in practically any situation where you need to organize data into categories and a hierarchy of subcategories, display that data consistently, and allow user or client editing.
Registering Fields and Field Setup
The first thing we want to do is create a new field group with a Repeater field and give it a name. We named our field group “Page: Menu”, and the first Repeater field “Menu Category”. The “Menu Category” Repeater will represent a restaurant menu’s typical categories, e.g. Appetizers, Entrees, Desserts, etc.
Each Menu Category can include multiple dishes. Each of these will also use a nested Repeater field, which itself will have its own subfields. There are no limits on the type or number of subfields you can use, but in this case there are only a few we need:
- Two Text fields for the names of the menu category and the dish.
- A Text Area field to describe the dish.
- A Number field to show the price.
- A Checkbox field defined so the client can simply check off if a dish is vegetarian, gluten-free, contains shellfish, etc.
This is a good time to reiterate just how much flexibility the ability to include subfields gives you and your clients. What if the restaurant has a specialty dish that must be ordered well in advance to give staff enough time to obtain the ingredients and prepare it? Just add a Date Time Picker subfield to that menu item’s Repeater!
Our final hierarchy of fields will look like this:
- Repeater field – Menu Category
- Text subfield – Menu Category Name
- Repeater subfield – Menu Item
- Text subfield – Title
- Number subfield – Price
- Text Area subfield – Description
- Checkbox subfield – Diet & Allergens
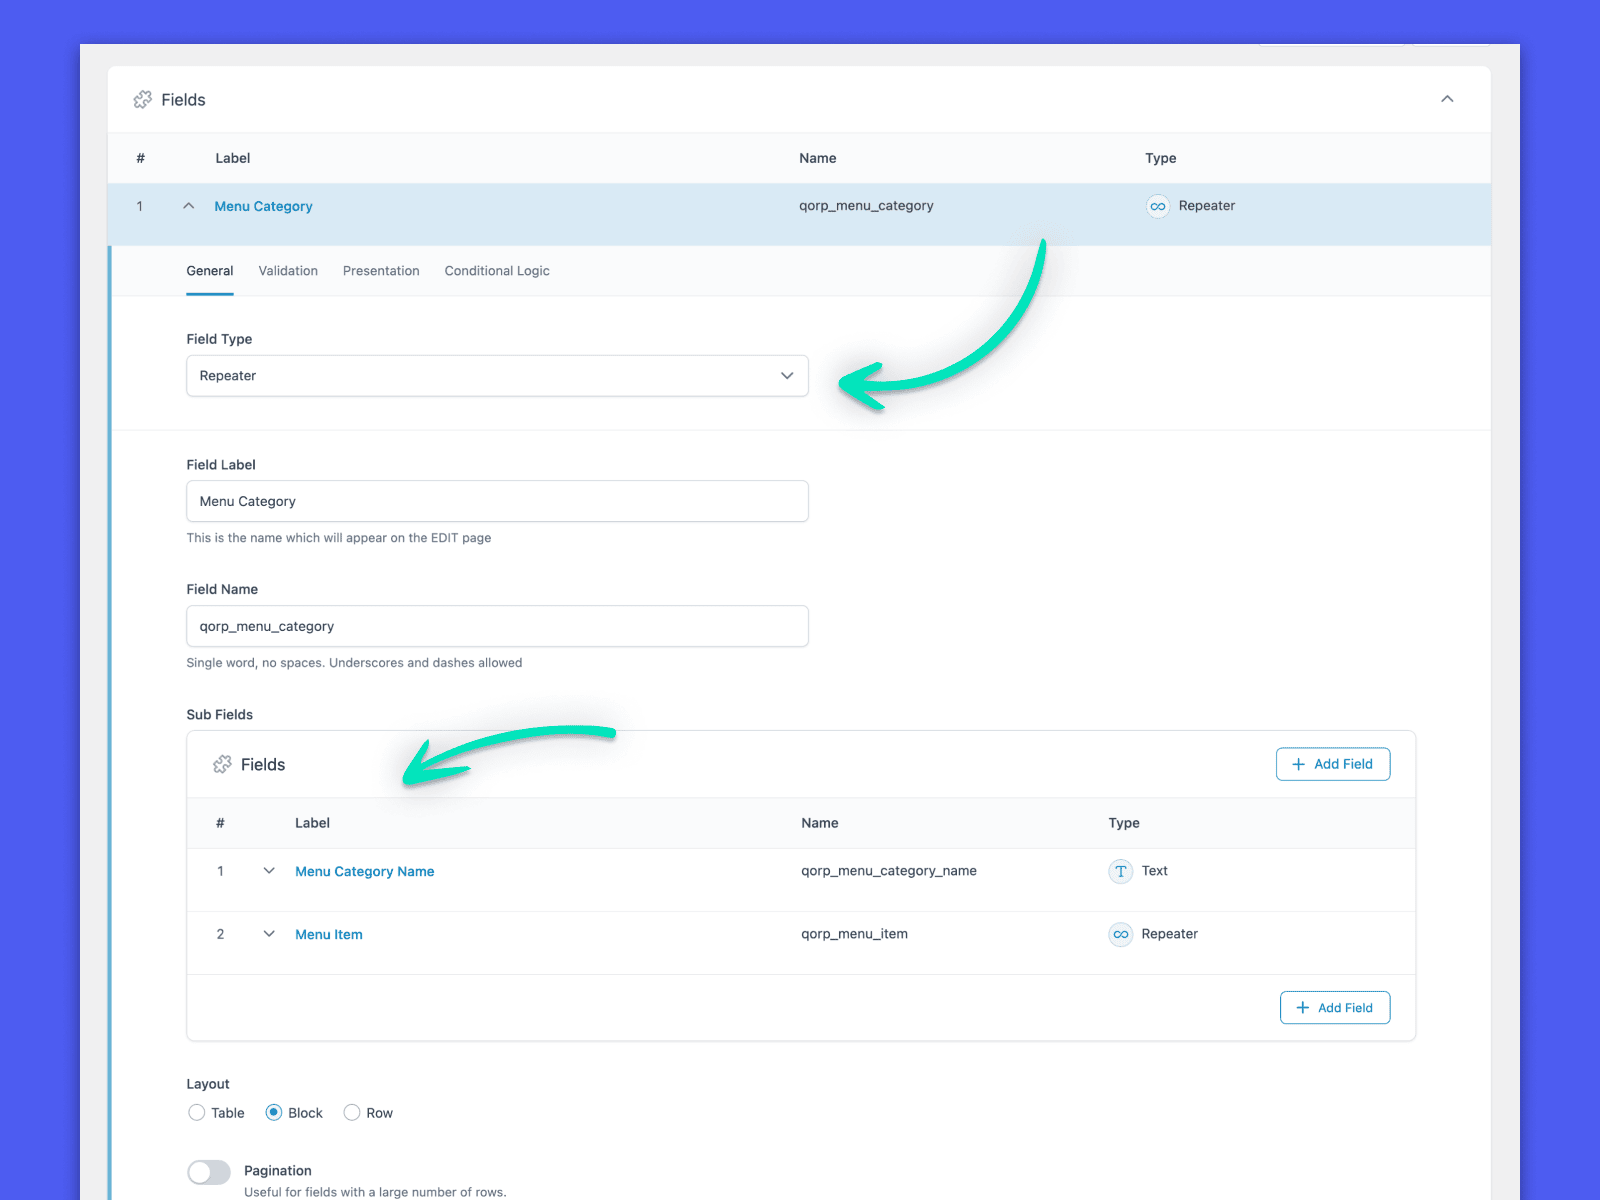
We chose the Block layout as the setting for the parent Repeater group. This seemed to provide the best editorial experience, which we’ll dive into next.
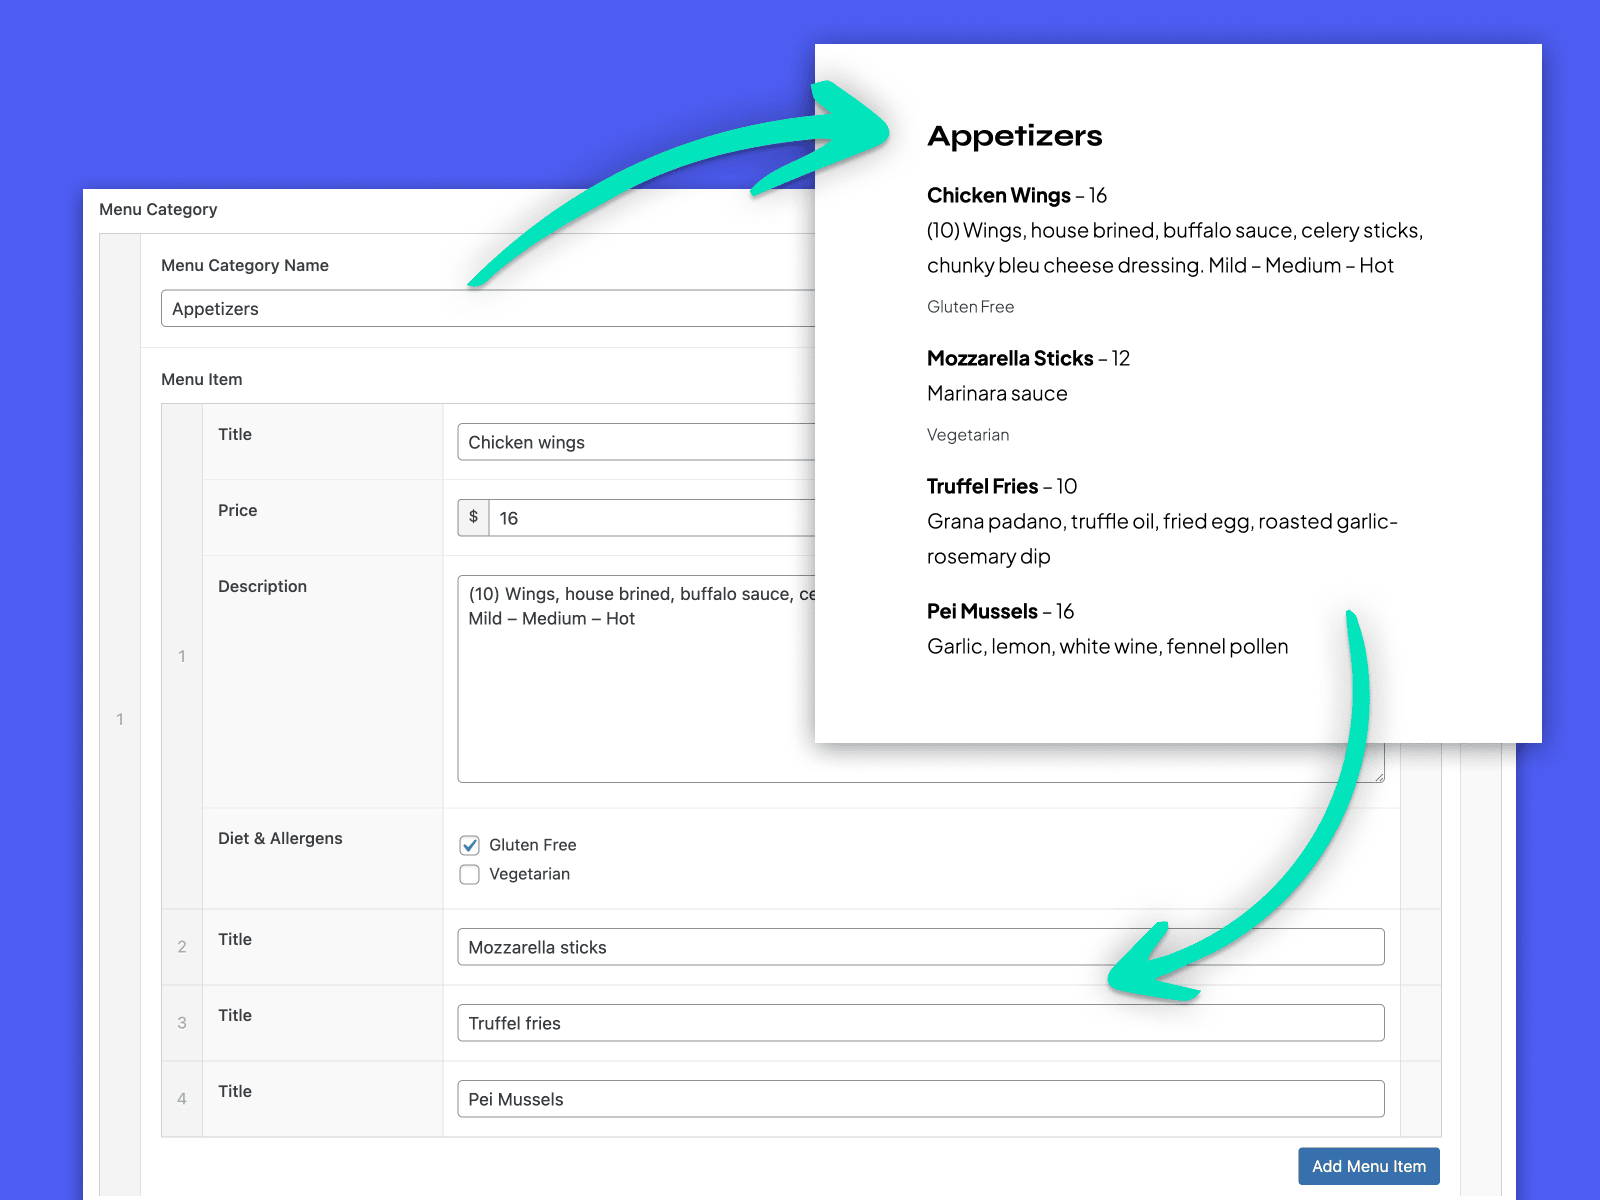
Editing and Inputting Data
Menu items can be added now that we have all the necessary Repeater fields and subfields registered in ACF PRO. The beautiful part is that this stage can be done by practically anyone.
One of the biggest advantages of the Repeater field is how it streamlines design and development workflows. It gives content editors, marketers, and small business owners incredible freedom to create and modify content as needed, while ensuring the content’s presentation remains tightly controlled.
The first step is to create a Menu Category Name (Appetizers). Next, start adding in nested Repeater field information for each item.
We’ll essentially repeat these steps for each menu category.
Output Logic for Templates
Once all of our dishes have been added, we still need to output our ACF field data in a template. We’ll break down some of the PHP used as we go, but you can find the full code at themes/qorp/page-menu.php.
You’ll need to include the usual stuff you use when creating a PHP template, like the get_header() function and The Loop, as well as apply any styling you want the template to have.
Once that’s out of the way, we can use the get_field function to call our parent Repeater fields, the Menu Categories:
$menu_categories = get_field( 'qorp_menu_category' );

if ( $menu_categories ) :
     foreach ( $menu_categories as $menu_category ) :
Our next few lines tell our template to pick up the category names (e.g., Appetizers) and the array of menu items for each category:
$menu_category_name = $menu_category['qorp_menu_category_name'];
$menu_category_items = $menu_category['qorp_menu_item'];
if ( $menu_category_name && $menu_category_items ) :
Now our template will display both categories and the dishes they contain, but that’s all we’ve got so far. Next, we add the subfields for our menu item Repeater field:
foreach ( $menu_category_items as $menu_item ) :
     $menu_item_title = $menu_item['qorp_title'];
     $menu_item_price = $menu_item['qorp_price'];
     $menu_item_description = $menu_item['qorp_description'];
     $menu_item_diet_allergens = $menu_item['qorp_diet_allergens'];
Finally, we can add the Checkbox options to the template:
if ( $menu_item_diet_allergens ) :
     foreach ( $menu_item_diet_allergens as $diet_allergen ) :

     endforeach;
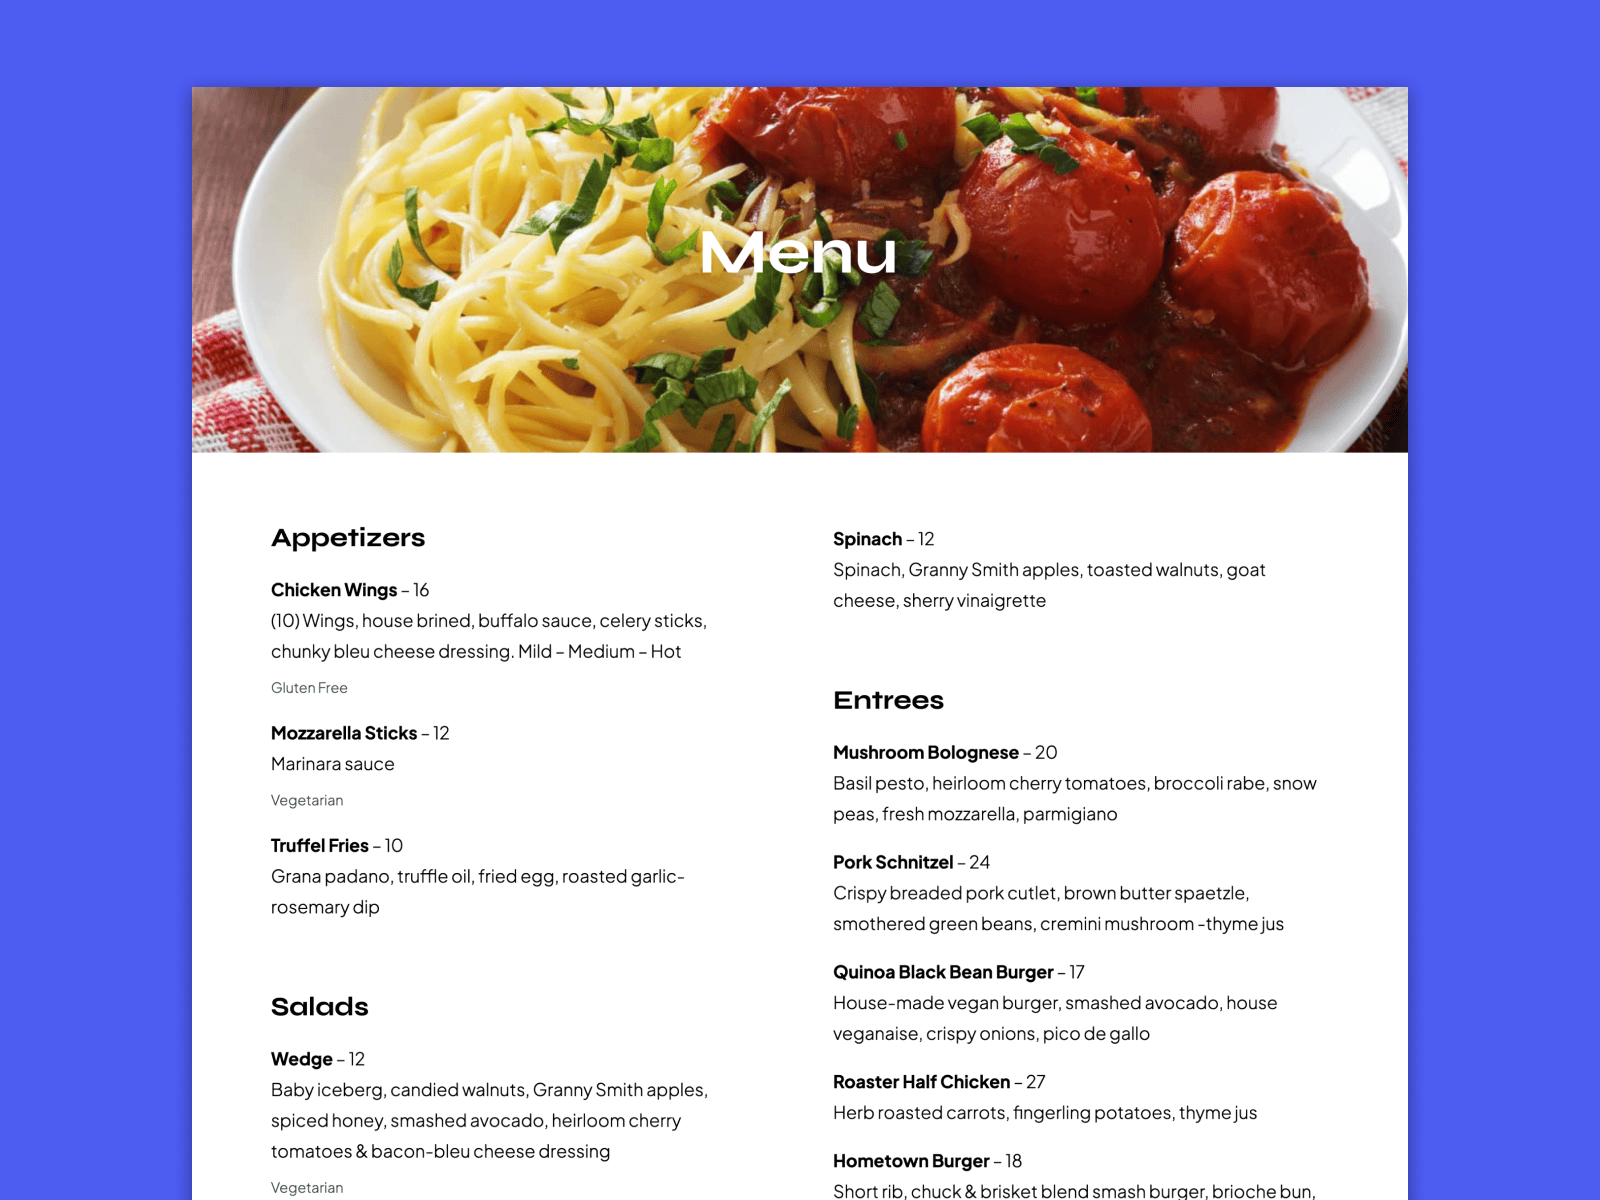
Remember, you’ll still need to add styling in the template to control exactly how all of this displays. After adding styling to the various sections, the results should look something like the screenshot below.
Conclusion
The basic purpose of the Repeater field is to serve as a wrapper for other fields. While there are plenty of use cases for this, it doesn’t even begin to describe what you can build when you start to add nested Repeaters.
Nested Repeaters are an amazing solution that gives you control, while still letting your client change content and layout with as much freedom as possible.
In a lot of ways, we’ve barely scratched the surface of what you can do with nested Repeaters and ACF PRO. This tutorial isn’t a complete list of what you can achieve, but a starting point to spark your own ideas. Go forth, and build something great.