Building with Advanced Custom Fields provides both users and developers a way to communicate via content. As the developer, you can think of ACF as a translator between yourself and your client, and it is up to you to design the best UI for this exchange!
Before diving into your next project, it’s worthwhile to take a little time and create a plan of attack. Consider the project’s wants, needs and how those may change down the road. Gather as much information as you can, because the decisions you make today will have a long-term impact on your site.
This sounds like common knowledge, and it is, but we needed to write a blog post we would like to share with you some best practices that can help you build a custom field structure that is speedy, efficient and most of all, future friendly. Here are some things to consider.
1. Naming Your Fields 🙋🙋♂️
Each field is given a name and label. The first is for internal use (DB / code) and the other is seen visually when editing content. As the developer, you can also edit these to just about anything you like. However, keep the following in mind.
Names should be PHP friendly
Similar to the WordPress standards for variables, field names should use lowercase letters (never camelCase). Separate words via underscores. Don’t abbreviate field names unnecessarily; let the code be unambiguous and self-documenting.
Code Example

// Yes
the_field('my_field_name');

// No
the_field('My-Field-Name');
Describe What the Field is, Not Where it Lives
It’s easy to get really specific when naming fields. But because each field is always saved against a post object, its name should reflect purpose – but not necessarily location. Therefore, a more generic name will cause less confusion when editing content and code. This example shows how an “over complicated” field name can create convoluted code.
Code Example
// Load the home page hero image
$home_page = get_post(123);

// Yes
the_field('hero_image', $home_page);

// No
the_field('home_page_hero_image', $home_page);
Don’t Repeat Names in Your Repeater
When working with sub fields, avoid repeating the parent field’s name within the sub field’s name. Doing so not only causes long-winded field names for you, but also causes ACF to generate even longer meta keys in your wp_postmeta table. This is because ACF joins together both the parent and child field name’s to create the meta key like so $parent_$index_$child.
Code Example
// Yes
$parent = 'staff_members';
$child = 'thumbnail';
$meta = 'staff_members_0_thumbnail';

// No
$parent = 'staff_members';
$child = 'staff_members_thumbnail';
$meta = 'staff_members_0_staff_members_thumbnail';
2. Structuring your Fields 📐
ACF is all about helping you get the most benefit out of the least amount of effort. So when designing your custom fields, you want to choose the method that allows the data to be easily edited, saved and loaded into your theme.
For example, let’s say that you have a slideshow on your homepage that will have three images. You could create something like this:
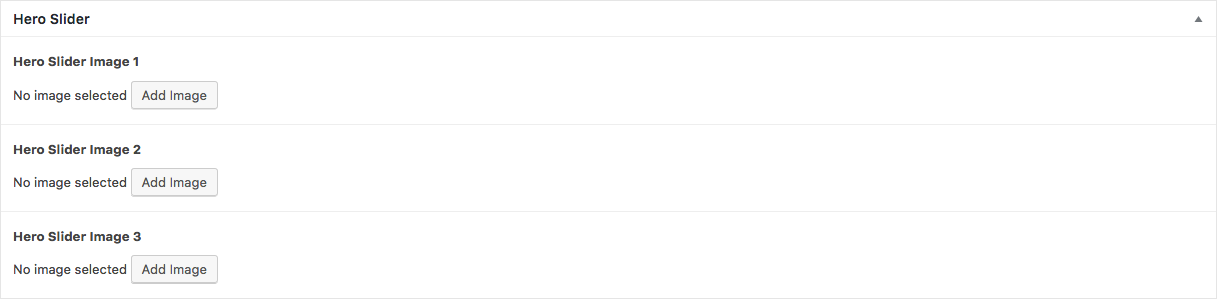
Code Example
<?php

$image_1 = get_field('hero_slider_image_1');
$image_2 = get_field('hero_slider_image_2');
$image_3 = get_field('hero_slider_image_3');

?>
<ul>
    <li class="slide-1"><?php echo wp_get_attachment_image( $image_1 ); ?></li>
    <li class="slide-2"><?php echo wp_get_attachment_image( $image_2 ); ?></li>
    <li class="slide-3"><?php echo wp_get_attachment_image( $image_3 ); ?></li>
</ul>
While this approach may work in the immediate future, there is no easy way to ‘extend’ this data structure. For example, what if a client wants more than just three images? What if they prefer to include a link along with each image? You’ll have to add and arrange new fields to make it work, not to mention the revisions to your theme.
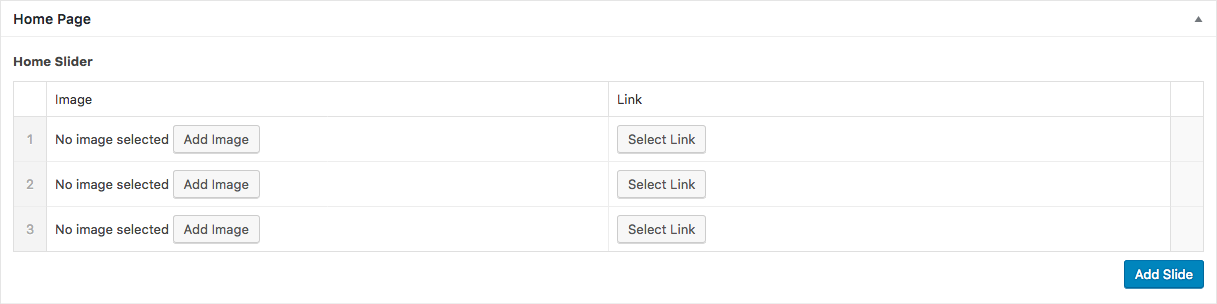
That’s where the ACF Repeater Field can save lots of future headaches. Since the content and layout can be repeated as many times as you’d like, you can set up fields once and not have to worry about trying to fully rebuild things if you need to make changes. Plus, you can cut down the amount of code needed in your theme by leveraging the available loop functions provided by ACF. Things are better organized all the way around.
Code Example
<?php if( have_rows('hero_slider') ): ?>
    <ul>
    <?php while( have_rows('hero_slider') ): the_row();

        $i = get_row_index();
        $image = get_sub_field('image');

        ?>
        <li class="slide-<?php echo $i ?>"><?php echo wp_get_attachment_image( $image ); ?></li>
    <?php endwhile; ?>
    </ul>
<?php endif; ?>
Both code examples shown above will take about the same amount of time to write (and will output the same HTML) , however, the second approach will massively cut down development time once we add in the extra Link field.
3. Designing your Fields 🎨
While data structure helps you behind the scenes, an attractive and easy-to-use UI is just as important to those who add and edit content. ACF offers plenty of options for creating a visual layout that meets your needs.
The Accordion and Tab fields are great for displaying related fields together in their own separate space. This keeps the user’s focus on one set of fields at a time, while also providing an intuitive means for navigation. Plus, it helps to keep the WordPress edit screen neat and tidy.
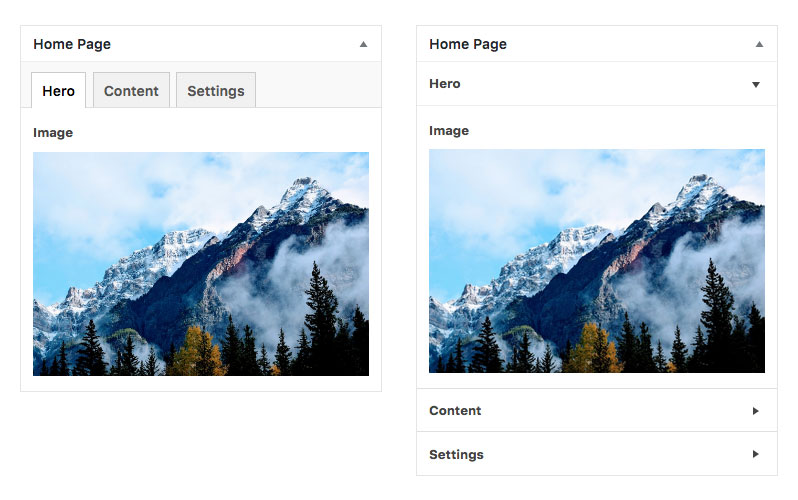
You can also take advantage of field widths to place multiple related fields on the same line. Introduced in ACF version 5, all fields can be set to a fill specific percentage width of the container. Using this technique can help prevent excessive scrolling while also making for a more attractive UI.
Lastly, it’s worth noting that fields should be ordered in the same manner as they will be displayed on the front end. It’s a small thing that helps avoid any confusion when inputting data.
4. Speed Up your Fields ⚡️
As developers, we are often looking to squeeze every bit of extra performance out of our sites. Increased load times are a turn-off to both visitors and search engines alike. So it’s worth implementing any and every edge you can get.
ACF’s Local JSON feature can dramatically boost performance when it comes to your custom fields. It works similar to caching in that it saves both field group and field settings as a .json file on your web server.
This feature is enabled by creating a folder in your theme called acf-json, that’s it! Once the folder exists, ACF will start saving and loading field settings from here. Without needing to consult the DB for each field’s settings, loading values can be done 50% faster!
The real power in ‘local JSON’ is the ability to sync changes. This allows multiple devs to work on a project, use git to push / pull files, and keep all databases synchronized with the latest field group settings!
Saving field groups as .json files within your theme comes with the added bonus of providing version control to your fields. This allows multiple devs to work on a project, use git to push / pull files, and keep all databases synchronized with the latest field group settings!
5. Simplify your Fields 🕶
When it comes to choosing which fields to use, a little creative thinking can result in a more efficient use of space and resources. Because, while our first instinct may be to implement lots of separate fields, we can often find ways to accomplish the same goal by using less.
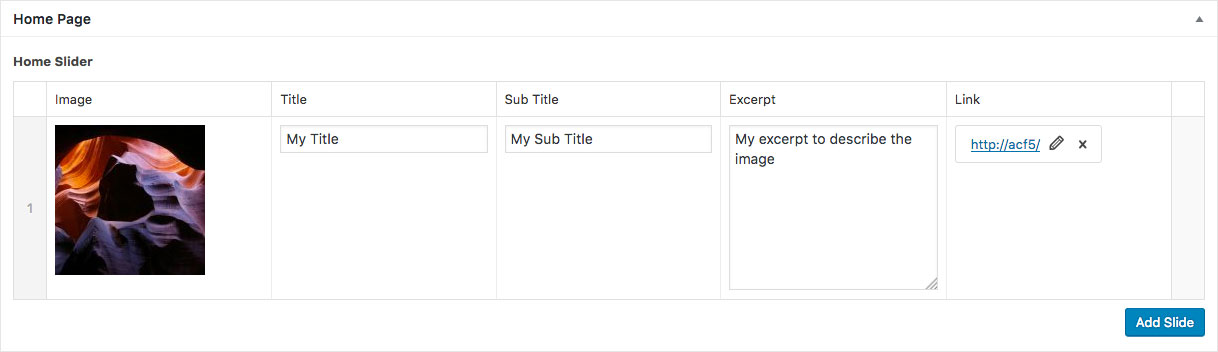
This less is more approach can be shown in our Home Slider example. Let’s imagine the client requires text over each image (title, sub title and excerpt). On first glance, we could set this up by creating three fields – 2 text and 1 text area. While it would certainly work in terms of functionality, it might not be the best solution. This arrangement could be a bit visually awkward, restricts the customization of content and doesn’t necessarily provide the most intuitive interface for users.
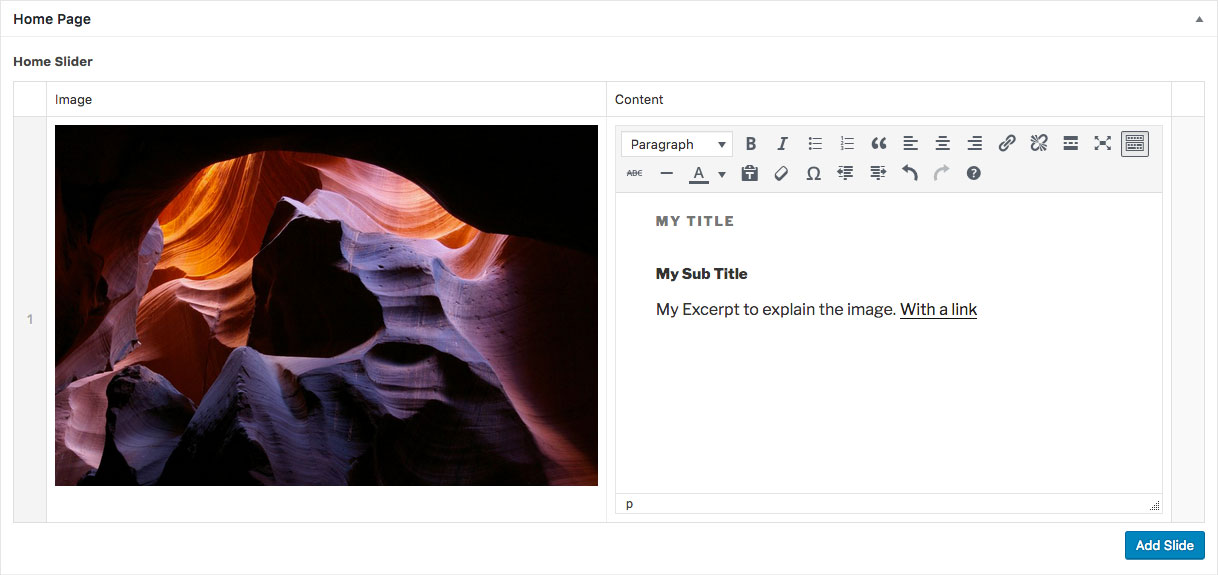
Taking that into consideration, we might choose instead to combine these fields into a single WYSIWYG field. ACF allows us to hide the Visual/Text tabs and turn off media uploads – so we won’t have to worry about our client going too far with things 😉. Using the Default Value field setting, we can also place sample content into the field so that all our client has to do is replace it. The result is something that makes more visual sense for users while still providing the functionality we need.
Think About the Future
It’s always a good idea to consider the future when building out a custom field UI. The needs of a website change over time and the fields you’ve setup initially may need tweaked down the road.
But that’s where the best practices above can serve you well. So, the next time you’re building something awesome with ACF, remember to:
- Name and label your fields based on their purpose, without getting overly specific.
- Take advantage of the Group and Repeater fields to structure data in a logical way.
- Build a UI that is visually intuitive for users.
- Leverage ACF’s Local JSON feature to improve site performance.
- Use some creative thinking to improve efficiency and avoid clutter.
Adding these best practices to your workflow will enable you to build a UI that is flexible, easy to use and implement. Happy building!