
Key points:
- When dealing with large amounts of content in WordPress, the built-in organization tools can prove limited.
- To make content easier to organize and query, you can add post meta programmatically.
- While this is possible without plugins, Advanced Custom Fields (ACF®) makes the process easier and more scalable, ideal for non-technical large-scale content teams.
As WordPress sites grow, managing content can quickly become overwhelming, especially when you need to consistently apply the same meta fields across hundreds or even thousands of posts.
The process of manually adding these fields can become a tedious, time-consuming task, often leading to frustration and errors. It’s a problem many content managers face, and without an efficient solution, the content organization process quickly becomes chaotic.
The solution would be adding post meta programmatically. This way, you save time, reduce errors, and scale your content management efforts. It also makes it easier to query and organize your content.
We’re going to walk through how to programmatically add meta to both new and existing posts. We’ll also explore what you can do with Advanced Custom Fields (ACF®), which offers a solid and easy-to-manage solution for handling post meta on WordPress, making the entire process even more scalable and efficient.
How to add post meta programmatically in WordPress
Before you can start programmatically adding metadata to your WordPress posts, there are a few things you need to do:
- Create a backup of your site before making any changes. A comprehensive backup gives you something to roll back to if anything goes wrong.
- Add all code to a custom plugin instead of editing your site’s functions.php. Using a custom plugin means the functionality remains even if you switch themes.
- Test these in a safe development environment before running them on your site. If there’s any risk to your existing content, it’s better if you find out in a development environment instead of the live site.
💡 The code samples we’re going to provide you in the next few sections run when you load an admin page. Do this once to verify they worked, then delete or comment them out until you need them again.
Adding post meta to all posts
Sometimes, you might want to add meta information to all posts, regardless of their content or individual IDs. Maybe you want to apply a specific piece of metadata to every post on your site, such as a default “read more” message or a default category tag. You can easily do this by looping through all your posts and adding the metadata.
Here’s how you can do that:
- Retrieve all posts.
- Loop through each post.
- Check if the meta key already exists to prevent duplicates.
- Add or update the post meta.
The code below does all this:
function add_custom_meta_to_all_posts() {
    // Set up the query to get all published posts
    $args = array(
        'post_type'     => 'post',
        'posts_per_page' => -1,
        'post_status'   => 'publish',
    );
    $posts = get_posts( $args );

    // Loop through each post and add meta if not already set
    foreach ( $posts as $post ) {
        // Replace 'custom_meta_key' with your meta key and 'custom_value' with the value you want to set.
        if ( ! get_post_meta( $post->ID, 'custom_meta_key', true ) ) {
            update_post_meta( $post->ID, 'custom_meta_key', 'custom_value' );
        }
    }
}

// Hook the function to run on the admin_init hook (runs in the admin area)
add_action( 'admin_init', 'add_custom_meta_to_all_posts' );
Adding post meta by post ID
If you want to add meta to one specific post, you’ll need to:
- Identify the target post by specifying its ID.
- Verify if the desired post meta key is already associated with the post.
- Add or update the post meta with a specified key and value if it doesn’t exist.
// Replace 123 with your target post ID
$post_id = 123;

// Check if the meta key 'custom_meta_key' already exists for this post
if ( ! get_post_meta( $post_id, 'custom_meta_key', true ) ) {
    // Add or update the post meta with your desired value
    update_post_meta( $post_id, 'custom_meta_key', 'custom_value' );
}
For multiple posts:
- Specify an array of post IDs where the meta should be added.
- Iterate through each post ID in the array.
- Check if the specified meta key does not exist for each post.
- Add or update the meta key with the desired value for posts that don’t already have it.
// Define an array of post IDs where you want to add the meta
$post_ids = array( 123, 456, 789 );

// Loop through each post ID
foreach ( $post_ids as $post_id ) {
    // Check if the meta key 'custom_meta_key' does not exist for this post
    if ( ! get_post_meta( $post_id, 'custom_meta_key', true ) ) {
        // Update or add the meta key with the value 'custom_value'
        update_post_meta( $post_id, 'custom_meta_key', 'custom_value' );
    }
}
For a range of post IDs:
- Define the range of post IDs by specifying the starting and ending values.
- Loop through each post ID within the defined range.
- Optionally verify if the post exists before attempting to add or update meta.
- Check if the specified meta key is not set for each post.
- Add or update the meta key with the desired value for posts that don’t already have it.
// Define the range of post IDs
$start_id = 100; // Replace with your starting ID
$end_id   = 200; // Replace with your ending ID

// Loop through each post ID in the range
for ( $post_id = $start_id; $post_id <= $end_id; $post_id++ ) {
    // Optional: Check if the post exists to avoid processing non-existent posts
    if ( get_post( $post_id ) ) {
        // Check if the meta key 'custom_meta_key' is not already set for this post
        if ( ! get_post_meta( $post_id, 'custom_meta_key', true ) ) {
            // Add or update the meta key with the value 'custom_value'
            update_post_meta( $post_id, 'custom_meta_key', 'custom_value' );
        }
    }
}
Creating posts programmatically
If the posts you want to add meta to don’t already exist, you have the option of preloading this data from the outset.
Here’s how to programmatically create a WordPress post and add custom metadata to it:
- Prepare the post data, including title, content, status, and author ID.
- Insert the post into the WordPress database.
- Verify if the post was successfully created by checking the returned post ID.
- Add a custom meta key with a specified value for the newly created post.
- Optionally add additional meta keys if needed.
- Handle errors if post creation fails, logging the error message for review.
// Prepare the post data
$post_data = array(
    'post_title'    => 'Your Post Title',    // Title of the post
    'post_content'  => 'Your post content here.', // Content of the post
    'post_status'   => 'publish',            // Post status (publish, draft, etc.)
    'post_author'   => 1,                    // Author ID (ensure this user exists)
);

// Insert the post into the database
$post_id = wp_insert_post( $post_data );

// Check if the post was created successfully
if ( $post_id && ! is_wp_error( $post_id ) ) {
    // Add a custom meta key 'custom_meta_key' with value 'custom_meta_value'
    update_post_meta( $post_id, 'custom_meta_key', 'custom_meta_value' );

    // If you have additional meta keys, add them here:
    // update_post_meta( $post_id, 'another_meta_key', 'another_value' );
} else {
    // Handle errors if the post creation failed
    error_log( 'Post creation failed: ' . print_r( $post_id, true ) );
}
To programmatically create multiple posts with custom metadata:
- Define an array of posts to be created, each with a title, content, and custom meta.
- Loop through the array, processing each post’s data.
- Prepare the post data, including title, content, status, and author ID.
- Insert each post into the WordPress database using wp_insert_post().
- Check if the post was successfully created by verifying the returned post ID.
- Add the custom meta key with the specified value for each successfully created post.
- Optionally log errors if post creation fails.
// Array of posts to be created
$posts_to_create = array(
    array(
        'post_title'    => 'First Post Title',
        'post_content'  => 'Content for the first post.',
        'custom_meta'   => 'Custom meta value for first post'
    ),
    array(
        'post_title'    => 'Second Post Title',
        'post_content'  => 'Content for the second post.',
        'custom_meta'   => 'Custom meta value for second post'
    ),
    // Add more posts as needed
);

// Loop through the array and create each post
foreach ( $posts_to_create as $post_info ) {
    // Prepare post data
    $new_post = array(
        'post_title'   => $post_info['post_title'],
        'post_content' => $post_info['post_content'],
        'post_status'  => 'publish', // Change to 'draft' if you don't want to publish immediately
        'post_author'  => 1,         // Replace with a valid user ID
    );

    // Insert the post into the database
    $post_id = wp_insert_post( $new_post );

    // If post creation is successful, add the custom meta key
    if ( $post_id && ! is_wp_error( $post_id ) ) {
        // Replace 'custom_meta_key' with your desired meta key name
        update_post_meta( $post_id, 'custom_meta_key', $post_info['custom_meta'] );
    } else {
        // Optional: Log errors if post creation fails
        error_log( 'Error creating post: ' . print_r( $post_id, true ) );
    }
}
Simplifying WordPress post meta management with ACF
If you’re looking into something as niche as programmatically adding post meta, you’re likely frustrated with WordPress’s built-in content organization tools. For anyone who’s after a bit more, allow us to introduce you to ACF – the ultimate plugin for creating and working with custom WordPress data.
ACF allows you to create custom fields that are saved as post meta, and you can do this from within the UI in a few clicks. This makes it infinitely more manageable and scalable for less technical content teams.
You have the option to define default values for your custom fields, which speeds up content production and means things don’t get catastrophic if someone forgets to fill them in.
What’s more, you can create custom post types for even better content organization. For instance, if you’re running a lifestyle blog, you could have features and reviews as separate post types entirely.
You can also retrieve your custom post meta values and even query posts by custom fields, making data management even simpler.
Supercharge Your Website With Premium Features Using ACF PRO
Speed up your workflow and unlock features to better develop websites using ACF Blocks and Options Pages, with the Flexible Content, Repeater, Clone, Gallery Fields & More.
Creating and displaying custom meta boxes in posts
To create and output meta boxes for collecting custom metadata, you’ll need to create a custom field group and assign it to all posts. Here’s how to do that in a few clicks with ACF:
- Install and activate ACF.
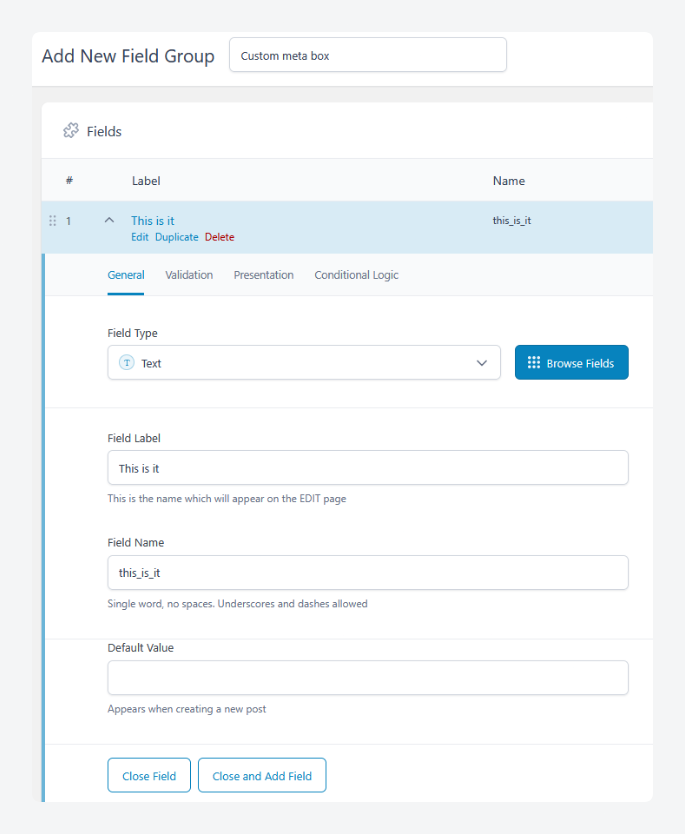
- From your admin dashboard, go to ACF > Field Groups then click Add New.
- Give the field group a name and add a custom field for the data you want. Set the field type to what’s most relevant to the kind of data you want to input.
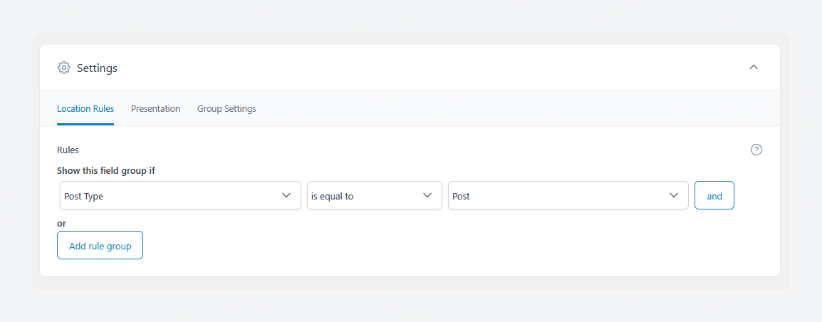
- Scroll down to the Settings section and make sure the Location Rules are set to show the field group if Post Type is equal to Post.
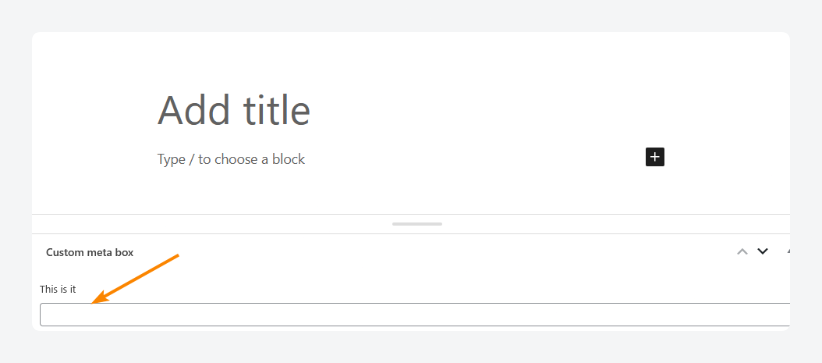
- Save your changes and create a new post, where the meta box should appear below the editor.
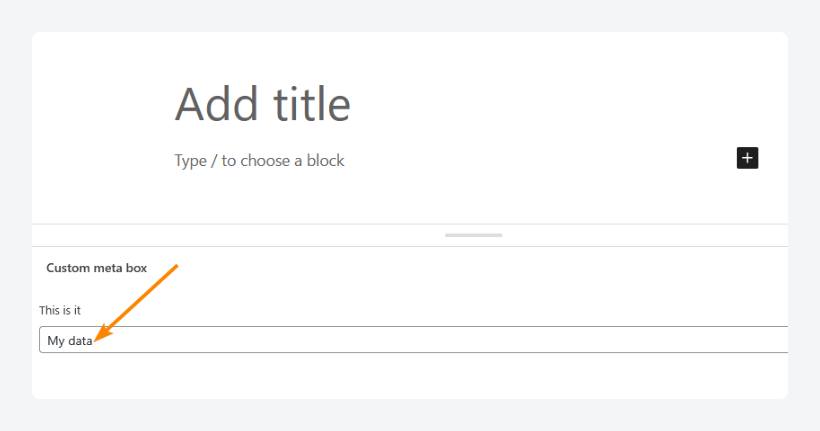
If you’d specified a default value when creating the custom field, it’ll appear prefilled, but you’ll still have the option to edit it.
Adding custom metadata to posts programmatically
If you’ve already created your posts and they have custom fields assigned to them, you can update their metadata programmatically using ACF’s built-in update_field function.
To update a single post:
- Specify the target post ID to update.
- Set the value for the ACF field you want to update.
- Update the specified ACF field with the new value for the target post.
// Replace 123 with your target post ID
$post_id = 123;

// Replace 'custom_field_name' with the ACF field name and set its value
$field_value = 'Custom ACF Value';
update_field( 'custom_field_name', $field_value, $post_id );
To update multiple posts:
- Define an array of post IDs to update.
- Set the value for the ACF field.
- Specify the field identifier (ACF field name).
- Loop through each post ID and update the ACF field with the defined value.
$post_ids = array( 123, 456, 789 );
$field_value = 'Custom ACF Value';
$field_identifier = 'custom_field_name';

foreach ( $post_ids as $post_id ) {
    update_field( $field_identifier, $field_value, $post_id );
}
To do the same for a range of posts:
- Define the range of post IDs to update.
- Set the value for the ACF field.
- Specify the field identifier.
- Iterate through each post ID in the range and update the ACF field with the defined value.
Adding custom meta keys and values for custom post types
As we stated at the beginning of our discussion on ACF, you can use the plugin to create custom post types in a few clicks.
Posts in these categories can also be updated programmatically with custom field values if you need to do it after they’ve been created.
To add post meta to everything published as a specific custom post type:
- Define the query parameters to target the custom post type.
- Run a query to fetch posts of the specified custom post type.
- Check if there are posts returned by the query.
- Iterate through each post and update the ACF field with the desired value.
- Reset the post data after the loop to ensure other queries are unaffected.
$args = array(
    'post_type'     => 'your_custom_post_type', // Replace with your custom post type slug
    'posts_per_page' => -1,
);

$query = new WP_Query( $args );

if ( $query->have_posts() ) {
    while ( $query->have_posts() ) {
        $query->the_post();
        update_field( 'custom_field_name', 'Custom ACF Value', get_the_ID() );
    }
    wp_reset_postdata();
Streamline WordPress meta management with ACF
As you’ve seen, managing post meta efficiently is a key part of building flexible, dynamic websites on WordPress.
While WordPress gives you the tools to handle metadata programmatically, ACF takes this process to the next level by providing a user-friendly interface and a simple, powerful way to manage custom fields.
When it comes to building a custom theme or finding a more organized way to manage metadata, ACF is the go-to solution for millions of users.
ACF lets you create custom meta boxes for posts, allowing you to add fields and data directly in the editor before publishing, all without coding. This makes it beginner-friendly and ideal for non-technical content production teams.
Its update_field function is perfect for managing post meta across different custom fields and post types, ensuring everything is kept neat and tidy.
If you prefer to work from the admin dashboard instead, Admin Columns lets you bulk update ACF fields directly.
ACF also offers additional features like custom taxonomies, giving you even more control over how your content and data are organized.
Check out ACF to streamline your content management and experience the difference for yourself.


For plugin support, please contact our support team directly, as comments aren't actively monitored.