
Key points:
- Custom field templates render structured post meta into consistent layouts across classic and block themes.
- Classic themes output meta with PHP using conditionals and reusable formatting helpers.
- Block themes connect blocks to post meta via the Block Bindings API or dynamic blocks.
- Advanced Custom Fields (ACF®) streamlines data modeling with field groups, validation, Repeaters, and Flexible Content.
- ACF supports multiple rendering paths: PHP templates, ACF Blocks, and page builder integrations.
WordPress post content works well for freeform writing, but it falls short when pages need to display predictable values like prices or product attributes.
Editors can manually format this information inside the block editor, but that approach breaks down at scale. Different authors make different formatting choices, and redesigns require touching every affected page.
Custom fields solve this by storing structured data separately from post content.
A theme template then pulls those values and renders them in fixed positions with consistent markup.
This separation works best when:
- Your content includes repeating data points that belong in specific layout positions
- Values need uniform formatting across pages
- You want to filter or query posts based on those values.
But first, a quick look at how the underlying system works.
What is a custom field template?
A custom field template is a theme or block template – sometimes a block component – built to read and display specific field values.
The data comes from custom fields. WordPress stores these fields as key-value metadata in the wp_postmeta table. The values can be text, numbers, dates, file references, or IDs.
For example, this is what the wp_postmeta table shows for a post using an Account Owner field group, with fields populated for Name, Role, and Since.
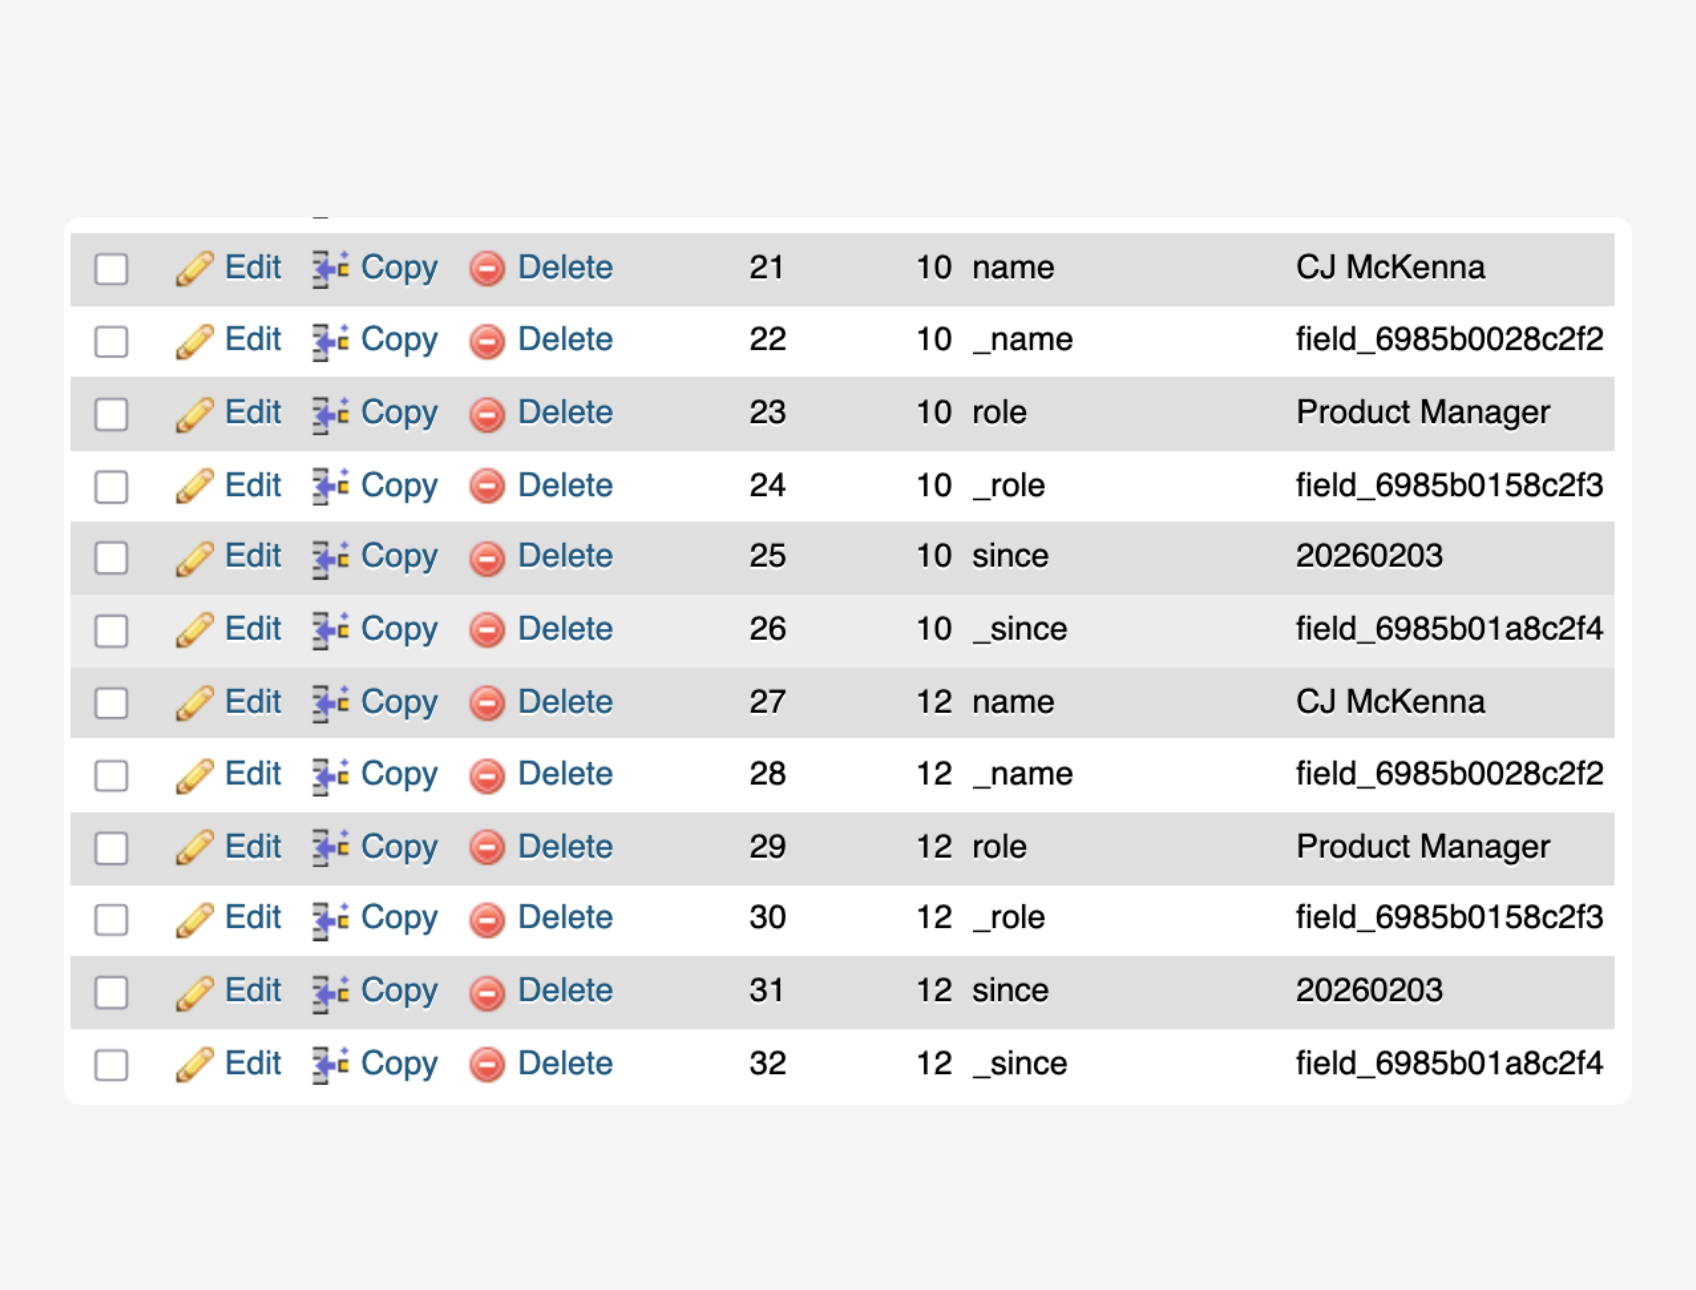
Those IDs can point to other objects, like posts or users. This data sits outside the post body. It stays structured and consistent.
Custom fields are just one part of WordPress customization. Custom post types define new content types, like “Products” or “Events”. Custom taxonomies define groupings, like categories or tags. Custom fields add extra attributes to any of those content types.
Because the template is built around expected fields, it needs rules for missing data. If a field is empty, the template uses conditionals or fallback content. The layout stays intact.
Why use custom field templates over content-only layouts?
Storing data in fields rather than post content eliminates repeated formatting work. Each value gets entered once in a simple input. The template applies consistent markup everywhere that value appears.
Layout drift disappears because editors no longer make individual styling decisions. A price always looks like a price. A date always follows the same format. This consistency holds whether you have ten pages or ten thousand.
Finally, redesigns become manageable. When the design changes, you update templates. The underlying data stays untouched, so you never need to open every page and reformat content by hand.
How to create custom fields for WordPress templates
Creating a custom field template involves two steps:
- Defining the fields.
- Displaying them in your theme’s templates or block layouts.
You can do this using a plugin like Advanced Custom Fields (ACF®) or manually through code.
The plugin path gives you a visual interface for building field schemas and a better editor experience. The manual path requires more effort, but keeps dependencies minimal and puts everything in version-controlled code.
Method 1: Using Advanced Custom Fields (recommended)
ACF provides a UI for defining field schemas that your templates can depend on. You create field groups containing individual fields, then assign those groups to specific contexts in the admin.
💡 If you don’t already have a template ready to consume field data, you can create a quick one via Appearance > Editor > Templates.
When you’re ready, follow these steps:
- Install and activate the ACF plugin.
- Navigate to ACF > Field Groups and create a new group.
- Add fields with appropriate types (text, number, image, etc.) and configure validation rules or default values.
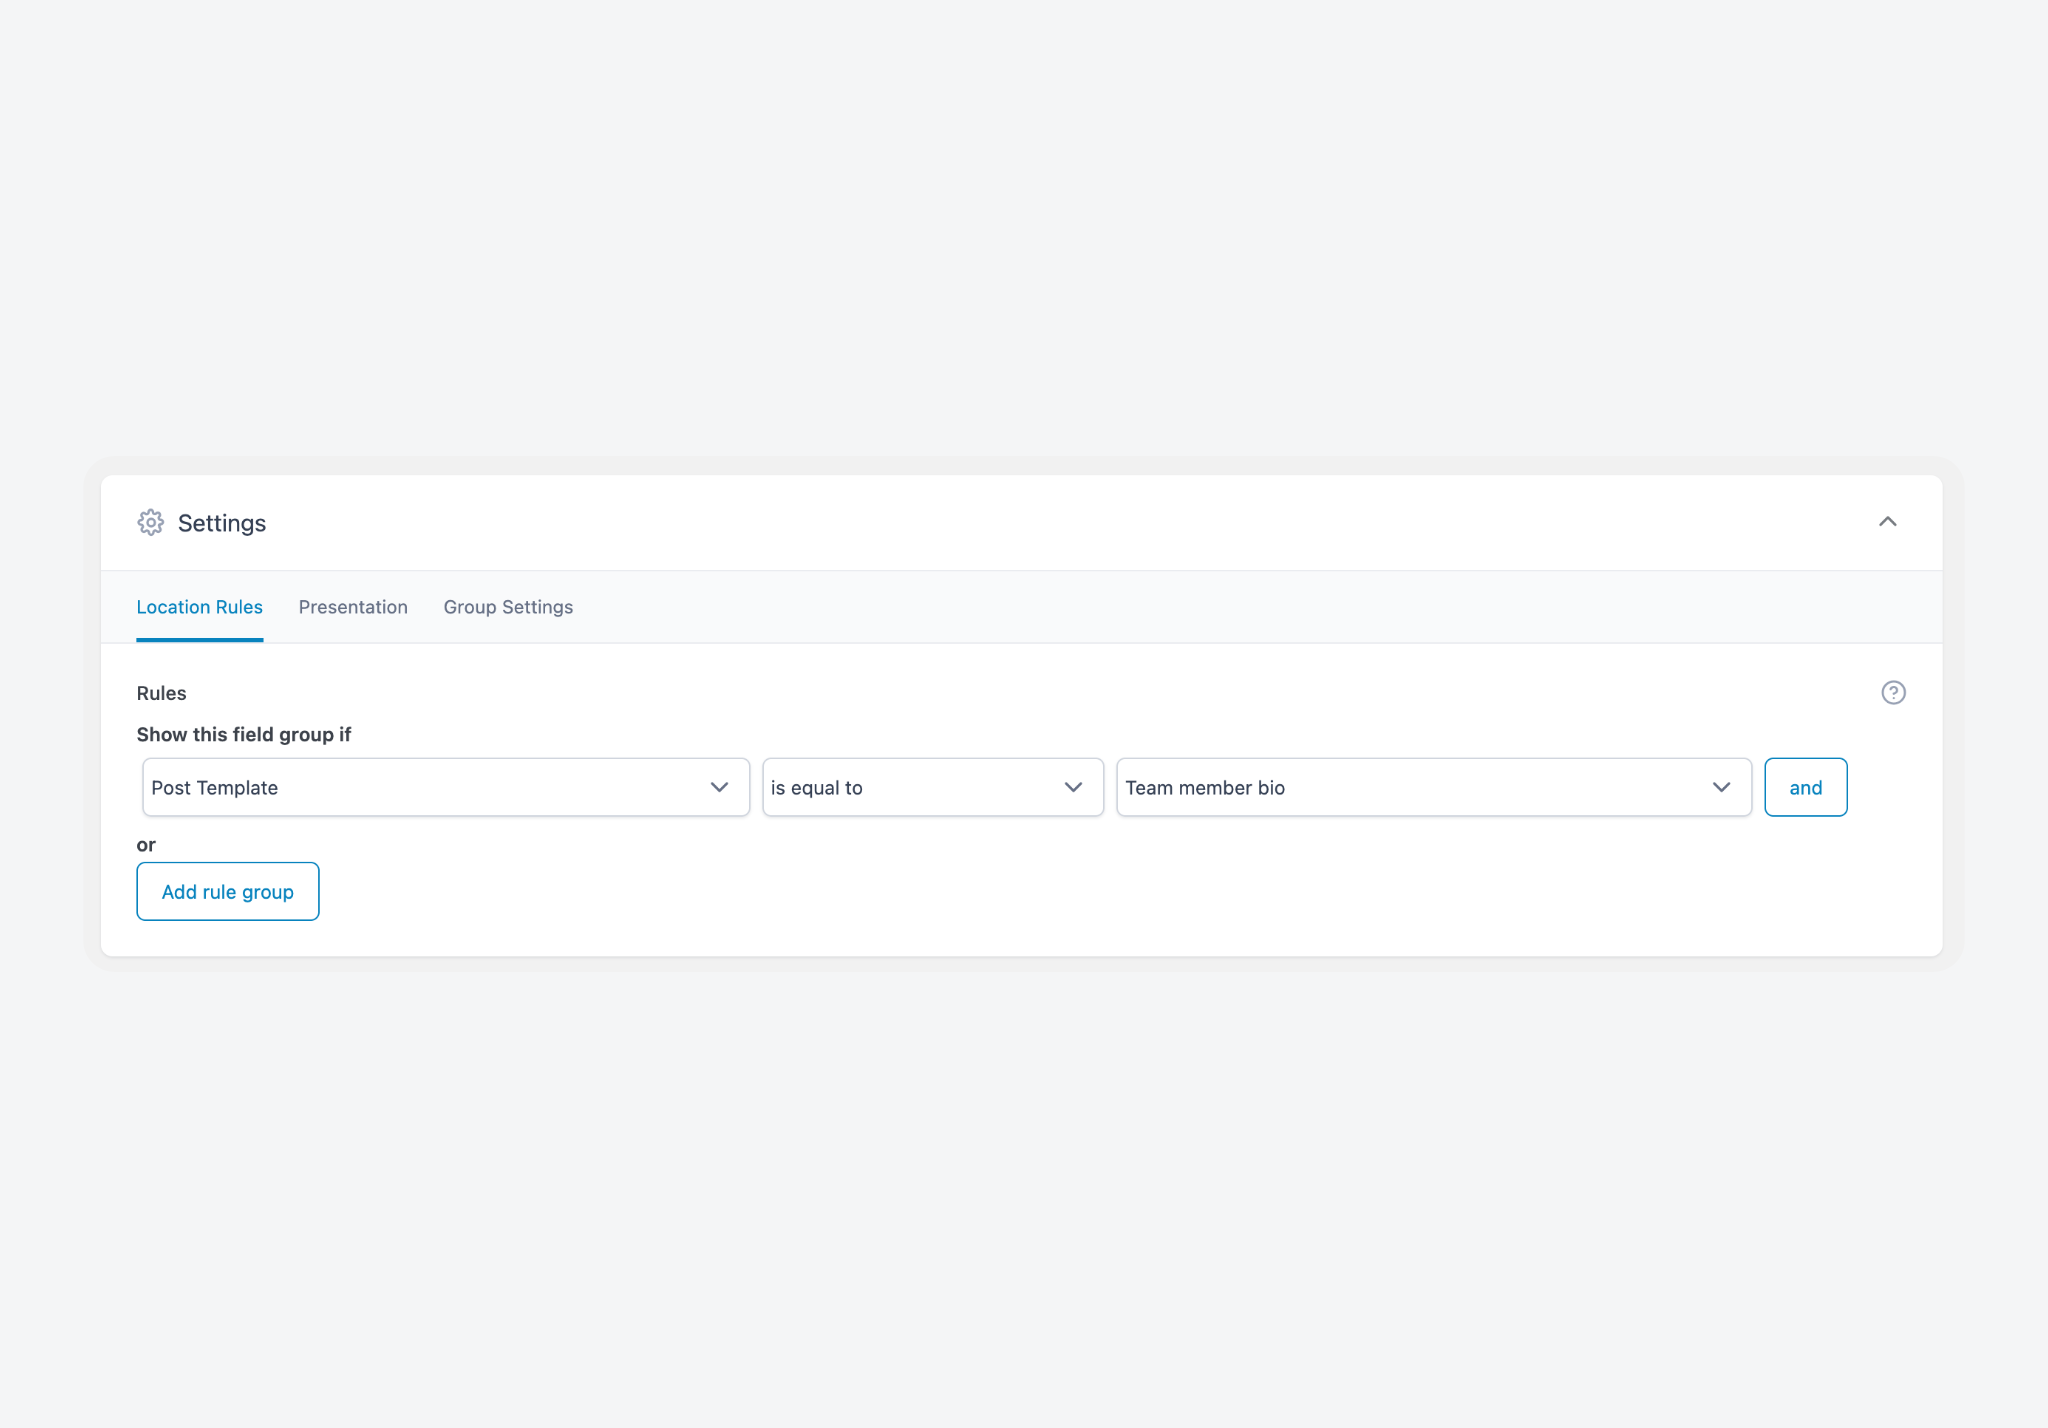
- Set location rules to match the template where you want these fields to appear. Select Page Template or Post Template is equal to and choose your target template from the dropdown.
- Publish the field group.
Field names and types establish a contract between what editors enter and what templates receive. If a field requires a URL, editors see a URL input. If a field needs a minimum length, ACF validates before saving.
ACF PRO extends this with Repeater fields and Flexible Content. Repeater fields handle structured rows like team members or FAQ entries. Flexible Content lets editors choose from predefined layout components. Both keep data structured while giving editors controlled flexibility.
Supercharge Your Website With Premium Features Using ACF PRO
Speed up your workflow and unlock features to better develop websites using ACF Blocks and Options Pages, with the Flexible Content, Repeater, Clone, Gallery Fields & More.
Method 2: Manually registering fields and binding them to templates (coding required)
You can skip plugins entirely and register custom fields through code. This approach uses WordPress core functions and keeps your field definitions in version-controlled files:
- Register your meta key with
register_meta()to define its type and sanitization. Includeshow_in_rest, set totrue:
register_meta( 'post', 'product_price', array(
    'type'              => 'number',
    'single'            => true,
    'sanitize_callback' => 'absint',
    'show_in_rest'      => true,
) );- In your template, retrieve values with
get_post_meta():
$price = get_post_meta( get_the_ID(), 'product_price', true );
if ( $price ) {
    echo '<p class="price">$' . esc_html( $price ) . '</p>';
}
For the editor interface, you have two options. Use add_meta_box() to build a custom input panel, or enable the built-in Custom Fields panel under the post editor’s preferences. The meta box approach gives you more control over labeling and layout.
🚩 The main drawback here is that field definitions live only in code. If a field name changes in your registration but not in your template (or vice versa), nothing warns you. Output simply disappears. This approach works best for small schemas that rarely change, particularly when your team prefers avoiding plugin dependencies.
Rendering custom field data in templates
Rendering is where stored metadata becomes HTML output. The method depends on your theme type and team preferences:
- Classic themes pull field values directly in template files.
- Block themes bind fields to block attributes or use dynamic blocks.
- Page builders offer visual interfaces for connecting fields to design elements.
Classic theme templates with PHP
Rendering ACF fields in a classic theme requires opening your template file, checking whether a field has a value, and then outputting it with appropriate markup:
- Open your template file (like single.php or a custom template).
- Use
get_field()to check if the field has a value. - Output the value with
the_field()or store it in a variable for further processing. - Wrap the output in a conditional to prevent empty markup when no value exists.
<?php if ( get_field( 'product_price' ) ) : ?>
    <p class="price"><?php the_field( 'product_price' ); ?></p>
<?php endif; ?>
For repeater fields, you loop through rows and access subfields within each iteration. Use have_rows() and access subfield values inside:
<?php if ( have_rows( 'team_members' ) ) : ?>
    <ul class="team">
        <?php while ( have_rows( 'team_members' ) ) : the_row(); ?>
            <li><?php the_sub_field( 'name' ); ?></li>
        <?php endwhile; ?>
    </ul>
<?php endif; ?>
If you’re working without ACF, use get_post_meta() with proper escaping:
$price = get_post_meta( get_the_ID(), 'product_price', true );
if ( $price ) {
    echo '<p class="price">$' . esc_html( $price ) . '</p>';
}
Always escape output from native meta. Use esc_html() for plain text, esc_url() for URLs, and esc_attr() for attribute values. Skipping this step opens your site to XSS vulnerabilities.
For consistency across templates, wrap your output logic in helper functions. These functions should handle both retrieval and escaping. This keeps template files neat and ensures uniform formatting.
If you’re modifying a parent theme, put your template overrides in a child theme. Otherwise, parent theme updates will overwrite your changes.
Block themes using native blocks and data connections
Block themes handle custom field rendering differently from classic themes. While block templates control which blocks appear in the editor, custom field templates control how stored data renders on the frontend.
The Block Bindings API connects block attributes to dynamic data sources. A Paragraph block can pull its content from a text field. An Image block can pull its URL from a file field. The editor displays the bound value, and the frontend renders it automatically.
ACF supports block bindings natively. To display an ACF field in your content:
- Create your field group in ACF and assign it to the relevant post/page type or template.
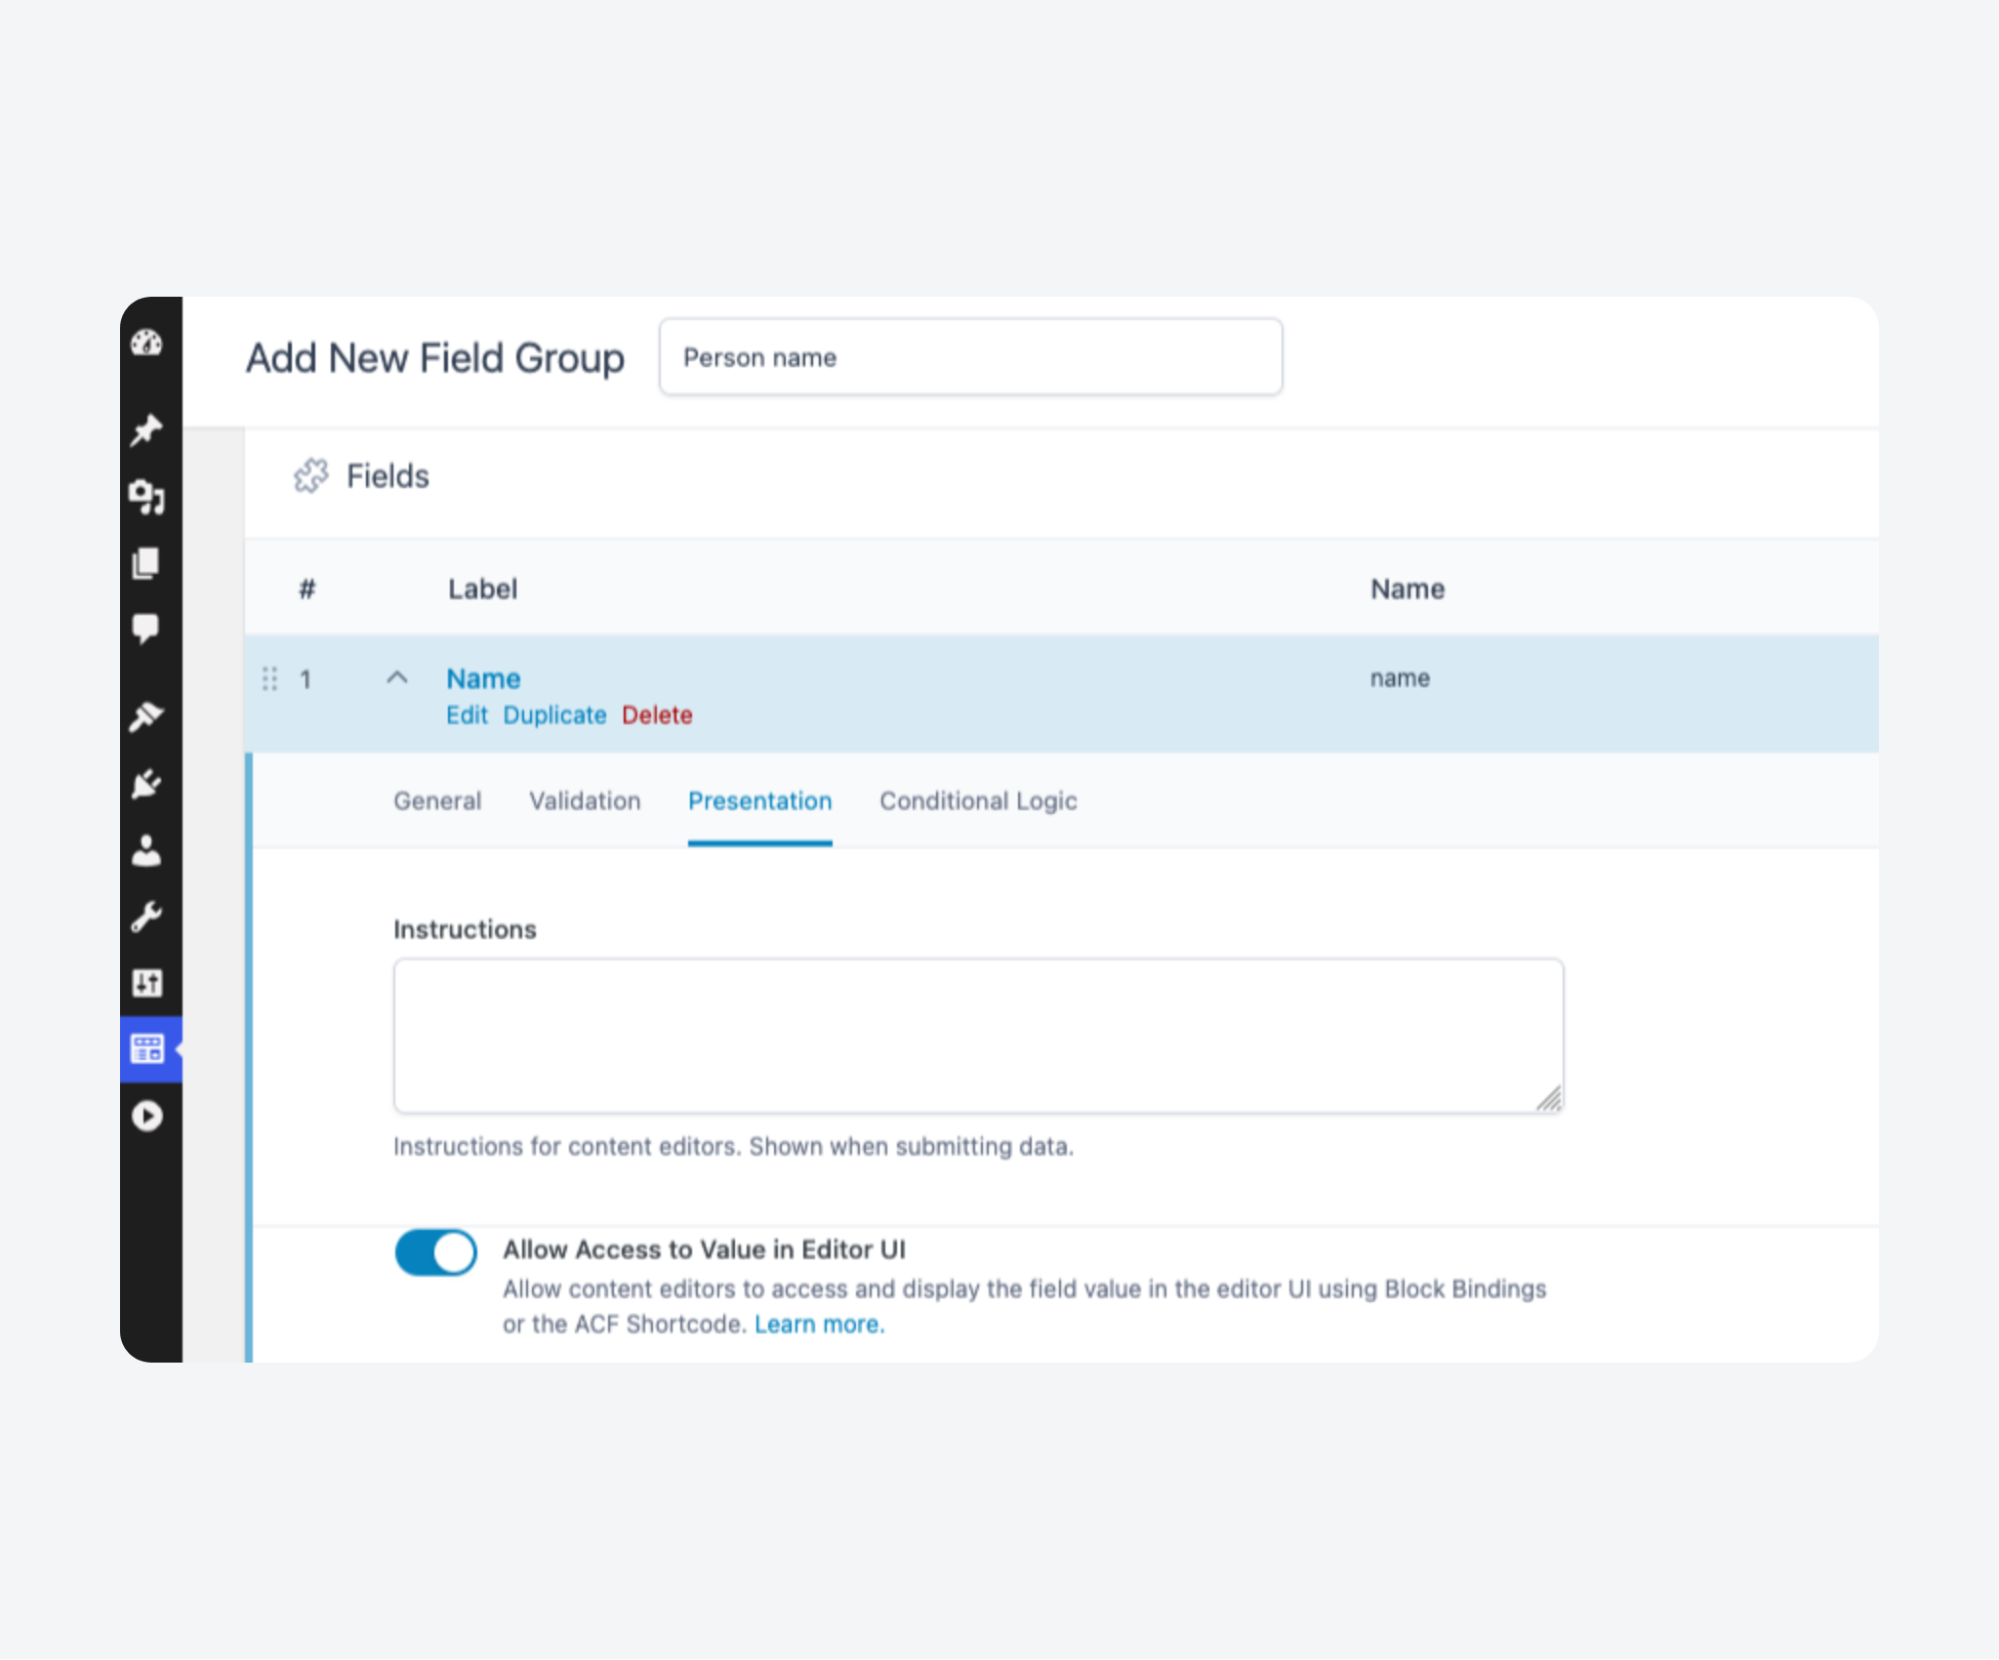
- In the Presentation tab under the field you want to target – not the field group – toggle the Allow Access to Value in Editor UI option.
- Open the Site Editor and navigate to your template.
- Fill in the custom field value using the meta box on the page.
- Identify a compatible core block (Paragraph, Heading, Image, or Button) where the custom field value could work.
- Switch to the code editor.
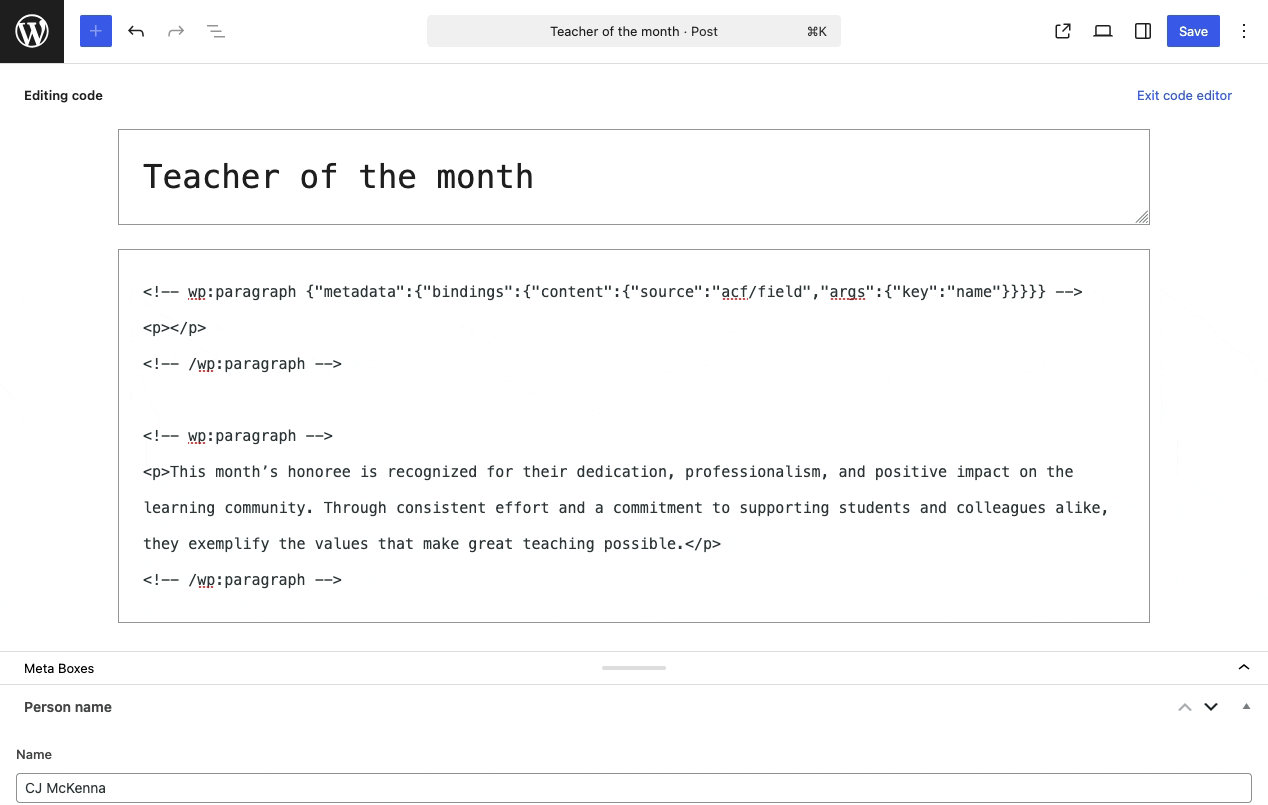
- Find the block where you want to output the custom field value, and add the code to bind the two. To output a
namevalue from above in a Paragraph block, for example, you’d replace the existing code with:
<!-- wp:paragraph {
  "metadata": {
    "bindings": {
      "content": {
        "source": "acf/field",
        "args": {
          "key": "name"
        }
      }
    }
  }
} -->
<p></p>
<!-- /wp:paragraph -->- Go back to the visual editor. You should see the placeholder content in the block, “ACF Field.” It’ll be replaced by the custom field value when you save, publish, and load it on the frontend.
The bound block now displays your placeholder text in the editor and the field value on the frontend when published.
Without ACF, ensure the meta keys you’d registered have REST API access enabled with 'show_in_rest' => true. The same code from above should work. Just replace "source":"acf/field" with "source":"core/post-meta".
Then bind blocks to that key through the Site Editor interface or directly in template markup.
Block bindings work well for simple scalar fields like text or URLs. When your data involves repeaters or conditional logic, use dynamic blocks with PHP render callbacks instead.
Page builders with dynamic content features
Most page builders include dynamic content features that connect field values to widget properties. Instead of writing PHP, you map fields to text elements, images, links, and attributes through the builder’s visual interface.
Our WPBakery guide walks through this process in detail, but the basics should work across alternatives like Divi and Elementor.
This approach works well when design iteration happens frequently and your field schema stays stable. Editors and designers can adjust layouts without touching template files.
The tradeoff is increased abstraction. Your rendering logic lives inside the builder’s system rather than in version-controlled templates. Switching builders later means rebuilding those connections from scratch.
For non-ACF fields, look for a “dynamic data” or “custom field” option in your builder’s widget settings. Select post meta as the source and enter your meta key exactly as registered. Mismatched keys produce empty output with no warning, so be careful.
ACF Blocks as field-driven components
ACF Blocks are reusable block components whose output is defined by a render template. Custom fields populate the content. They provide component-level templates, not theme templates.
Available with ACF PRO, ACF Blocks combine a field schema with a dedicated render file.
You register the block in PHP or JSON, assign fields to it, and create a template that outputs those field values. The block then appears in the editor alongside core blocks.
Each block controls its own markup independently of the surrounding theme template. Editors place the block wherever needed, fill in the fields, and the render template handles output.
This component-level approach complements page-level custom field templates. Use theme templates for data that appears in fixed positions on every page. Use ACF Blocks for repeatable sections that editors place flexibly within content areas.
Supercharge Your Website With Premium Features Using ACF PRO
Speed up your workflow and unlock features to better develop websites using ACF Blocks and Options Pages, with the Flexible Content, Repeater, Clone, Gallery Fields & More.
Advanced considerations for scale, performance, and maintainability
Custom field templates introduce complexity that compounds as your site grows. Scaling problems typically emerge from high field counts, frequent write operations, complex admin interfaces, and unclear relationships between stored data and template output.
Maintainability depends on how well you manage change over time.
Consistent naming conventions, predictable schemas, and version-controlled field definitions help teams avoid silent breakage when requirements evolve.
Performance implications of field-heavy templates
Every custom field adds database overhead.
Each save operation writes to wp_postmeta, and pages with many fields generate many writes. Large schemas can noticeably slow the editor experience, particularly on shared hosting.
ACF stores additional meta entries alongside your field values. These entries associate stored data with field definitions, enabling features like field type detection and conditional logic. The tradeoff is increased meta volume per post.
Nested structures and conditional field logic add admin-side processing.
A field group with multiple Repeaters containing conditional subfields requires more validation and rendering work than flat text fields. If editors report slow load times on content-heavy posts, field complexity is often the cause.
Designing for change and reuse
Use descriptive, namespaced field names from the start. A name like acme_product_price avoids collisions with other plugins and remains meaningful when you revisit the codebase months later.
Treat your field schema as an internal API. Document which templates and components consume which fields. When a field name changes or a field gets removed, this documentation tells you what breaks.
Design templates to handle missing data gracefully. Use conditionals to skip empty fields and provide defaults where appropriate. This tolerance lets you add new fields without updating every template simultaneously.
Export your field groups and commit them to version control. This enables code review for schema changes and supports migration between staging and production environments.
Create reliable editor-to-template contracts with ACF
The most reliable custom field implementations start with structure.
Define your fields first, then build templates around them. When the schema is stable and well-documented, templates can depend on predictable data without guesswork.
ACF standardizes this process. Field groups establish a clear contract between what editors enter and what templates receive. Validation rules enforce data quality at the point of entry. Consistent field names make template code predictable and maintainable.
This contract holds across rendering contexts. The same field group works with PHP templates, block themes, ACF Blocks, and page builders. When designs change, you update presentation logic while the underlying data structure remains intact.
Download ACF PRO to access Repeater fields, Flexible Content, ACF Blocks, and the full toolkit for building scalable custom field templates.

For plugin support, please contact our support team directly, as comments aren't actively monitored.