
Overview
ACF Blocks give you the power to create virtually any block you could desire, with the same features found in WordPress core blocks, such as InnerBlocks, Variations, and Styles. In this tutorial, we’ll show you how to create a testimonial block using ACF Blocks, including registering the required ACF fields.
The blocks you create with ACF Blocks are a custom type of block, similar to native dynamic blocks, building their structure and content on the spot from a PHP template while ACF handles the rendering for you.
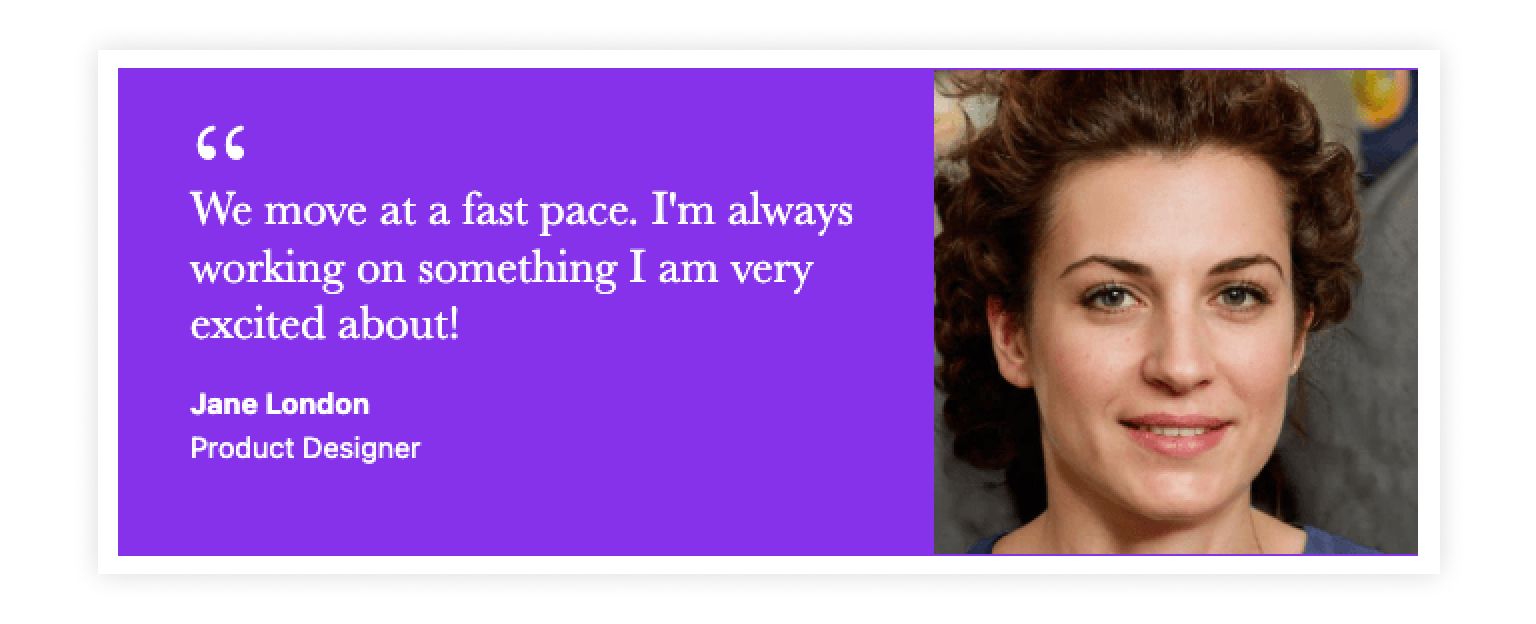
Below is a screenshot of what our final testimonial block will look like.
You can dive right in by downloading the tt3child.zip! Be sure to have the TwentyTwentyThree theme installed as well as ACF PRO.
Parts of a Block
There are a few critical things to consider whenever you’re getting ready to create a new block. What information will editors need to control and update? What information might be statically rendered (PHP, HTML) and does the block require its own CSS? Your block may also contain custom JavaScript to power interactivity, but our first block here won’t require any.
Before creating a block, we need to think about the features required to power it.
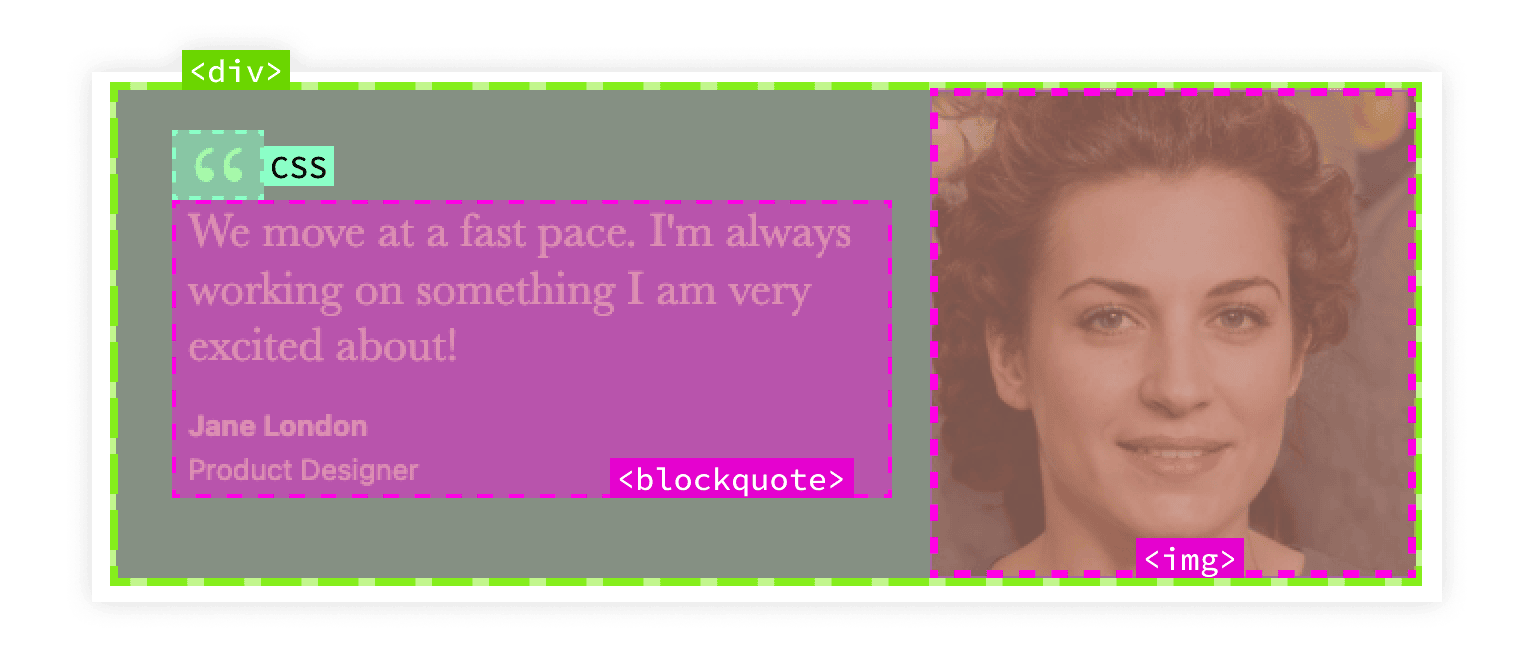
You may want to consider creating a standalone prototype of the final component using only HTML and CSS. This will help solidify your plans, indicate which ACF fields will be required, and it may even help you determine which fields will empower your editors to intuitively manage their data. Planning becomes quicker and easier the more blocks you build.
We focus on a basic testimonial block in this tutorial, as it helps introduce the fundamental planning that you will utilize to create more complex blocks in the future.
Getting Started and Requirements
This tutorial uses a WordPress Child Theme to organize our ACF Blocks. However, you could just as easily organize your blocks within a custom WordPress plugin. We’ll demonstrate how to organize blocks in a plugin in future tutorials.
There are only three things that are necessary to follow this tutorial:
- ACF PRO. ACF Blocks is a premium feature and is not available in the free version of ACF.
- A self-hosted WordPress site where you have access to the
wp-contentdirectory. We highly recommend spinning up a sandbox site in Local. - The default Twenty Twenty-Three theme installed and activated, so you can create a child theme to organize your customizations.
With that said, creating new ACF Blocks will require some working knowledge of PHP and CSS to create the templates and stylesheets. It’s also handy to have access to a code editor like Visual Studio Code, but it’s not technically required.
Create a Child Theme
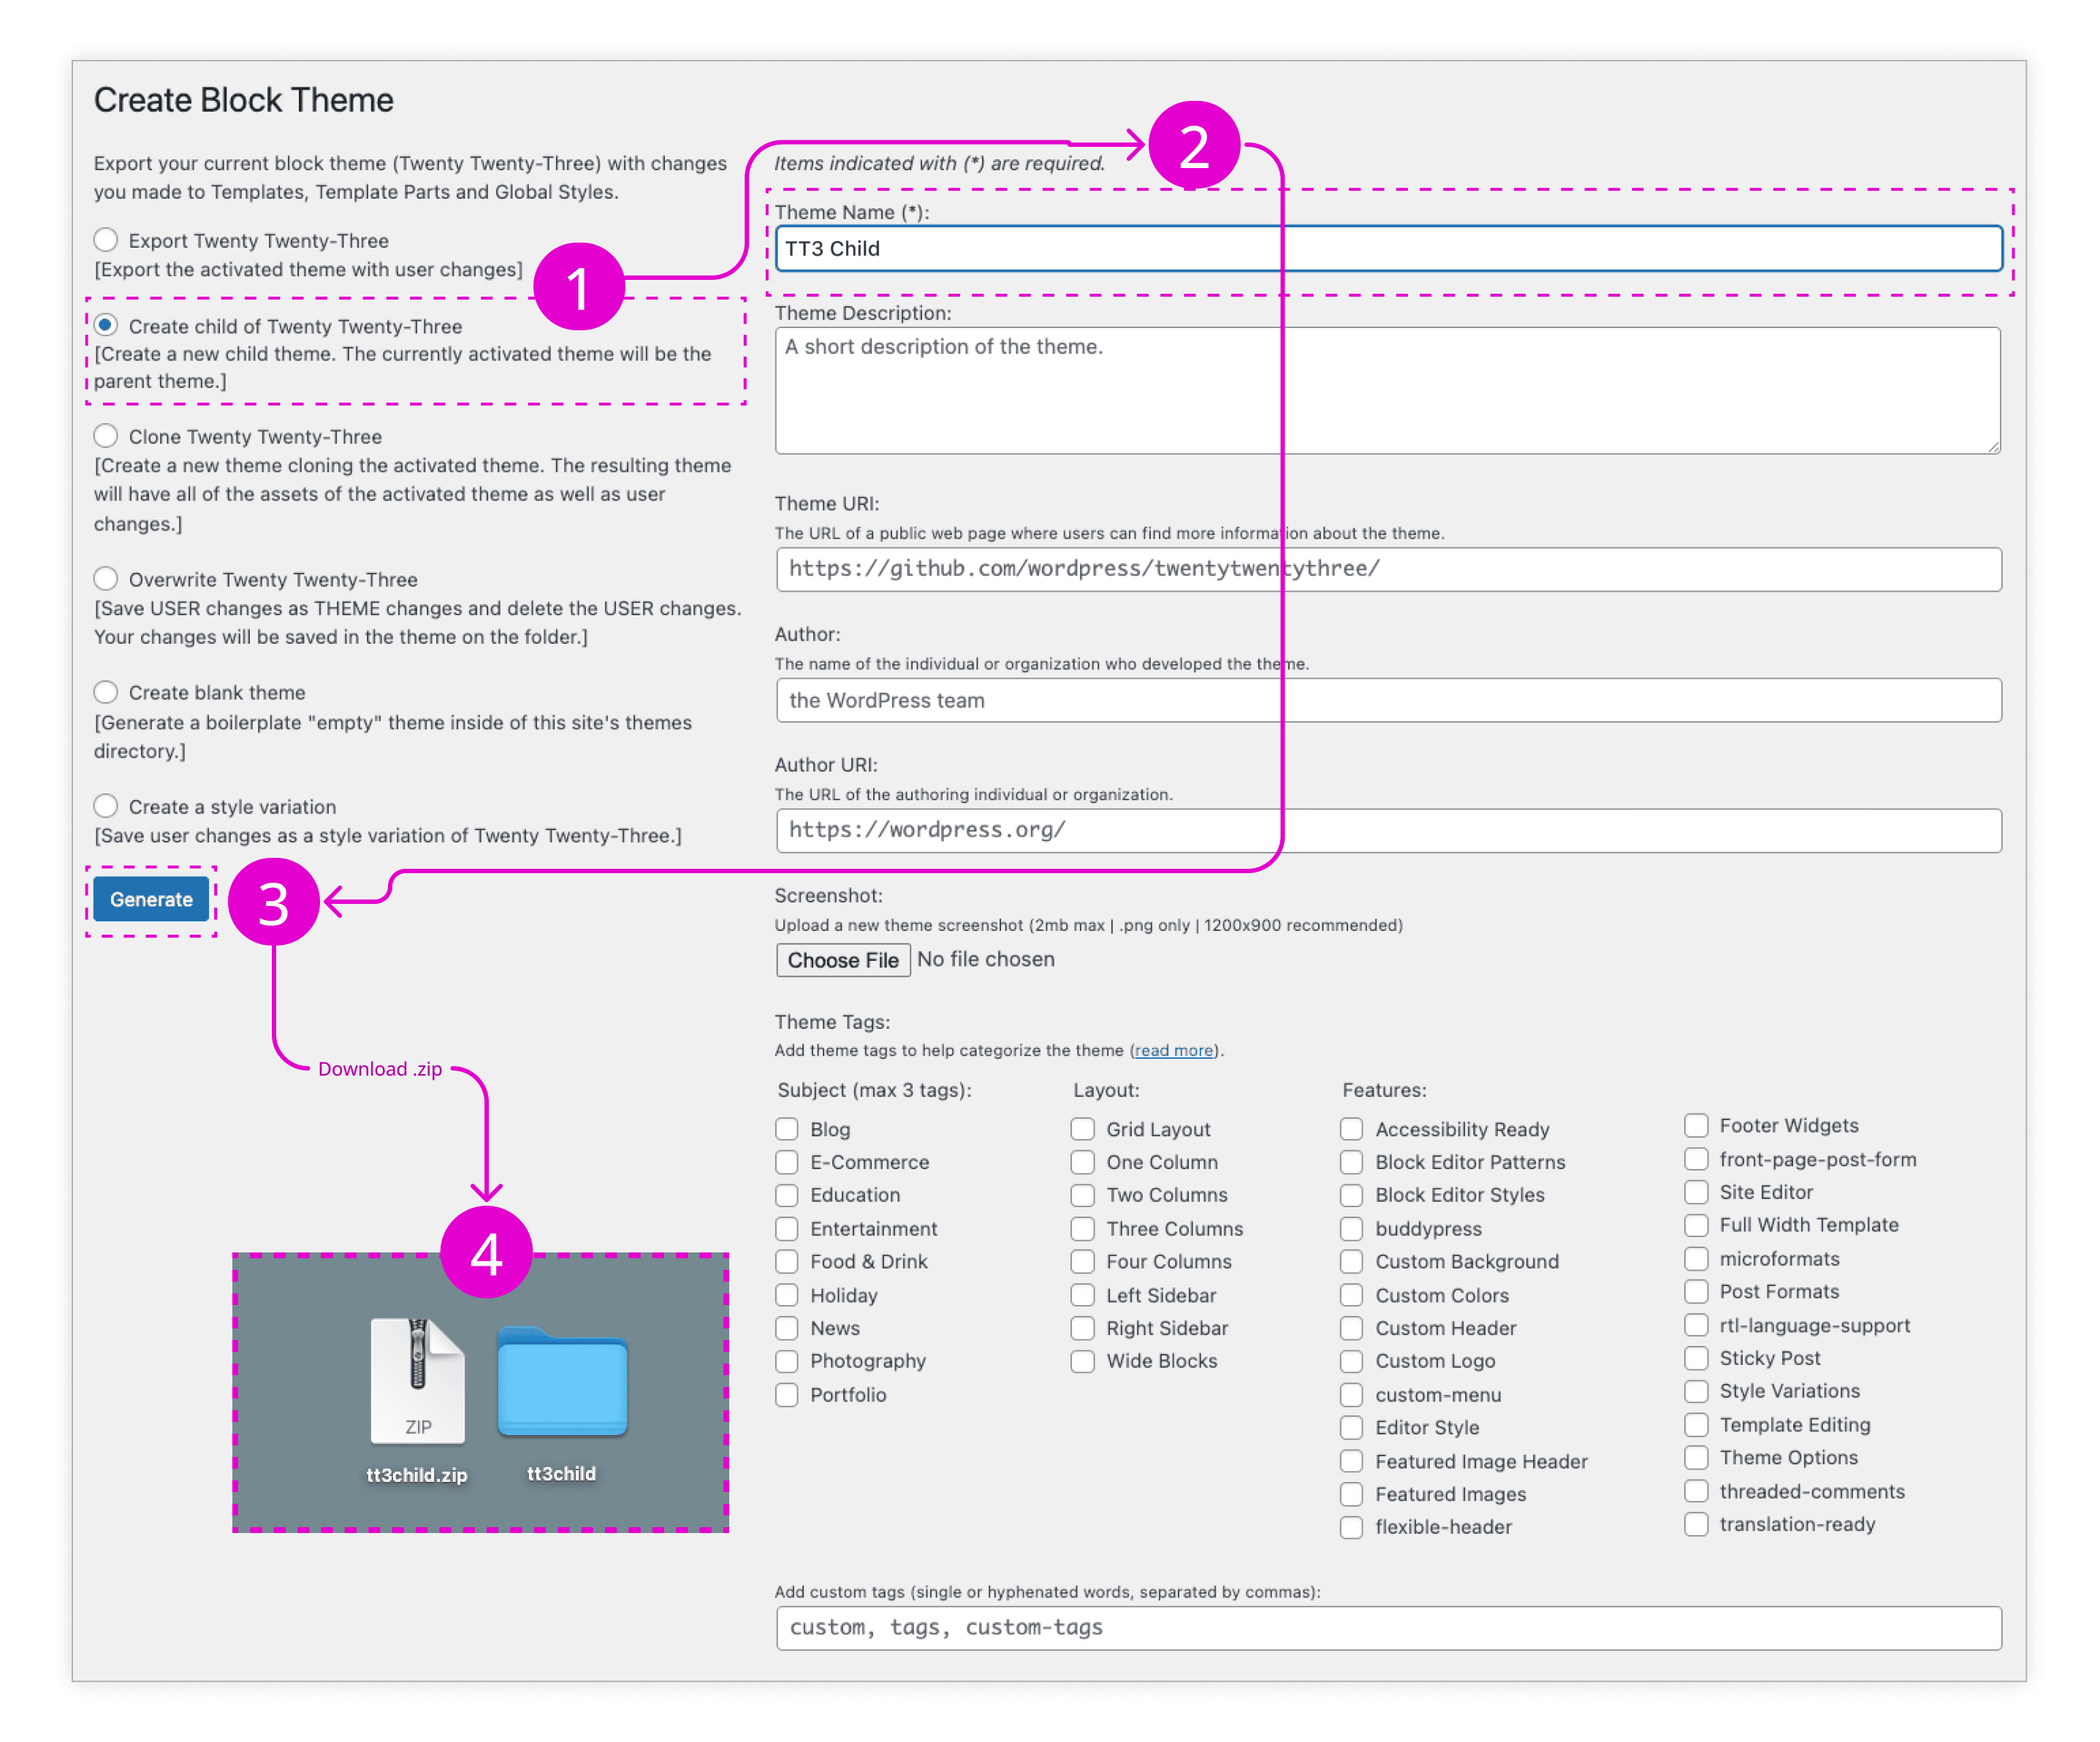
For this tutorial, we’ll use the Create Block Theme plugin from WordPress.org to generate our child theme. After installing and activating the plugin, be sure you have the Twenty Twenty-Three theme installed and activated, and then click Create Block Theme under “Appearance” in the WordPress admin. This opens a list of options based on the current theme.
We select Create child of…” to proceed, give our child theme a name: “TT3 Child”, and click Generate. You should be prompted to download and save a .zip of your new child theme.
Child themes should be placed alongside their parent theme found in wp-content/themes. This structure ensures WordPress will look for template files in the child theme first, then check the parent theme if it doesn’t find the right template. This is what your final theme directory should look like after you unzip and place your child theme alongside the parent Twenty Twenty-Three theme:
wp-content/themes/twentytwentythree[parent theme]wp-content/themes/tt3child[child theme]
Be sure to activate your new child theme once you’ve added it. Also, feel free to deactivate the Create Block Theme plugin, as it is no longer needed.
Create functions.php
The next step is to create a functions.php file and save it in our child theme’s directory. Here is what the final code will look like in our new functions.php.
<?php
/**
 * We use WordPress's init hook to make sure
 * our blocks are registered early in the loading
 * process.
 *
 * @link https://developer.wordpress.org/reference/hooks/init/
 */
function tt3child_register_acf_blocks() {
    /**
     * We register our block's with WordPress's handy
     * register_block_type();
     *
     * @link https://developer.wordpress.org/reference/functions/register_block_type/
     */
    register_block_type( __DIR__ . '/blocks/testimonial' );
}
// Here we call our tt3child_register_acf_block() function on init.
add_action( 'init', 'tt3child_register_acf_blocks' );
In the above code we’re adding a new function tt3child_register_acf_blocks(), which contains a call to the WordPress register_block_type() function. We’re passing the path for a directory called __DIR__ . '/blocks/testimonial', that will eventually locate a required block.json file. We haven’t created the block.json file yet, but we will soon.
Finally, we assign our new tt3child_register_acf_blocks() function to be called against WordPress’s init hook. This ensures that our tt3child_register_acf_blocks() function will be called early in WordPress’s lifecycle.
Registering Blocks with block.json
Next, we need to create two new directories within our child theme. The first is called blocks, and will hold all our ACF Blocks. The second is acf-json, which will store any field group data we associate with our blocks.
We’ll also create a subdirectory within blocks called testimonial. The blocks/testimonial directory is where we’ll store the template, stylesheet, and block.json file for our testimonial block.
The main features and attributes of any ACF or WordPress block are defined in block.json. It’s the heart of registering custom blocks, and streamlines the process by providing a standardized structure for defining block settings, styles, and metadata in a single file.
Since our register_block_type() is referencing __DIR__ . '/blocks/testimonial' in our plugin’s directory then it needs to find a block.json within our blocks/testimonial directory. Let’s create a new block.json and add the following block metadata for our testimonial block.
{
    "name": "acf/testimonial",
    "title": "Testimonial",
    "description": "A custom testimonial block that uses ACF fields.",
    "style": [ "file:./testimonial.css" ],
    "category": "formatting",
    "icon": "admin-comments",
    "keywords": ["testimonial", "quote"],
    "acf": {
        "mode": "preview",
        "renderTemplate": "testimonial.php"
    },
    "supports": {
        "anchor": true
    }
}
Let’s take a closer look at what we’re seeing above. With the exception of acf, the configuration keys used are also found in WordPress core blocks.
name: A unique, namespaced identifier for the block. It must follow the formatnamespace/block-name. ACF Blocks default to a namespace ofacfif you don’t specify one, but you’re free to change this.title: A human-readable label for the block used in the ACF and WordPress UIs.description: A brief explanation of the block’s purpose, displayed in the block inserter when a site editor hovers over or clicks on the block.style: This references the CSS, which will be applied in both the editor and the front end. In this casetestimonial.cssfrom the same directory as theblock.jsonfile.category: The category in which the block will be grouped when displayed in the block inserter (e.g., “text”, “media”, “design”, “widgets”, “embed”).icon: An icon associated with the block, either a Dashicon slug or an SVG.keywords: An array of search terms you can add to help site editors find your block.acf: The ACF key allows us to set the preview mode (preview,auto, oredit), and indicates the template file used to draw ACF fields into our block, in this casetestimonial.php. Just like with our stylesheet, the template file is located in the same directory asblock.json.supports: An object indicating features that the block supports or overrides, such as custom colors, text alignments, or responsive embedding.
For a full list of metadata, please check out the WordPress Block Editor Handbook’s reference: Metadata in block.json.
Create the Testimonial Field Group
The testimonial.php file referenced in block.json is where we’ll add all of our display logic and reference values from our custom ACF fields. First, we need to register our custom ACF fields and assign them to our testimonial block. To do that, we first need to create a new field group in ACF called “Block: Testimonial”. Next, we add the fields we need:
Quote: A Text Area field that holds the quote used in the testimonial.
Author: A Text field with the name of the person contributing the testimonial.
Role: Another Text field, this time listing the customer’s position with their company.
Image: An Image field, containing an image of the customer.
Color Settings: An Accordion that contains our Color Picker fields for the background and text.
Background Color: A Color Picker field to control the background color used in the testimonial block.
Text Color: As above, but controlling the color of the text.
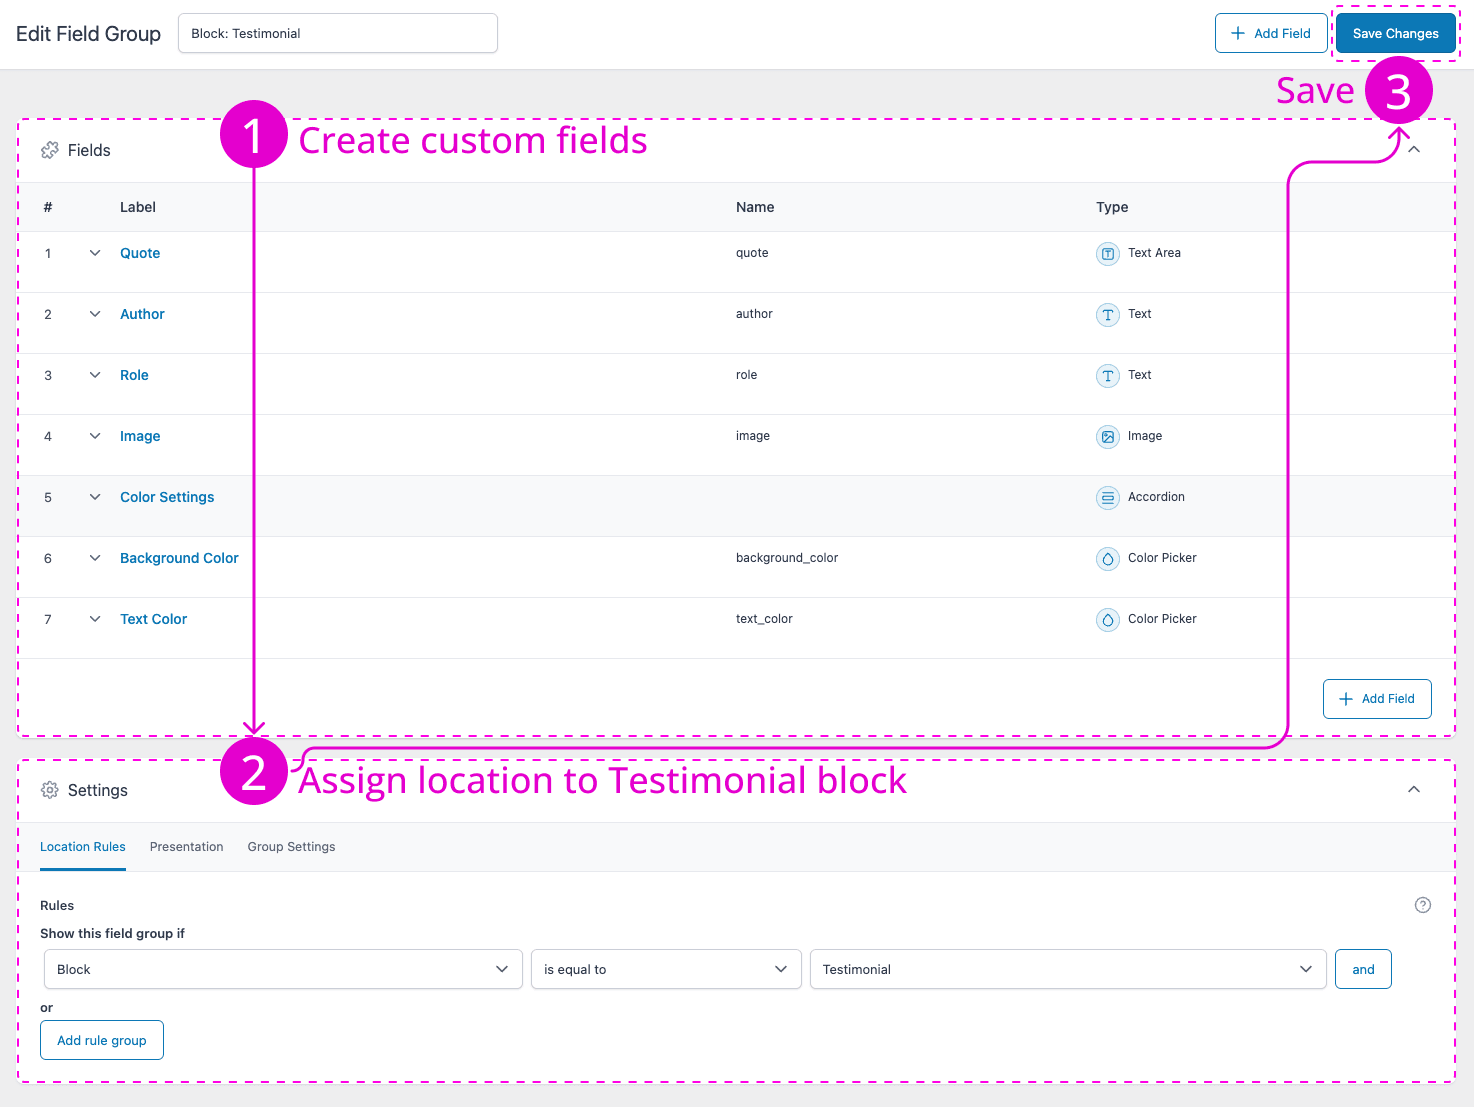
Now, we need to assign our new “Block: Testimonial” field group to our testimonial block. We can assign a location under “Settings > Location Rules” while editing the field group. Once we’ve added our testimonial block’s block.json, it should show up if we choose “Show this field group if: Block is equal to Testimonial.
Finally, we click Save Changes, which will automatically save a group_xxxxxx.json file within our child theme. Remember when we created the acf-json directory in the previous section? This is where our “Block: Testimonial” field group information is saved.
Every time we update our “Block: Testimonial” field group and click Save Changes, it will overwrite the existing group_xxxxxx.json file with the latest information. The JSON sync feature is handy for working collaboratively, and it can even be version controlled.
Create the Template and Stylesheet
With our field group saved, the next step is to create the testimonial.css and testimonial.php files referenced in block.json, and save them in the testimonial subdirectory, relative to the testimonial block’s block.json file. Afterwards you should have the following organization:
wp-content/themes/tt3child/blocks/testimonial/block.jsonwp-content/themes/tt3child/blocks/testimonial/testimonial.csswp-content/themes/tt3child/blocks/testimonial/testimonial.php
Having these critical files co-located is part of the convenience of leveraging ACF Blocks for creating your custom blocks.
Inside testimonial.php
Here is what our entire testimonial.php file will look like when we’re done. We’ll go over some of the relevant sections below.
<?php
/**
 * Testimonial Block template.
 *
 * @param array $block The block settings and attributes.
 */

// Load values and assign defaults.
$quote             = !empty(get_field( 'quote' )) ? get_field( 'quote' ) : 'Your quote here...';
$author            = get_field( 'author' );
$author_role       = get_field( 'role' );
$image             = get_field( 'image' );
$background_color  = get_field( 'background_color' ); // ACF's color picker.
$text_color        = get_field( 'text_color' ); // ACF's color picker.
$quote_attribution = '';

if ( $author ) {
    $quote_attribution .= '<footer class="testimonial__attribution">';
    $quote_attribution .= '<cite class="testimonial__author">' . $author . '</cite>';

    if ( $author_role ) {
        $quote_attribution .= '<span class="testimonial__role">' . $author_role . '</span>';
    }

    $quote_attribution .= '</footer><!-- .testimonial__attribution -->';
}

// Support custom "anchor" values.
$anchor = '';
if ( ! empty( $block['anchor'] ) ) {
    $anchor = 'id="' . esc_attr( $block['anchor'] ) . '" ';
}

// Create class attribute allowing for custom "className" and "align" values.
$class_name = 'testimonial';
if ( ! empty( $block['className'] ) ) {
    $class_name .= ' ' . $block['className'];
}
if ( ! empty( $block['align'] ) ) {
    $class_name .= ' align' . $block['align'];
}
if ( $background_color || $text_color ) {
    $class_name .= ' has-custom-acf-color';
}

// Build a valid style attribute for background and text colors.
$styles = array( 'background-color: ' . $background_color, 'color: ' . $text_color );
$style  = implode( '; ', $styles );
?>

<div <?php echo esc_attr( $anchor ); ?>class="<?php echo esc_attr( $class_name ); ?>" style="<?php echo esc_attr( $style ); ?>">
    <div class="testimonial__col">
        <blockquote class="testimonial__blockquote">
            <?php echo esc_html( $quote ); ?>

            <?php if ( !empty( $quote_attribution ) ) : ?>
                <?php echo wp_kses_post( $quote_attribution ); ?>
            <?php endif; ?>
        </blockquote>
    </div>

    <?php if ( $image ) : ?>
        <div class="testimonial__col">
            <figure class="testimonial__image">
                <?php echo wp_get_attachment_image( $image['ID'], 'full', '', array( 'class' => 'testimonial__img' ) ); ?>
            </figure>
        </div>
    <?php endif; ?>
</div>
Let’s break down some of what’s in our testimonial.php. First, we have a PHP DocBlock with commented code, highlighting the parameters passed down through $block.
<?php
/**
 * Testimonial Block template.
 *
 * @param array $block The block settings and attributes.
 */
The next section loads the values and assigns defaults from our “Block: Testimonial” field group. There’s no special process associated with ACF Blocks for this part. You register your fields as you normally would:
// Load values and assign defaults
$quote             = !empty(get_field( 'quote' )) ? get_field( 'quote' ) : 'Your quote here...';
$author            = get_field( 'author' );
$author_role       = get_field( 'role' );
$image             = get_field( 'image' );
$background_color  = get_field( 'background_color' ); // ACF's color picker.
$text_color        = get_field( 'text_color' ); // ACF's color picker.
$quote_attribution = '';

if ( $author ) {
    $quote_attribution .= '<footer class="testimonial__attribution">';
    $quote_attribution .= '<cite class="testimonial__author">' . $author . '</cite>';

    if ( $author_role ) {
        $quote_attribution .= '<span class="testimonial__role">' . $author_role . '</span>';
    }

    $quote_attribution .= '</footer><!-- .testimonial__attribution -->';
}
We’re doing some logic for quote_attribution to make sure the content editor has provided this information. We can give them some smart fallbacks here, and set them up for success.
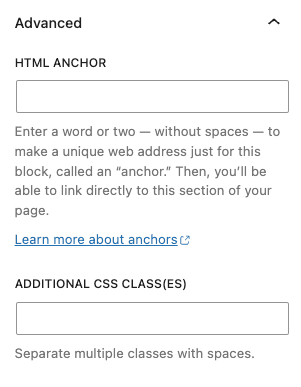
Next, we pass down the anchor ID that editors are allowed to enter on a per block basis in the block editor.
$anchor = '';
if ( ! empty( $block['anchor'] ) ) {
    $anchor = 'id="' . esc_attr( $block['anchor'] ) . '" ';
}
We also want to pass all our unique classes down. Keep in mind that editors can also add special classes on a per-block basis in the block editor. That is why we first check for if ( ! empty( $block[‘className’]).
Then we check for any special alignment classes that are enabled by default and inherited from WordPress core’s Block Supports APIs. Also, we’ll pass down our custom background color and text color.
// Create class attribute allowing for custom "className" and "align" values.
$class_name = 'testimonial';
if ( ! empty( $block['className'] ) ) {
    $class_name .= ' ' . $block['className'];
}
if ( ! empty( $block['align'] ) ) {
    $class_name .= ' align' . $block['align'];
}
if ( $background_color || $text_color ) {
    $class_name .= ' has-custom-acf-color';
}
Finally, we have the heart of the output logic. In this section, we pass through the styling for our background, text colors, etc.:
$styles = array( 'background-color: ' . $background_color, 'color: ' . $text_color );
$style  = implode( '; ', $styles );
… and last but not least, the data from our ACF fields:
<div <?php echo esc_attr( $anchor ); ?>class="<?php echo esc_attr( $class_name ); ?>" style="<?php echo esc_attr( $style ); ?>">
    <div class="testimonial__col">
        <blockquote class="testimonial__blockquote">
            <?php echo esc_html( $quote ); ?>

            <?php if ( !empty($quote_attribution) ) : ?>
                <?php echo wp_kses_post( $quote_attribution ); ?>
            <?php endif; ?>
        </blockquote>
    </div>

    <?php if ( $image ) : ?>
        <div class="testimonial__col">
            <figure class="testimonial__image">
                <?php echo wp_get_attachment_image( $image['ID'], 'full', '', array( 'class' => 'testimonial__img' ) ); ?>
            </figure>
        </div>
    <?php endif; ?>
</div>
Using get_block_wrapper_attributes()
Including the get_block_wrapper_attributes() function in your template allows you to use WordPress native supports for blocks, such as colors and spacing. The function will automatically output a complete style attribute in the wrapper WordPress adds around your block, but it needs to be used in conjunction with ACF’s is_preview variable for ACF Blocks to render correctly.
Inside testimonial.css
There are practically no limitations on how you style your blocks. The one used to style our example testimonial block is reproduced below for convenience. We’ve made certain choices here in regards to box-sizing, display, etc., but ultimately how you style your blocks is up to you.
.testimonial {
    --testimonial-font-family: Baskerville,Baskerville Old Face,Hoefler Text,Garamond,Times New Roman,serif;
    --testimonial-font-size: 1.5rem;
    --testimonial-spacing: 0.5rem;
}

.testimonial {
    align-items: center;
    box-sizing: border-box;
    display: flex;
    flex-wrap: wrap;
}

.testimonial > * {
    box-sizing: border-box;
    flex-grow: 1;
    min-width: 0;
    overflow-wrap: break-word;
    width: 100%;
    word-break: break-word;
}

.testimonial__blockquote {
    align-self: center;
    font-family: var(--testimonial-font-family);
    font-size: var(--testimonial-font-size);
    line-height: 1.18;
    padding: calc(4 * var(--testimonial-spacing)) calc(4.5 * var(--testimonial-spacing)) calc(2.5 * var(--testimonial-spacing));
    position: relative;
}

.testimonial__blockquote::before {
    color: currentColor;
    content: "“";
    display: block;
    font-family: var(--testimonial-font-family);
    font-size: calc(8 * var(--testimonial-spacing));
    position: absolute;
    top: calc(-1.25 * var(--testimonial-spacing));
}

.testimonial__attribution {
    font-family: var(--wp--preset--font-family--system-font);
    font-size: calc(0.6 * var(--testimonial-font-size));
    line-height: 1.5;
    margin-top: calc(2 * var(--testimonial-spacing));
}

.testimonial__author {
    font-style: normal;
    font-weight: 700;
}

.testimonial__role {
    display: block;
}

.testimonial__image {
    box-sizing: border-box;
    height: 100%;
    line-height: 0;
    margin-bottom: 0;
}

.testimonial__image img {
    height: 100%;
}

.testimonial__img {
    box-sizing: border-box;
    max-width: 100%;
    object-fit: cover;
}

@media (min-width: 600px) {
    .testimonial {
        flex-wrap: nowrap;
    }

    .testimonial__col:first-of-type {
        flex-basis: 64%;
    }

    .testimonial__col:last-of-type {
        flex-basis: 38%;
    }
}
Testing the Block
Now that we have the necessary files in place defining our block, template, and stylesheet, it’s time to take our testimonial block for a test drive.
We create a new post and select Testimonial from the block inserter. Next, we fill in all the fields, including the image. We can choose to alter the background and text color here as well if desired, but the block will simply use the theme colors if we don’t change them. When you’ve filled in all the fields, click Publish, and the testimonial we’ve created is visible on the frontend of our site. You can see the whole process in the video below.
Conclusion
Following this tutorial will result in the creation of a basic testimonial block, but ACF Blocks has much more potential. ACF Blocks provides most of the features available when building WordPress blocks with React, but in a PHP-based framework.
There are numerous ways to improve the basic testimonial block we’ve created here. In the next tutorials, we show how you can use WordPress core’s InnerBlocks component with ACF Blocks to pass an array of core blocks and pre-populate the nested block data with <InnerBlocks template="">, and then use templateLock="all" to lock them down and set our content editors up for success.
We can go still further and extend our use of InnerBlocks to include Styles and allow for the addition of a class to our final output, which we can target with specific stylistic appearances.
Adding InnerBlocks to our testimonial block would also give us access to Variations. This goes far beyond appearance, allowing for different versions of blocks that retain some of the same functionality.
Once you understand how they work, ACF Blocks open a world of limitless possibilities. With this tutorial under your belt, we’re excited to see what you build.
Supercharge Your Website With Premium Features Using ACF PRO
Speed up your workflow and unlock features to better develop websites using ACF Blocks and Options Pages, with the Flexible Content, Repeater, Clone, Gallery Fields & More.
Related
- ACF Blocks: Using Context With ACF Blocks
- ACF Blocks: Key Concepts
- ACF Blocks: ACF Blocks: Using InnerBlocks and Parent/Child Relationships
- ACF Blocks: ACF Blocks
- Functions: acf_register_block_type()
