
Key points:
- You can build fast, scalable headless sites by pairing WordPress as a backend with a modern React frontend.
- Tackle common pain points like authentication, CORS, and SEO with proven tools and clear architecture.
- Advanced Custom Fields (ACF®) lets you streamline content flow, giving editors control and developers structured data via the WordPress REST API.
WordPress has long been the go-to for managing content, but its all-in-one approach can get in the way when building fast, modern web apps.
A headless setup changes that: WordPress handles the content, and a separate frontend – like one built with React – handles the user experience. You get the flexibility of a custom frontend without giving up the admin tools that content teams rely on.
React fits naturally into this model. It’s fast, modular, and plays well with APIs, making it a solid choice for building frontends that feel more like apps than websites. Paired with WordPress as a backend, it opens the door to performance gains, better development workflows, and more control over your UI.
Let’s walk through what it takes to get a headless WordPress site up and running with React – from setting up API access to routing, authentication, and deployment.
Building headless WordPress sites with React: architecture overview
In a headless WordPress setup with React, the architecture separates content management (the body) from content presentation (the head).
It’s not like a React-powered WordPress theme – WordPress here is used only for the backend. Editors interact with the familiar WordPress admin panel to create and manage content. This content is exposed through an API rather than being rendered by WordPress’s PHP-based frontend.
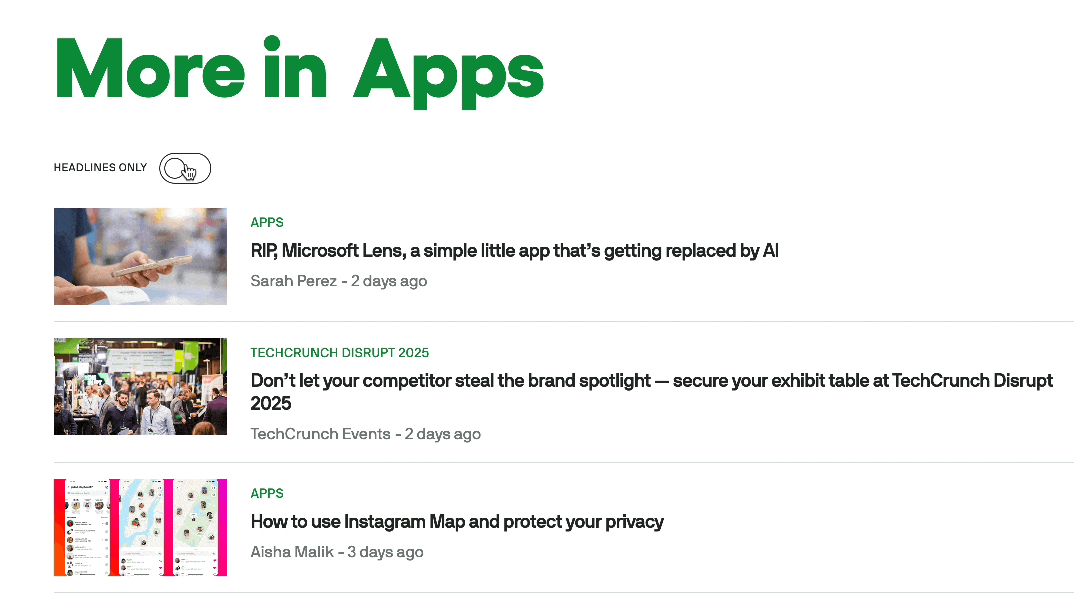
Headless WordPress isn’t just some new fad – major websites have been adopting it for a while now.
Take TechCrunch, for example: they adopted a headless WordPress architecture powered by React as far back as 2018. A key feature enabled by the headless setup is a dynamic content section with a toggleable, headline-only view, powered by React state and virtual DOM updates for fast client-side rendering:
Tools like Advanced Custom Fields (ACF®) use this approach to enable flexible, structured content modeling that can be easily exposed through the WordPress REST API.
On the frontend, a React application consumes the API to fetch and display content. This app can be built using frameworks like Next.js or Gatsby for added benefits like server-side rendering, static generation, and routing.
The frontend runs separately from the WordPress backend, usually on platforms like Netlify, Vercel, or a custom server, and communicates with it via APIs. Some WordPress-focused hosts, like WP Engine, can actually host both the frontend and backend, simplifying deployment and minimizing latency.
Authentication is handled through mechanisms like application passwords, OAuth, or JWT, depending on whether the frontend needs access to private content or user-specific data. Media assets and uploads remain hosted on the WordPress server, though they can be proxied or offloaded to a CDN.
This decoupled architecture improves frontend performance, enables modern development workflows, and allows the same WordPress backend to serve multiple frontends (e.g., web, mobile apps, smart devices).
On the other hand, it also introduces complexity in areas like caching, routing, and preview functionality, which need to be re-implemented on the frontend side.
Supercharge Your Website With Premium Features Using ACF PRO
Speed up your workflow and unlock features to better develop websites using ACF Blocks and Options Pages, with the Flexible Content, Repeater, Clone, Gallery Fields & More.
How to set up WordPress as a headless CMS with React
We’re going to cover the complete process of creating a headless WordPress setup using React as the frontend framework. You’ll learn to separate your content management from presentation, enabling faster performance and greater flexibility in how you display your content.
Step 1: WordPress setup
Start by preparing your WordPress installation to serve as a headless CMS, exposing your content through API endpoints that your React application can consume:
- Install WordPress on your hosting platform and complete the standard setup process with database configuration and admin user creation.
- Configure permalinks in Settings > Permalinks. Choose Post name or custom structure /%postname%/ for API-friendly URLs.
- Install the WPGraphQL plugin to expose data at /graphql, or use the built-in WP REST API at /wp-json/wp/v2/.
- Install JWT Authentication plugin, JWT Authentication for WP REST API, for secure frontend-backend communication.
- Create custom content using ACF if needed, then verify API access by visiting /wp-json/wp/v2/posts or /graphql.
- Test endpoints with GET requests to confirm your WordPress installation properly exposes content through your chosen API.
Step 2: React setup
Next, create a React application that fetches and displays content from your WordPress API, establishing the foundation for your headless architecture:
- Create React project using
npx create-react-app my-headless-wpor Vite:npm create vite@latest my-headless-wp --template react. - Install the data-fetching library. For GraphQL use
npm install @apollo/client graphql. For REST API use built-in fetch ornpm install axios. - Set up environment variables in the .env file:
REACT_APP_WP_API_URL=https://your-wp-site.com/wp-json/wp/v2/(REST) orREACT_APP_GRAPHQL_URL=https://your-wp-site.com/graphql(GraphQL). - Configure Apollo Client (GraphQL) in src/index.js with your endpoint and authentication headers, or create REST API service functions for posts, pages, and content types.
- Build React components for displaying WordPress content using
useEffectoruseStatefor REST or Apollo’suseQueryfor GraphQL. - Implement data fetching with proper loading states and error handling for a smooth user experience.
- Create navigation components that consume your WordPress menu data and handle routing between different content types.
Step 3: Deploy
Deploy your headless WordPress setup to production, ensuring both your WordPress backend and React frontend are properly hosted and accessible:
- Deploy WordPress to production hosting (managed WordPress like WP Engine or traditional hosting), ensuring plugin compatibility.
- Deploy React frontend to static hosting like WP Engine, Vercel (
vercel), or Netlify (GitHub integration or drag-and-drop). - Update environment variables in your React deployment to point to production WordPress API URLs instead of development URLs.
- Configure build settings on hosting platform using
npm run buildcommand withbuild/output directory. - Set up custom domains with SSL certificates for both WordPress backend and React frontend to ensure secure API communications.
Step 4: Configure the setup
Finally, address the technical configurations necessary for your headless WordPress and React applications to communicate properly in production:
- Enable CORS on WordPress by adding headers to .htaccess or installing a CORS plugin to allow cross-domain API requests from your React frontend.
- Configure CORS headers including
Access-Control-Allow-Origin,Access-Control-Allow-Methods, andAccess-Control-Allow-Headersfor your React domain. - Set up React routing with React Router (
npm install react-router-dom) to handle navigation matching WordPress post and page slugs. - Implement slug-based routing by creating route handlers that take slug parameters and query the WordPress API for matching content.
- Configure authentication flow for user login features, implementing JWT token storage and renewal in React for authenticated sessions.
- Optimize performance with caching strategies, lazy loading for images, and code splitting to ensure fast loading times.
- Test cross-domain functionality to verify the React frontend successfully communicates with the WordPress backend and handles authentication/CORS issues.
How ACF simplifies data flow between WordPress and React
ACF significantly streamlines data flow between WordPress and a React frontend by giving developers fine-grained control over content structure.
Instead of relying solely on default post fields, ACF allows you to define custom fields – text, images, repeaters, flexible content blocks, and more – that fit your exact data model. These fields are accessible through the WordPress REST API, making it much easier to fetch and render structured content in a decoupled React app.
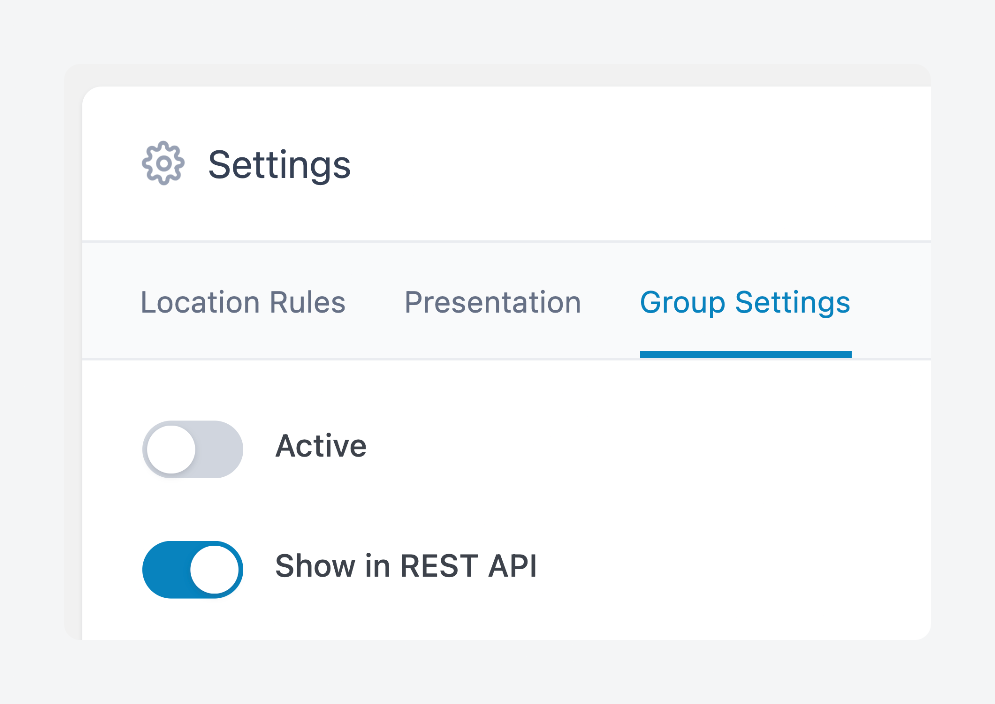
To make a field group available via the REST API, you just need to toggle the option in its Group Settings tab:
This approach solves common integration pain points. For example, without ACF, developers often need to write custom meta queries or work around WordPress’s limited default post schema. With ACF, editors can manage complex content layouts through the admin UI, and developers can query predictable, structured data from the API.
Real-world use cases include dynamic landing pages, modular content blocks, or product pages where structured data, like pricing and specifications, needs to be managed flexibly but consistently.
Here’s a simple example showing just how easy it is to render ACF data in React:
function Hero({ data }) {
  return (
    <section className="hero">
      <h1>{data.acf.headline}</h1>
      <p>{data.acf.subheadline}</p>
    </section>
  );
}
As web developer at ACF, Liam Gladdy, puts it:
“The real power of ACF is giving non-technical users the ability to manage structured content without touching code – while giving developers a solid API to work with.”
Overcoming common obstacles in WordPress-React integration
Here are some challenges you might encounter when building a headless CMS setup with React and WordPress, and how to deal with them:
- Authentication issues arise because WordPress’s cookie-based authentication doesn’t work with decoupled React applications, making cross-origin API requests. Install a JWT plugin like JWT Authentication for WP REST API, configure token generation in WordPress, and store tokens securely in your React app to authenticate API requests.
- CORS errors occur when React runs on a different domain/port than WordPress, causing browsers to block cross-origin requests. Fix this by adding
Access-Control-Allow-Originheaders via your theme’s functions.php using therest_pre_serve_requesthook. - Data fetching performance suffers when React makes multiple API calls or requests large datasets, creating slow page loads. Implement client-side caching with React Query or SWR for automatic data synchronization, plus server-side caching using WordPress plugins like WP Rocket.
- SEO challenges emerge because React renders content client-side, making it difficult for search engines to crawl your content. Use Next.js for server-side rendering or static site generation to pre-render React components and serve complete HTML to search engines.
- Content structure management becomes complex when you need flexible content beyond WordPress defaults. Use ACF to create custom field groups and flexible layouts that output structured JSON data through the REST API while providing intuitive editing interfaces.
- API rate limiting problems occur when React makes too many requests, overwhelming the server or hitting hosting limits. Implement pagination with
per_pageandoffsetparameters, add request throttling using libraries like Bottleneck, and use lazy loading for non-critical content. - Error handling becomes critical when API calls fail due to network or server issues, potentially breaking user interfaces. Implement React error boundaries, create fallback UI components for failed requests, and use try-catch blocks to handle errors gracefully with meaningful user messages.
Start building your React-powered WordPress website with ACF
Building a headless WordPress site with React unlocks capabilities far beyond what traditional WordPress themes offer. You retain the powerful content management experience that teams rely on, while gaining the speed, flexibility, and modern tooling that React brings to the frontend.
Challenges like authentication, CORS, performance optimization, and SEO are real – but they don’t have to spell doom. With a clear understanding of how these systems interact and the right set of tools, each issue becomes manageable.
The initial effort to architect a headless setup pays off in faster load times, improved UX, and more scalable code.
ACF plays an important role in this stack, acting as a bridge between user-friendly editorial workflows and complex frontend needs. It gives content teams an intuitive interface to manage structured data, while allowing developers to work with its data via an API.
Together, WordPress, React, and ACF form a flexible, future-ready foundation. You can start small – just exposing posts or pages – and expand as your needs evolve.
Take your headless WordPress project to new heights. Check out ACF for structured, React-ready content.

For plugin support, please contact our support team directly, as comments aren't actively monitored.