Key points:
- WPBakery is a WordPress page builder that integrates with Advanced Custom Fields (ACF®) to output custom field data without coding.
- Compared with more popular page builders like Divi and Elementor, though, the integration isn’t as versatile.
- Learn how to extend it with the ACF-VC Integrator add-on that creates a new element for displaying ACF data.
WPBakery is one of WordPress’s go-to page builders – familiar, functional, and the choice for a lot of developers who prefer drag-and-drop ease over wrangling code.
Like most major builders, it supports Advanced Custom Fields (ACF®), an indispensable plugin for customizing WordPress content. In fact, WPBakery consistently ranks among the top five builders paired with ACF, making it a common player in developer workflows.
The rub is that WPBakery’s documentation hasn’t kept pace. If you’ve tried to bridge the two recently, you’ve likely run into dead ends, vague examples, or outright omissions.
This article is your missing manual. We’ll walk through both the basics and the more sophisticated tricks for integrating ACF with WPBakery – from building something lean and editorial, to something more tailored and dynamic.
2 methods for displaying ACF fields in WPBakery
Before we dive into the how-to, let’s get grounded in the basics. Below are two core approaches for getting ACF data onto the frontend using WPBakery.
1. Using the built-in element
The simplest way to display ACF data in WPBakery is by using its built-in Advanced Custom Field element. It’s the only ACF-specific tool WPBakery offers – unlike Divi or Elementor, which come with multiple dynamic modules.
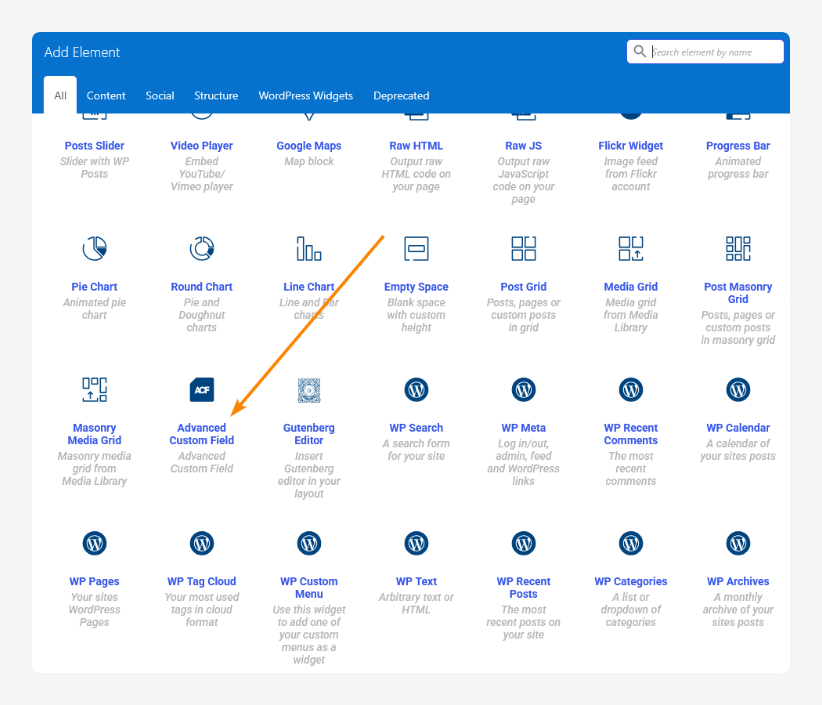
This element handles basic text-based fields fairly well: text, textarea, number, and so on. But that’s about where its strengths end. It tends to break down when dealing with more complex field types like repeaters, galleries, or flexible content.
If your ACF use is straightforward, this method works – just don’t expect much flexibility.
2. Using the ACF-VC add-on
The next step up is the ACF-VC Integrator plugin – a free add-on that brings much-needed depth to WPBakery’s ACF support. Once installed and activated, it adds a new element to WPBakery called ACF-VC Integrator.
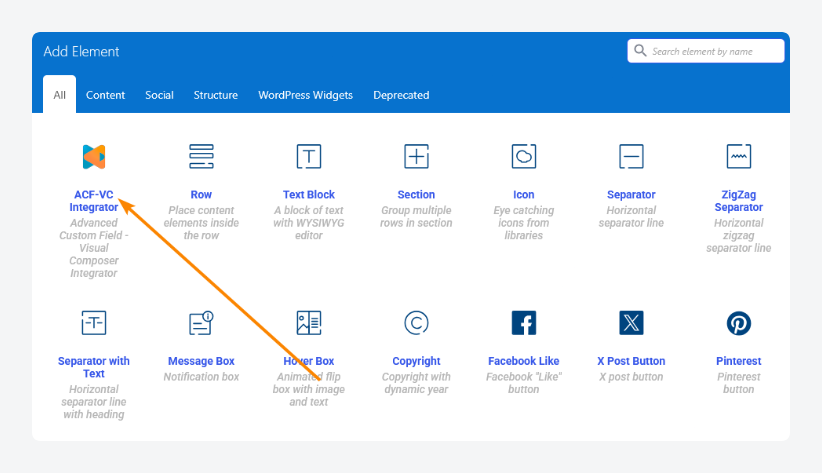
It unlocks a broader range of field types, including custom images, and adds UI-level controls that normally require CSS workarounds.
For example, you can adjust image sizes directly from the settings panel, eliminating the need for class targeting.
If you’re planning to do more than just display plain text, this plugin is a must – it fills in several key gaps WPBakery leaves open.
How to integrate ACF and WPBakery
Now that you’ve seen the main ways to display ACF fields in WPBakery, let’s put them into practice. In this section, we’ll walk through two common use cases – one beginner-friendly, one more advanced.
First, you’ll learn how to build a simple page or post that pulls in ACF data using WPBakery.
Then we’ll step it up and show you how to create a dynamic template for a custom post type.
Supercharge Your Website With Premium Features Using ACF PRO
Speed up your workflow and unlock features to better develop websites using ACF Blocks and Options Pages, with the Flexible Content, Repeater, Clone, Gallery Fields & More.
Beginner techniques: Building a simple page or post
This first part covers the basics. You’ll set up a few ACF fields and display them on a standard page or post using WPBakery. It’s a straightforward way to get familiar with how the two tools work together.
Step 1: Activating the WPBakery builder for posts
By default, the WPBakery builder only works for pages, but you can activate it for posts as well:
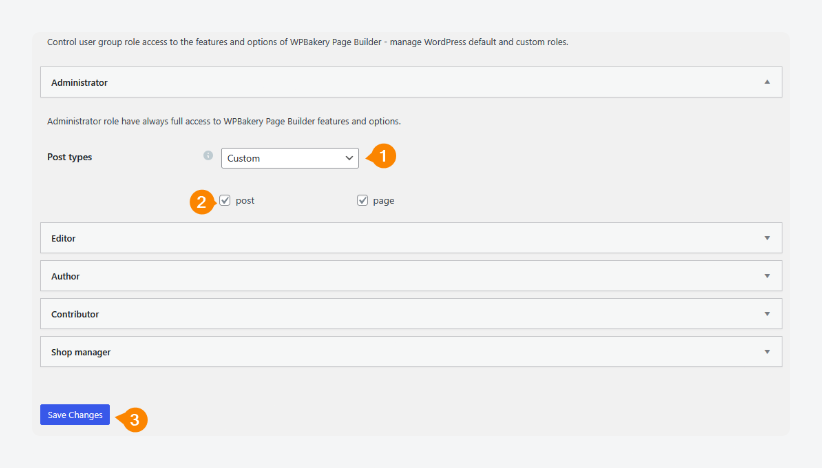
- From the admin dashboard, go to WPBakery Page Builder > Role Manager.
- Click the dropdown next to Post types and select Custom.
- Ensure both post and page are checked.
- Save your changes.
Step 2: Creating the layout
Next, we’ll use WPBakery to build the layout.
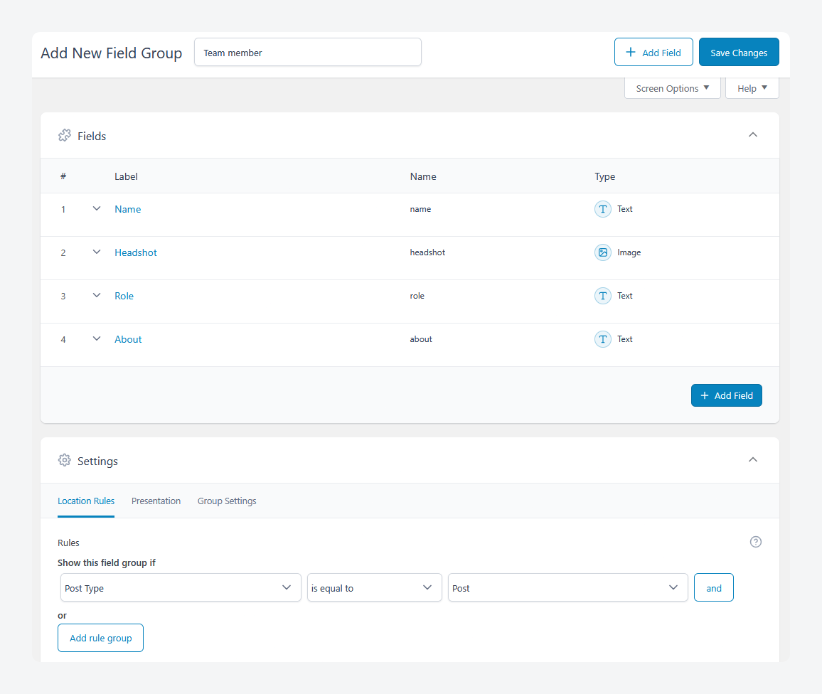
Before doing that, though, we’ll need to set up the ACF fields we’ll be outputting. We’re going to create a custom field group for team members and assign it to the post or page type you’re working on. The fields within this group are:
- Name
- Role
- Headshot
- About
The easiest way to get started would be to ensure the Location Rules are set to show the field group if Post Type is equal to Post. When you’re done, here’s what that should look like:
Now, we can get started:
- Create a new post from the dashboard via Posts > Add New Post.
- Fill in the custom field data in the fields just below the editor.
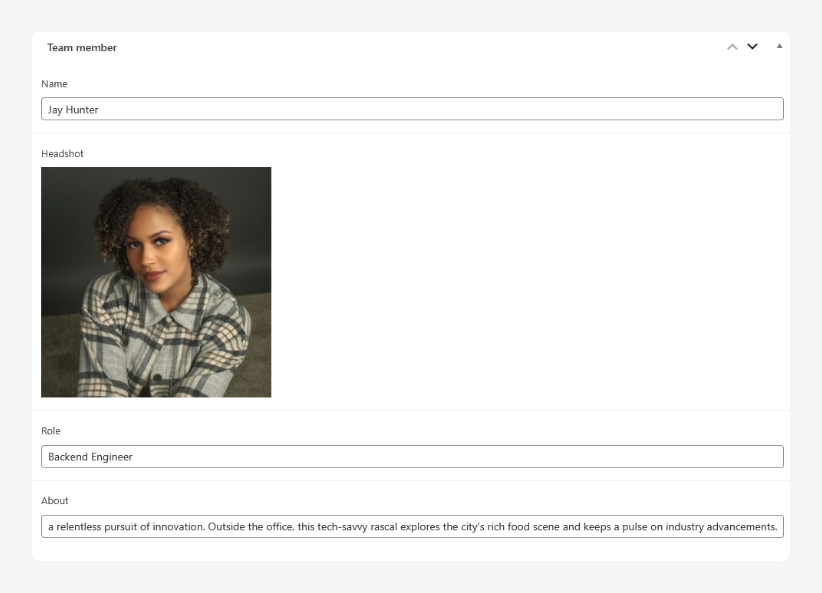
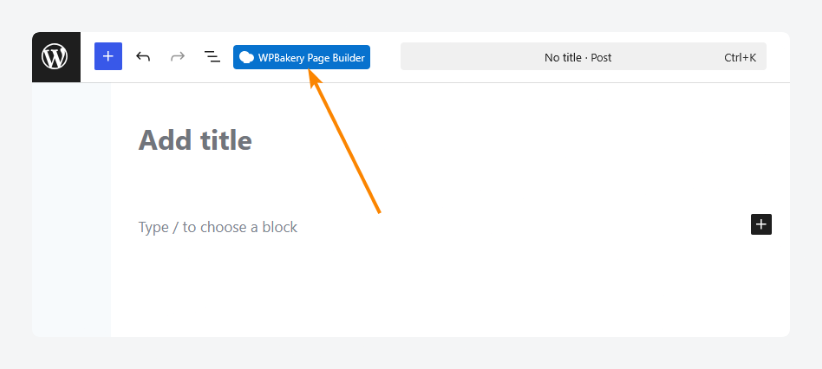
- Click WPBakery Page Builder at the top of the page to open the builder.
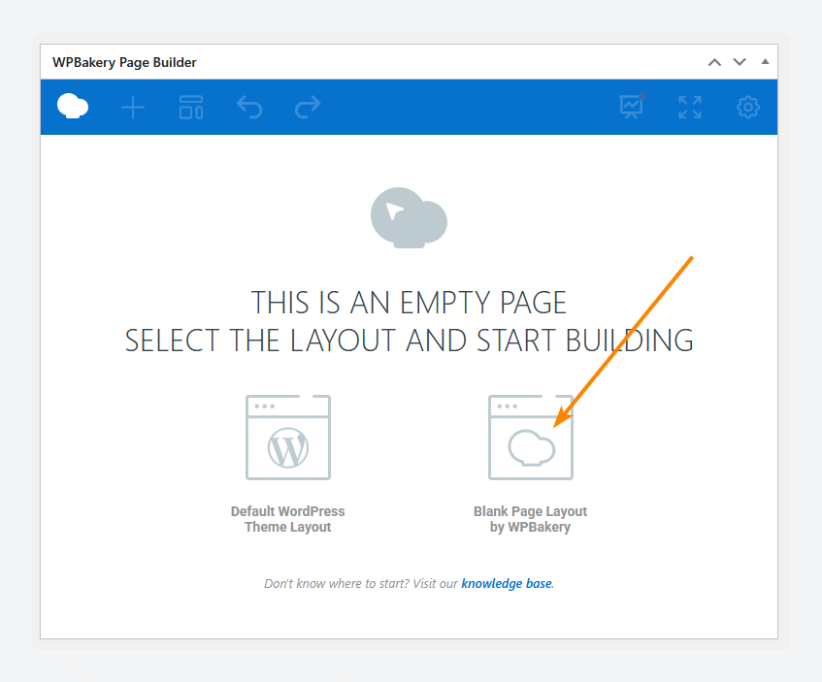
- Click Blank Page Layout by WPBakery.
- Click Add Element, then use the ACF-VC element since it’s more versatile than the built-in Advanced Custom Field element.
- Choose which ACF field you want to output in the element and configure all relevant parameters.
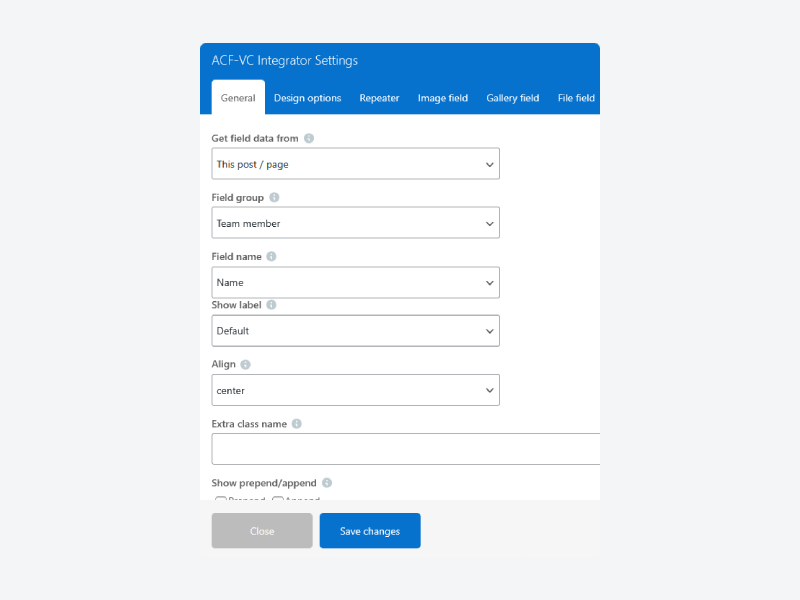
- Switch to the Design options tab and style the element as needed.
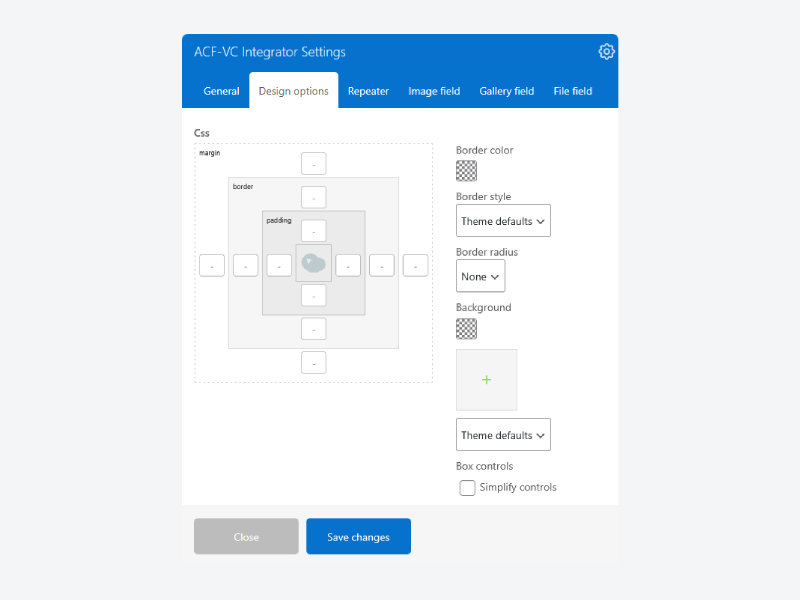
- Repeat steps 6 and 7 as needed with the other custom fields.
- Save your changes and load up the post on the frontend.

Advanced techniques: Creating a custom post type template with ACF and WPBakery
This portion of the walkthrough focuses on creating a reusable layout for a custom post type. You’ll connect ACF fields, build the template in WPBakery, and ensure each post pulls in the right data automatically.
Before getting started, create a custom post type for team members using ACF. Go back to the field group created in the previous section and change its location rules to show it if Post Type is equal to Team member.
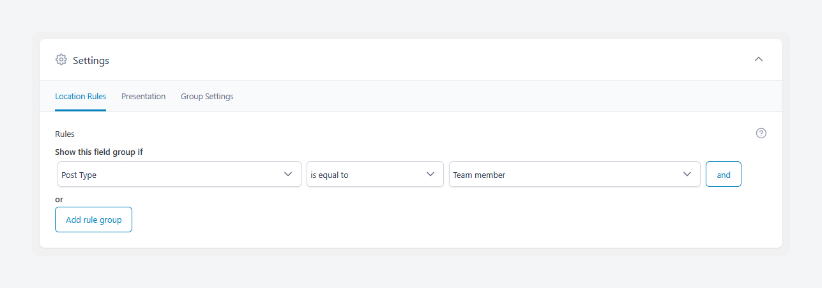
When you’re done, then you can get started.
Step 1: Activating the WPBakery builder for custom post types
Just like we did for default posts in the previous walkthrough, we’ll need to activate the builder for our custom post type:
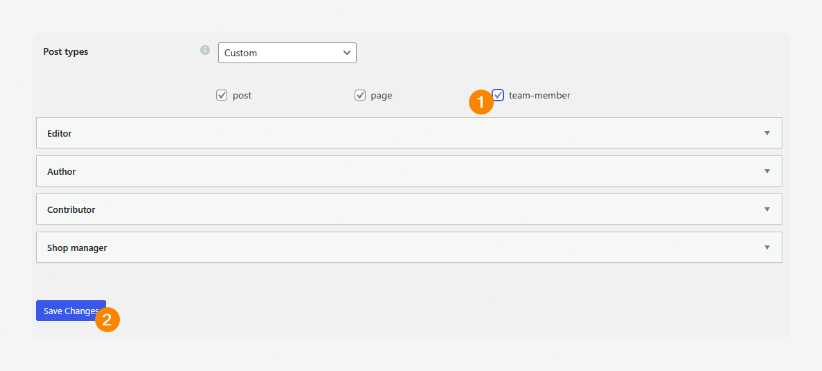
- From the dashboard, go to WPBakery Page Builder > Role Manager.
- Under Post types, ensure your custom post type is checked so you can use the WPBakery builder with it.
- Save your changes.
Step 2: Creating the template
You can turn any post or page you’re editing using the WPBakery builder into a custom template. Here, we’re going to do that with the post created in the previous section, which was already using ACF fields:
- From the dashboard, go to Posts > All Posts and find the post created using WPBakery in the previous section.
- Hover over it and click the Edit with WPBakery Page Builder option when it appears.
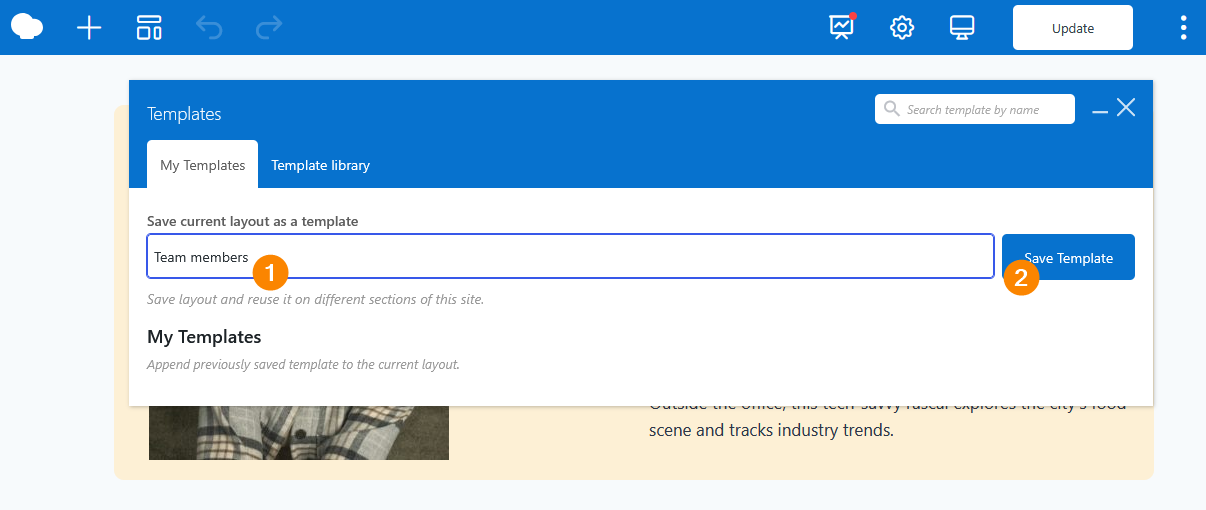
- When the builder opens, click the Templates icon highlighted in the image below.
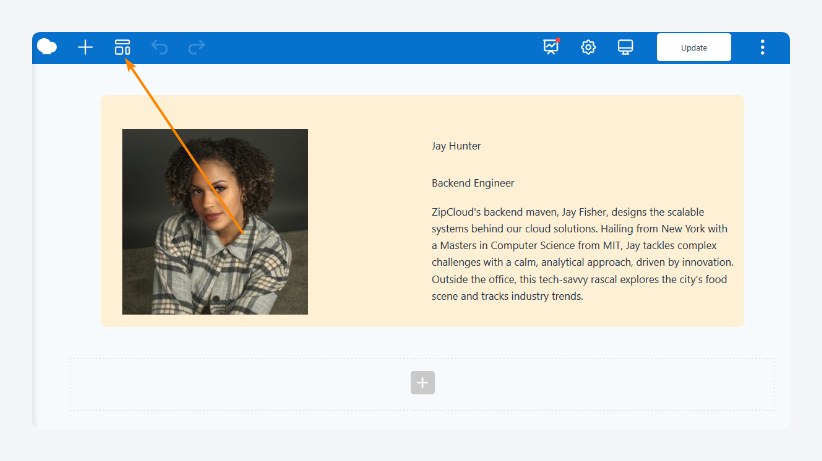
- Give the template a name and save it.
- Exit the builder.
Step 3: Assigning the template to the custom post type
With your template ready, you can assign it to custom post types:
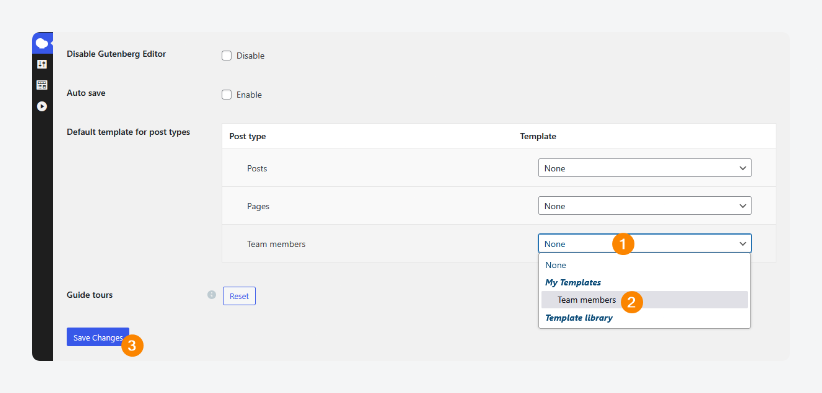
- From the dashboard, go to WPBakery Page Builder > General Settings.
- Scroll down to the Default template for post types section and click the dropdown next to your custom post type.
- Select a template from the list and save your changes.
Now, when you add a new team member, you just fill in the custom field values as usual:
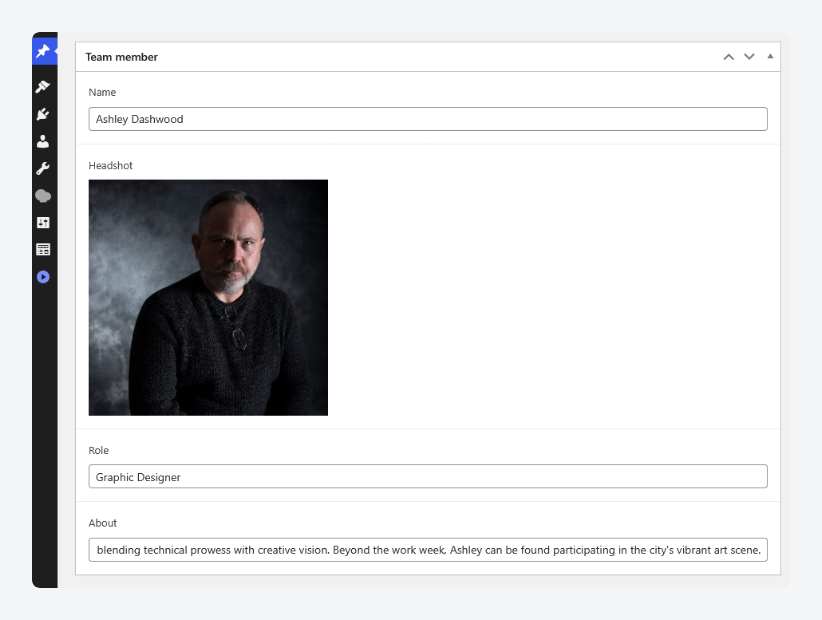
6. Hit Publish, and the page should load up with the template applied!

Start building custom WPBakery layouts with your ACF fields today
On its own, WPBakery is a solid page builder – with ACF, it turns into something far more flexible.
Out of the box, the integration is minimal and functional, but limited. Still, with the right additions, namely the ACF-VC Integrator plugin, it opens up.
Suddenly, you’re building dynamic templates, styling custom post types, and managing content. No code required, unless you want to.
It’s a setup that balances control and convenience – enough to satisfy developers, yet accessible enough for anyone comfortable in the WordPress dashboard. Looking to assemble a portfolio or curate a product library? WPBakery and ACF can get you there – if you know how to use them together.
If you haven’t already, take a closer look at ACF and see how far you can take WPBakery.



For plugin support, please contact our support team directly, as comments aren't actively monitored.