
Overview
Locking down your ACF Blocks with block locking ensures those blocks can’t be removed or modified in unauthorized ways. You can think of block locking as a safety mechanism, whether you’re using it on a client’s WordPress site or one of your own. In this tutorial, we’ll show you how to use locking to restrict the movement and removal of individual blocks, and even patterns and templates.
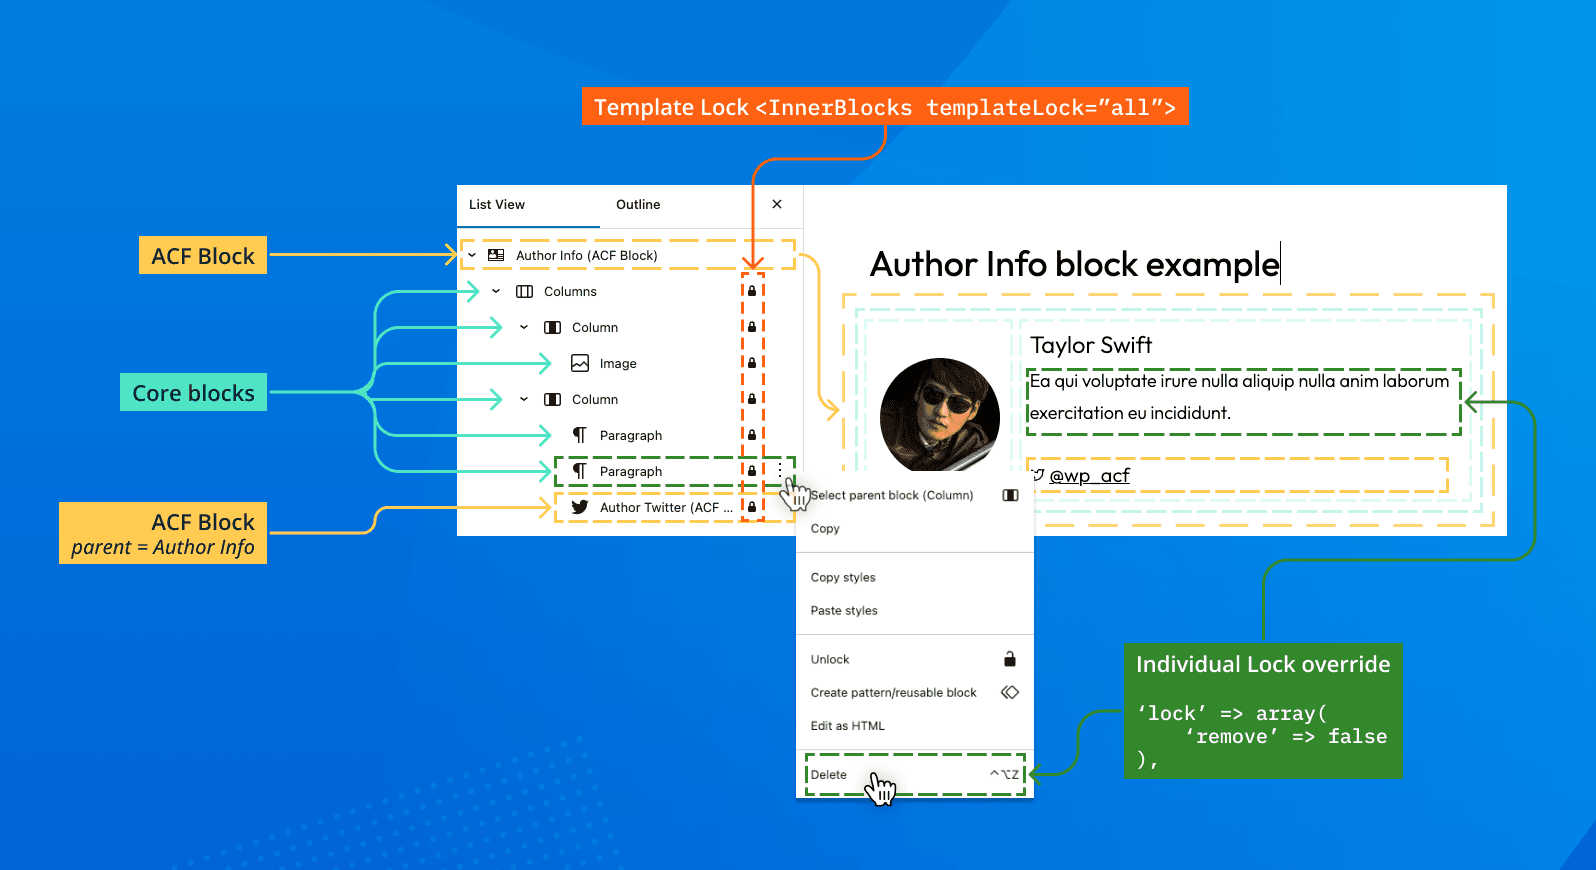
In our previous tutorial on using ACF Blocks with InnerBlocks and parent/child relationships, we built a custom Author Info block (parent). This custom ACF Block used InnerBlocks to pass a series of nested blocks, which included another custom Author Twitter block (child).
The Author Twitter block was only available as a nested block within its parent Author Info block context. We used "parent": [ "acf/author-info" ] in the Author Twitter’s block.json file to establish this relationship and nested discoverability.
Now, we want to extend this Author Info block to refine the editorial experience for our editors. We want to make sure that they can get right to editing, and not accidentally remove or move a block and mess up the overall layout. This is where block locking is useful.
If you want to follow the steps in this tutorial exactly and already have some experience with ACF Blocks, you can download the plugin created in our last tutorial and add to it as we go.
New to ACF Blocks? Start with our tutorial on creating your first ACF Block!
What is Block Locking?
WordPress provides two types of block locking: template locking and individual block locking. You can utilize either of these, or combine them for sophisticated restrictions on your blocks.
Some other considerations when using block locking in WordPress:
- Developers can use
templateLockin their nested blocks. - Developers can lock entire templates with
template_lock, even when registering custom post types. - Individual blocks can be assigned
lockparameters in block markup. Assignedlockparameters can be used on the individual blocks passed into a template. The individual block’slockoverrides the template locking, unless the template locking value iscontentOnly.
We highly recommend reviewing this helpful video on The Key to Locking Blocks from Wes Theron of the Make WordPress Training Team, along with the WordPress documentation.
Using InnerBlock Template Locking
Template locking can be accomplished by passing templateLock to the InnerBlocks component. Like this:
<?php
<InnerBlocks templateLock="all" />
Template locking options include the following:
contentOnly— Prevents all operations. Additionally, the block types that don’t have content are hidden from the list view and can’t gain focus within the block list. Unlike the other lock types, children can’t override this.all— Prevents all operations. It is not possible to insert new blocks, move existing blocks, or delete blocks.insert— Prevents inserting or removing blocks, but allows moving blocks.
Below are screenshots of what each of these would look like when applied to our Author Info block.
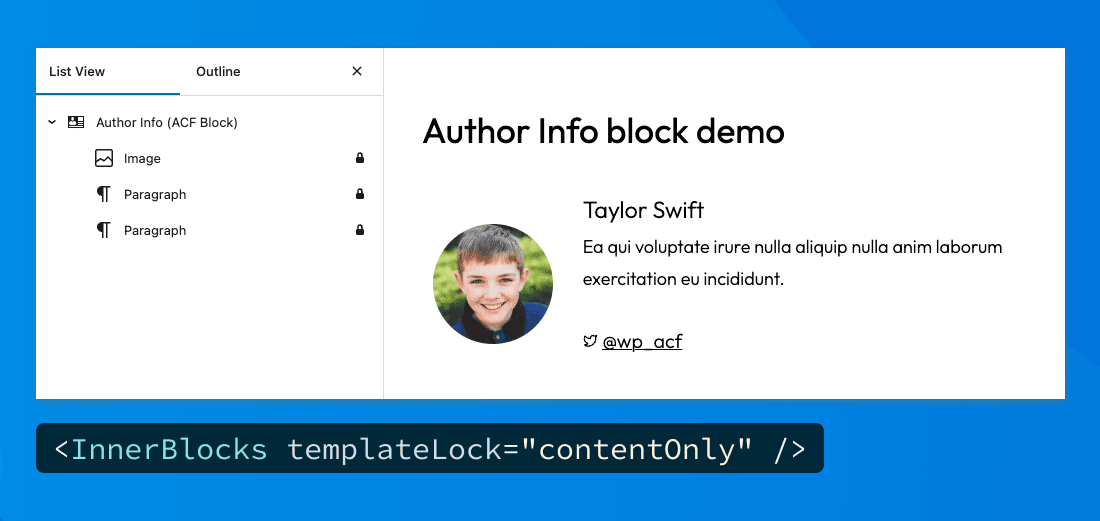
templateLock="contentOnly" set on InnerBlocks. All nested blocks that do not contain content are hidden from the list view. Only content is editable.
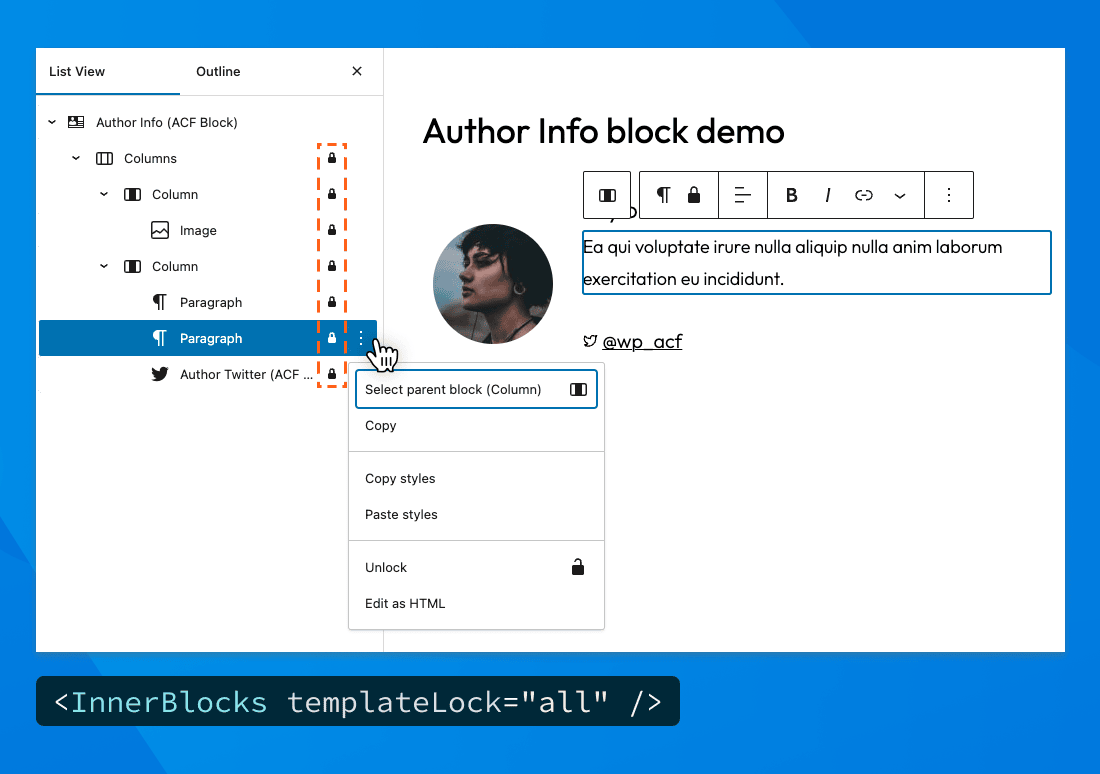
templateLock="all" set on InnerBlocks. All nested blocks are locked to prevent moving, deleting, or inserting new blocks.

templateLock="insert" set on InnerBlocks. All nested blocks are locked from being removed or having new blocks inserted. Existing blocks can be moved.
Unlocking One Nested Block
For our Author Info block, we want to offer editors the option to remove the author’s biography paragraph, but everything else should remain locked from being removed. We’ll start by locking all the blocks down with templateLock="all" attribute on our InnerBlocks component, and then we’ll use individual locking properties to unlock the one nested block we want to allow them to remove. We’ll make all of our changes to the Author’s Info template.php file, in the author-info directory of the custom plugin we created in our tutorial on InnerBlocks.
For now, we’ll update our InnerBlocks code as follows:
<?php
<InnerBlocks templateLock="all" />
Next, we’ll have to update our individual nested block to allow removal. So, if editors choose to remove the author’s biography paragraph then they have the ability.
How to Use Individual Block Locking
Individual block locking takes priority and overrides template locking, unless templateLock="contentOnly" is used. This hides all blocks that do not have content from the list view, and allows editors to update only the nested content block.
However, we previously decided to apply templateLock="all". To update the individual Paragraph block nested within our passed template, we just need to target it with an additional lock parameter. Here is our abbreviated nested code before applying the parameter:
array(
    'core/paragraph',
    array(
        'style'    => array(...),
        'fontSize' => 'small',
        'content'  => 'Ea qui voluptate irure nulla aliquip nulla anim laborum exercitation eu incididunt.',
    ),
    array(),
),
And here it is after, with our lock applied:
array(
    'core/paragraph',
    array(
        'style'    => array(...),
        'fontSize' => 'small',
        'content'  => 'Ea qui voluptate irure nulla aliquip nulla anim laborum exercitation eu incididunt.',
        'lock'     => array(
            'remove' => false,
        ),
    ),
    array(),
),
With the 'remove' => false above, we’re stating that the nested Paragraph block should be allowed to be removed. Yes, the false is confusing, but this is how ya do it! 😉
Now we have our desired control of the block, with both template locking and individual block locking in place.
Next Steps and Considerations
This tutorial shows how you can use block and template locking to set editorial conditions and prevent unauthorized removal or modification of your ACF Blocks, but there is a lot of room left to explore.
There is another element to curating your editorial experience, which can be utilized when placing your blocks within patterns. If you plan to leverage your ACF Blocks in the context of patterns, then you’ll want to check out content-only block locking.
You could also extend your block content control strategy by preventing certain roles or users from locking and unlocking blocks. Be sure to check out how to restrict locking and unlocking for roles, specific users, or even post types.
If you’ve been following along, your final, full plugin code should match our version: author-info-block-v2.zip
In the next tutorial, we’ll show you how to use WordPress global styles and block styles with your ACF Blocks, providing a consistent and easy to use experience when managing settings and styles.
Supercharge Your Website With Premium Features Using ACF PRO
Speed up your workflow and unlock features to better develop websites using ACF Blocks and Options Pages, with the Flexible Content, Repeater, Clone, Gallery Fields & More.
Related
- ACF Blocks: ACF Blocks: Using InnerBlocks and Parent/Child Relationships
- ACF Blocks: Extending ACF Blocks With Block Supports
- ACF Blocks: Using Context With ACF Blocks
- Functions: acf_register_block_type()
- ACF Blocks: ACF Blocks Configuration via block.json
