
Overview
In this tutorial, we’ll show you how to utilize the InnerBlocks component within an ACF Block. We’ll also demonstrate how you can leverage relationships to nest blocks while limiting their discoverability.
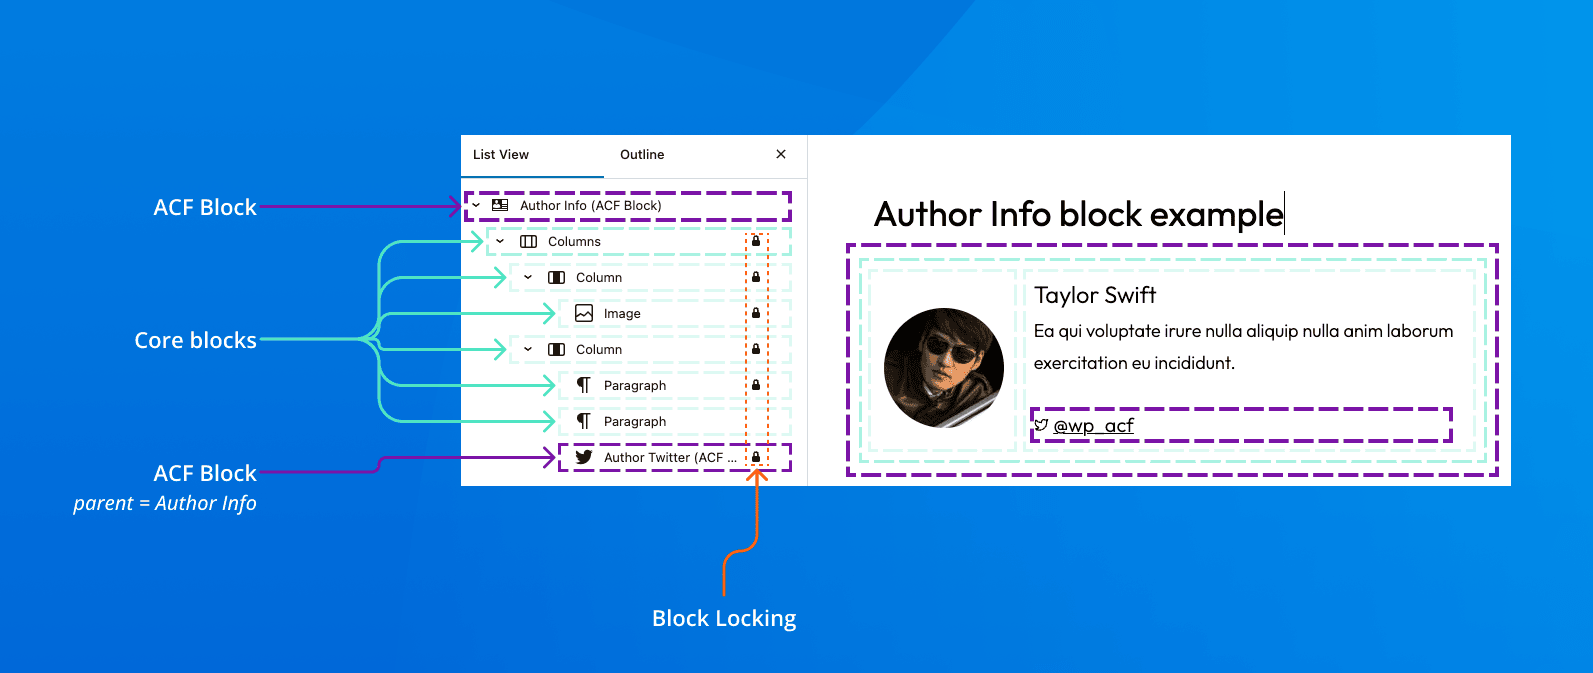
By the end of the tutorial, you’ll know how to create an “Author Info” block that mixes ACF Blocks with WordPress core blocks, allowing editors to assign an author image, name, bio, and a social link.
In future tutorials, we’ll demonstrate how to use the Block Locking API (introduced in WordPress 5.9) to lock certain blocks from being modified or moved, and show how to extend your ACF Blocks with alternative Block Styles.
New to ACF Blocks? Start with our tutorial on creating your first ACF Block!
The video below provides a walkthrough of the Author Info block we’re going to create.
Steps to complete
- Create a WordPress plugin to organize our custom code
- Register parent and child ACF Blocks with
block.json - Register ACF field for the author’s Twitter
- Create display logic with InnerBlocks and block template
Requirements
ACF Blocks is a premium feature found only in ACF PRO. You will also need a WordPress site where you have access to the wp-content directory. We highly recommend using Local or another WordPress development environment to create a sandbox site so you can experiment in complete safety.
Nesting Blocks With InnerBlocks
The InnerBlocks WordPress component is handy for creating a custom block that passes a series of curated nested blocks. There are a few things about how InnerBlocks works that we should cover before we get too deep into the tutorial.
Some native WordPress blocks already utilize InnerBlocks as part of their functionality, including the Columns and Social Icons blocks.
It is important to note that a block can only contain a single InnerBlocks component. This is due to the way the contents of InnerBlocks is stored on the block.
Using nested templates in InnerBlocks
Passing a template of blocks into the InnerBlocks component can pre-populate nested blocks and placeholder attributes, expediting the editorial experience.
Admittedly, the process to create your nested block template can be a bit clumsy, especially if you’re using several blocks and nesting is a few levels deep. Typically, we recommend something like the following process:
- Create your nested block layout in the block editor, assigning all desired styles and attributes.
- Select the parent block in the editor and choose Copy.
- Visit the WPHTML Converter and paste your block markup from the editor. Click Convert to PHP, and copy the converted markup.
- Paste the converted markup into your block’s
template.phpand assign it to a variable so you can use it later on. Be sure to nest it within anarray(). We’ll cover this in our last step in this tutorial.
Here is a simple example of what this might look like:
Example of passing a template to InnerBlocks

<?php
    $my_block_template = array(
        array(
            'core/group',
            array(
                'layout' => array(
                    'type' => 'constrained',
                ),
            ),
            array(
                array(
                    'core/paragraph',
                    array(
                        'align'   => 'center',
                        'content' => 'I'm a paragraph.',
                    ),
                    array(),
                ),
                array(
                    'core/separator',
                    array(),
                    array(),
                ),
            ),
        ),
    );

    //...

    <InnerBlocks template="<?php echo esc_attr( wp_json_encode( $my_block_template ) ); ?>" />
Using parent and ancestor relationships in blocks
A common pattern for using InnerBlocks is to create a custom block that’s only available if its parent block is inserted. This allows builders to establish a relationship between blocks, while also limiting a nested block’s discoverability. Currently, there are two relationships builders can use: parent and ancestor. The differences are:
- If you assign a
parent, then you’re stating that the nested block can only be used and inserted as a direct descendant of the parent. - If you assign an
ancestor, then you’re stating that the nested block can be used and inserted as any descendant of the parent.
The key difference between parent and ancestor is that parent has finer specificity, while an ancestor has greater flexibility in its nested hierarchy.
In our Author Info block, we want the Author Twitter block to be nested inside as a direct descendant. Author Info is defined as the parent in the Author Twitter’s block.json file:
Example block.json with parent key
{
    ...
    "parent": [ "acf/author-info" ]
}
Alright, let’s start building our custom plugin and blocks!
1. Create a WordPress plugin to organize our custom code
For our example, we’ll create a custom WordPress plugin to organize our code, although you can create the blocks directly in your theme if you wish. Create a new author-info-block folder in your WordPress site’s wp-content/plugins folder. Then add an author-info-block.php file in the folder. It’s within this file that we’ll define our new WordPress plugin with the following code:
wp-content/plugins/author-info-block/author-info-block.php
<?php
/**
 * Plugin Name: Author Info Block for ACF PRO
 * Description: An example ACF PRO Block to display Author Info.
 * Text Domain: demo-author-block-acf
 */
2. Register parent and child ACF Blocks with block.json
We need to register two ACF Blocks:
- Author Info (parent)
- Author Twitter (child)
If you’ve followed our Create Your First ACF Block tutorial, then this should be pretty familiar. However, we’re doing things a bit differently, because we’re organizing our blocks in a custom WordPress plugin for this tutorial instead of a child theme.
To register our blocks, we’ll continue editing author-info-blocks.php, and add the following code right after the header:
wp-content/plugins/author-info-block/author-info-block.php
<?php
/**
 * Register our blocks.
 *
 * @link https://www.advancedcustomfields.com/resources/whats-new-with-acf-blocks-in-acf-6/
 *
 * @return void
 */
function demo_author_block_acf_blocks_register() {
    /**
     * We register our blocks with WordPress's handy
     * register_block_type();
     *
     * @link https://developer.wordpress.org/reference/functions/register_block_type/
     */
    // Author Info (parent) block.
    register_block_type( __DIR__ . '/blocks/author-info' );
    // Author Twitter (child) block.
    register_block_type( __DIR__ . '/blocks/author-twitter' );
}
add_action( 'init', 'demo_author_block_acf_blocks_register', 5 );
The code snippet above is registering two blocks with register_block_type(). See the WordPress docs for more information on the args you can pass with this function.
All WordPress blocks, including ACF Blocks, require a block.json file to register their properties. Each block must have its own block.json file.
First, create a blocks directory in your plugin, and then two more directories nested within it: author-info and author-twitter.
Each of these blocks needs the required block.json file. We’ll also create an empty template.php in each directory, which is where our display logic will go (we’ll get to this later). When you’re done, you should have the following within your plugin’s blocks directory:
author-info-block/blocks/author-info/block.jsonauthor-info-block/blocks/author-info/template.phpauthor-info-block/blocks/author-twitter/block.jsonauthor-info-block/blocks/author-twitter/template.php
Let’s start by populating our Author Info block’s block.json metadata.
blocks/author-info/block.json
{
    "name": "acf/author-info",
    "title": "Author Info (ACF Block)",
    "description": "Display an author's info and picture.",
    "icon": "id",
    "keywords": ["author", "writer"],
    "acf": {
        "mode": "preview",
        "renderTemplate": "template.php"
    },
    "supports": {
        "align": false,
        "anchor": true,
        "mode": false
    }
}
And here is the block.json code for the Author Twitter block.
blocks/author-twitter/block.json
{
    "name": "acf/author-twitter",
    "title": "Author Twitter (ACF Block)",
    "description": "Display an author's Twitter link.",
    "icon": "twitter",
    "keywords": ["author", "twitter"],
    "acf": {
        "renderTemplate": "template.php"
    },
    "supports": {
        "anchor": false,
        "align": false
    },
    "parent": [ "acf/author-info" ]
}
The configuration keys used in ACF Blocks are generally the same as those used in WordPress core blocks, but with the addition of the acf configuration key.
If you’re new to registering WordPress block types with block.json metadata, then be sure to dig in to WordPress Block Editor Handbook’s reference: Metadata in block.json.
Some things of note in the block.json files:
"renderTemplate": "template.php": Found in both files, this is where our template logic will exist for each block. You are free to change the names of your template files as long as that change is reflected in your JSON file as well. We’ll add the code to these template files in a later step."parent": [ "acf/author-info" ]: This is found only in the Author Twitter block, making it available only within the Author Info block. Theparentconfiguration key automatically designates the block as only available when used as a child block of the named parent.
Be sure to save your progress, and then go ahead and activate your custom plugin. Because we’ve already defined our ACF Blocks with block.json in the plugin, activating it will automatically make those blocks available. However, the Author Twitter block will only be available in the block inserter if its parent, the Author Info block, exists. Also, since our template.php files are empty, you’ll see nothing in the block editor. Let’s keep going and fix that.
3. Register ACF field for the author’s Twitter
We want to allow editors to be able to add a custom Twitter username, which will in turn create a link for the author’s Twitter profile. So, we need to register a custom field for this and assign it to our Author Twitter block. There are two ways to go about this. One way is to register everything through ACF’s UI, use “Generate PHP” in the ACF’s Tools menu, and then drop the generated code into your plugin’s author-info-block.php file. Alternatively, you can register the fields via PHP in author-info-block.php.
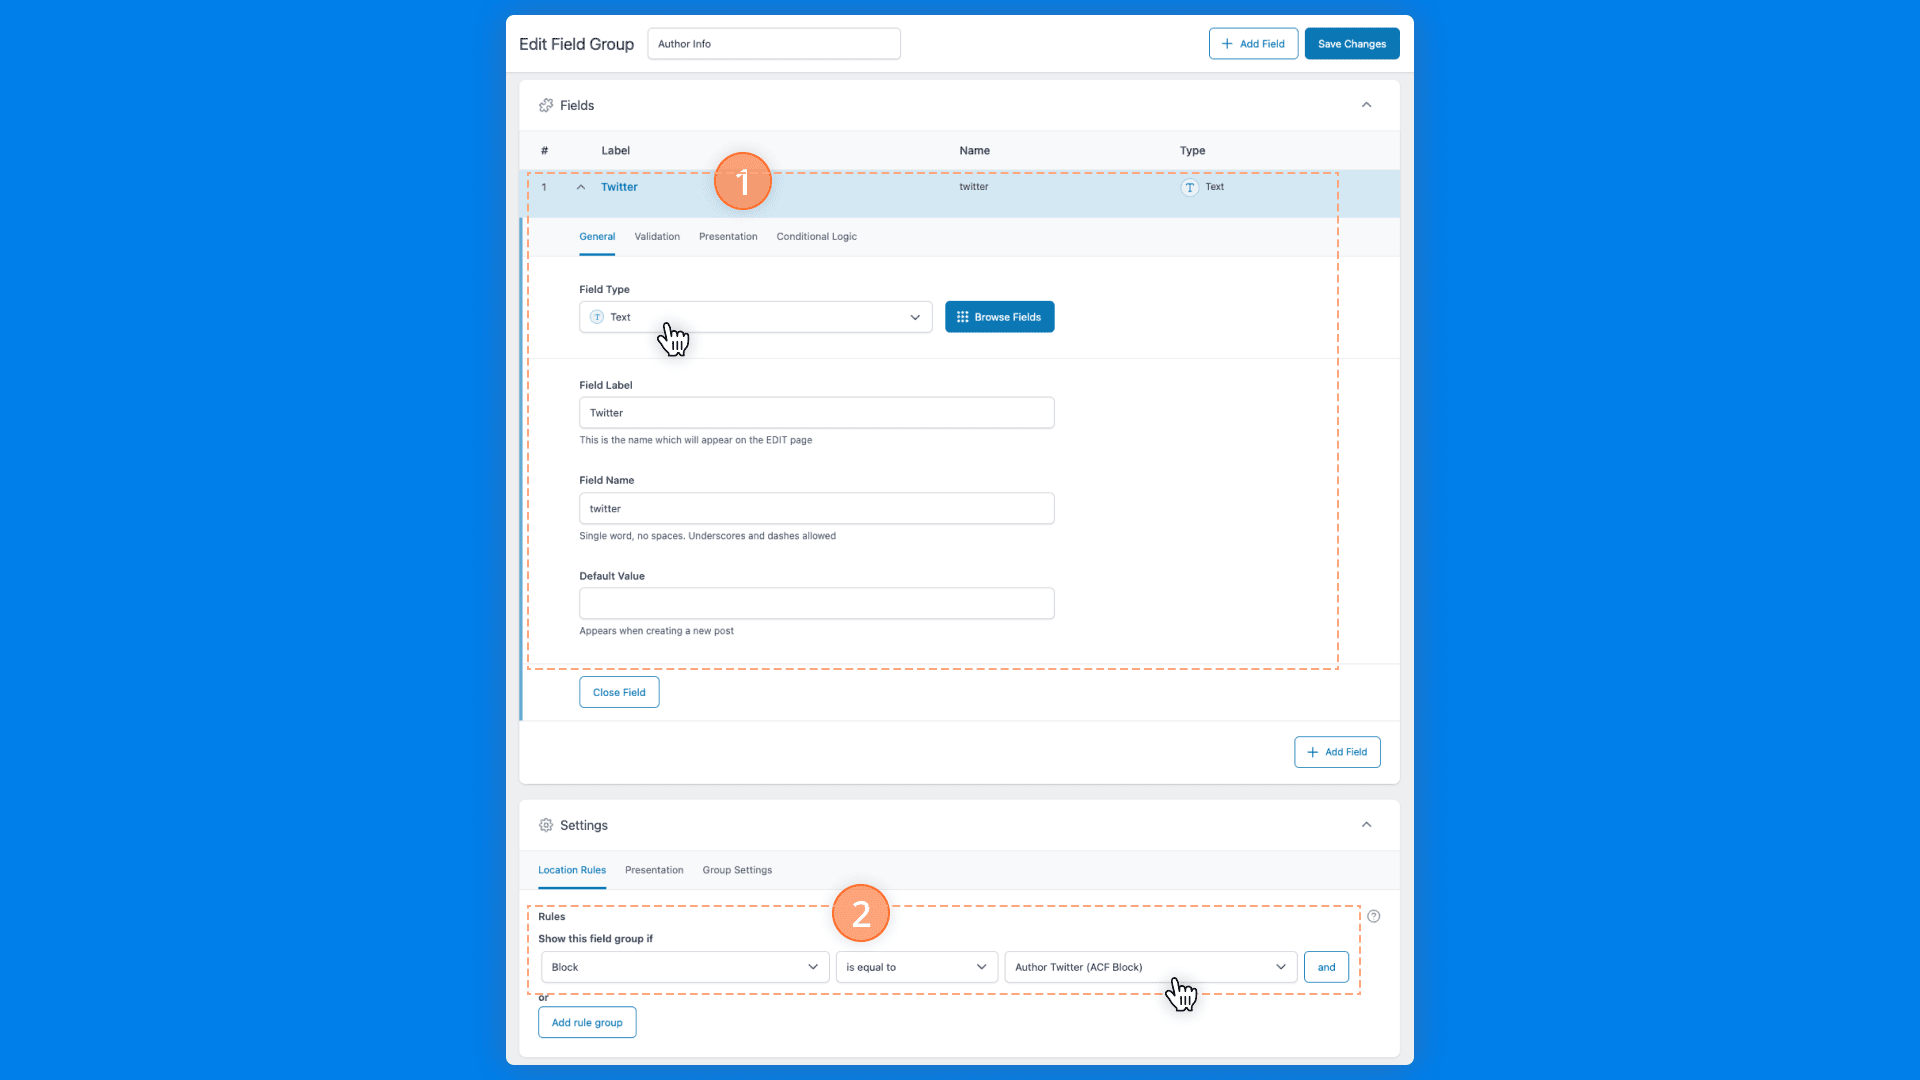
If you’re using ACF’s UI, go ahead and create a new field group for Author Twitter and add a single Text field for Twitter. Be sure to assign it to the Author Twitter block under the “Location Rules” settings.
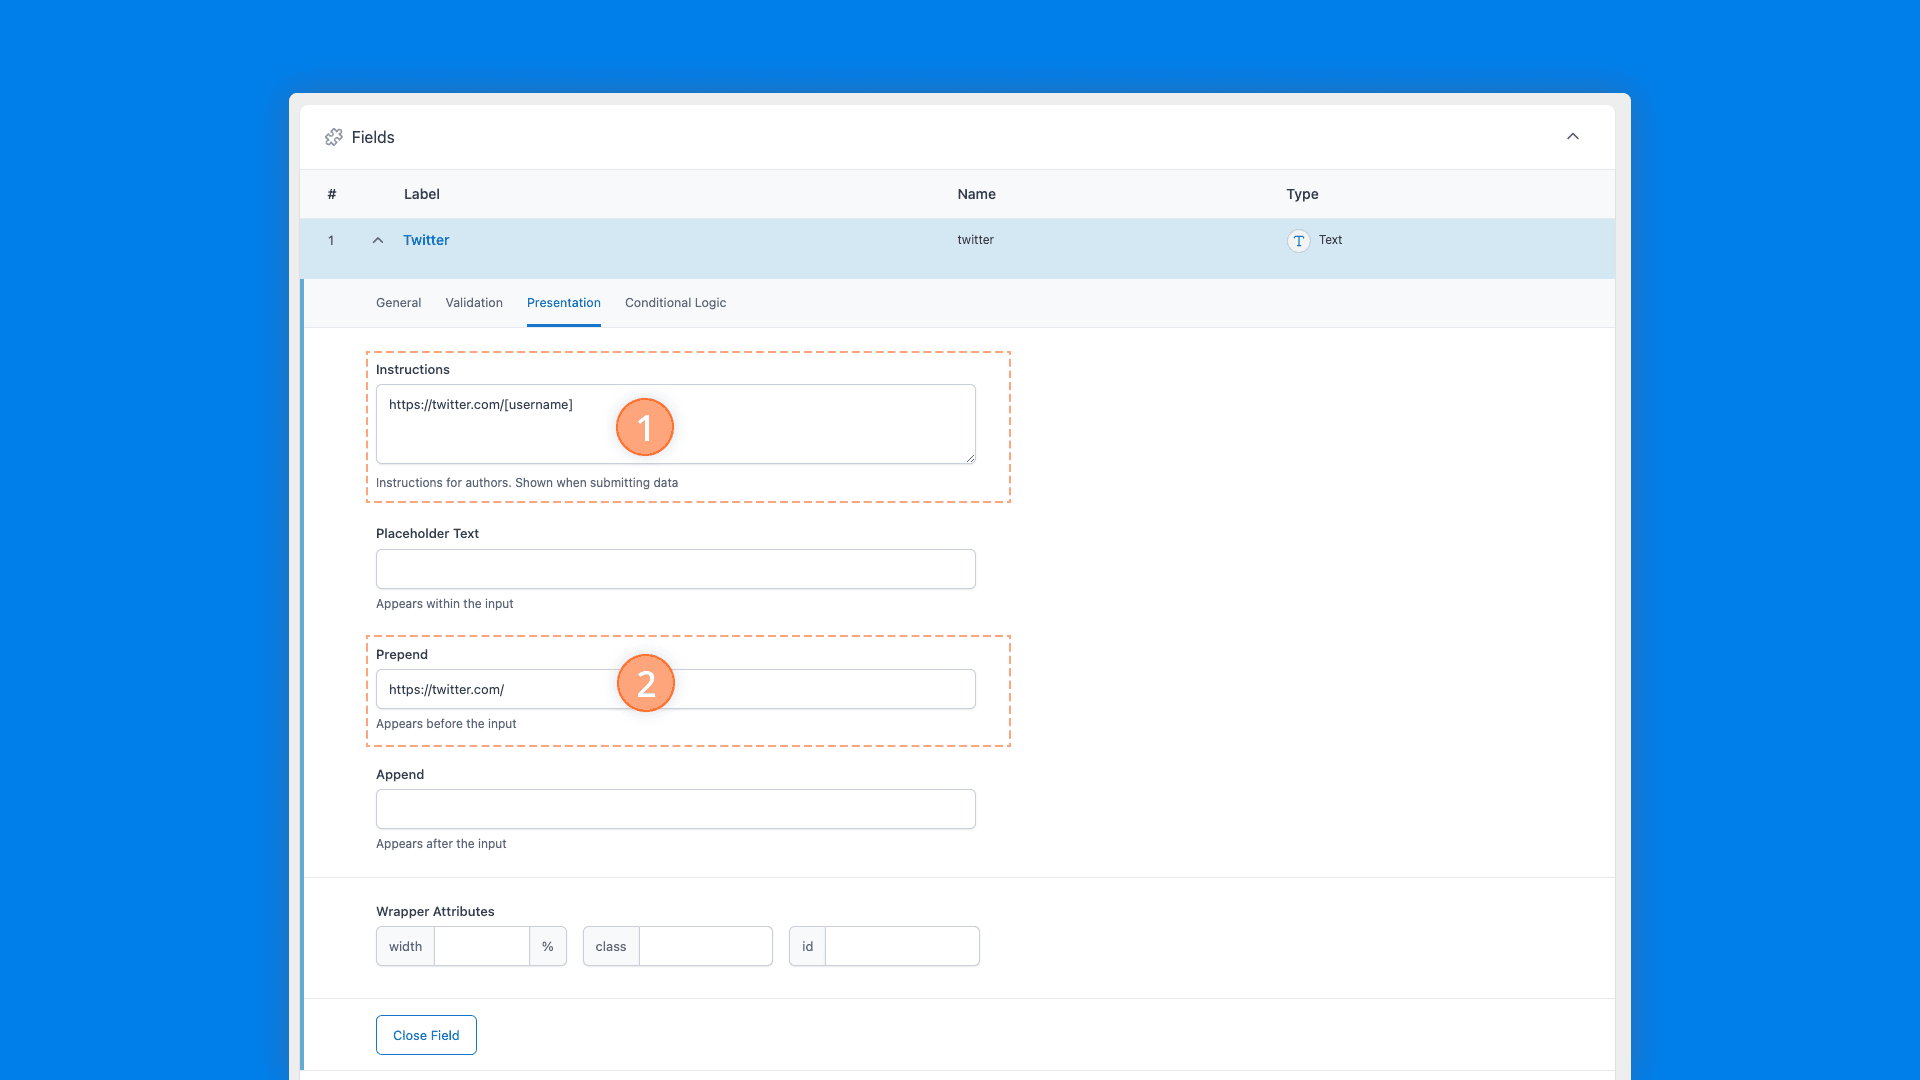
Changing settings on the Twitter field’s Presentation tab can provide an easier editorial experience:
- Presentation > Instructions:
https://twitter.com/[username] - Presentation > Prepend:
https://twitter.com/
We could stop here, because technically our field group is registered and assigned to the block. However, we want to keep our entire custom block plugin portable and distributable between projects. So, we’ll want to co-locate the registration of our newly created Author Twitter field group to reside within our custom plugin. Lucky for us ACF makes this easy too!
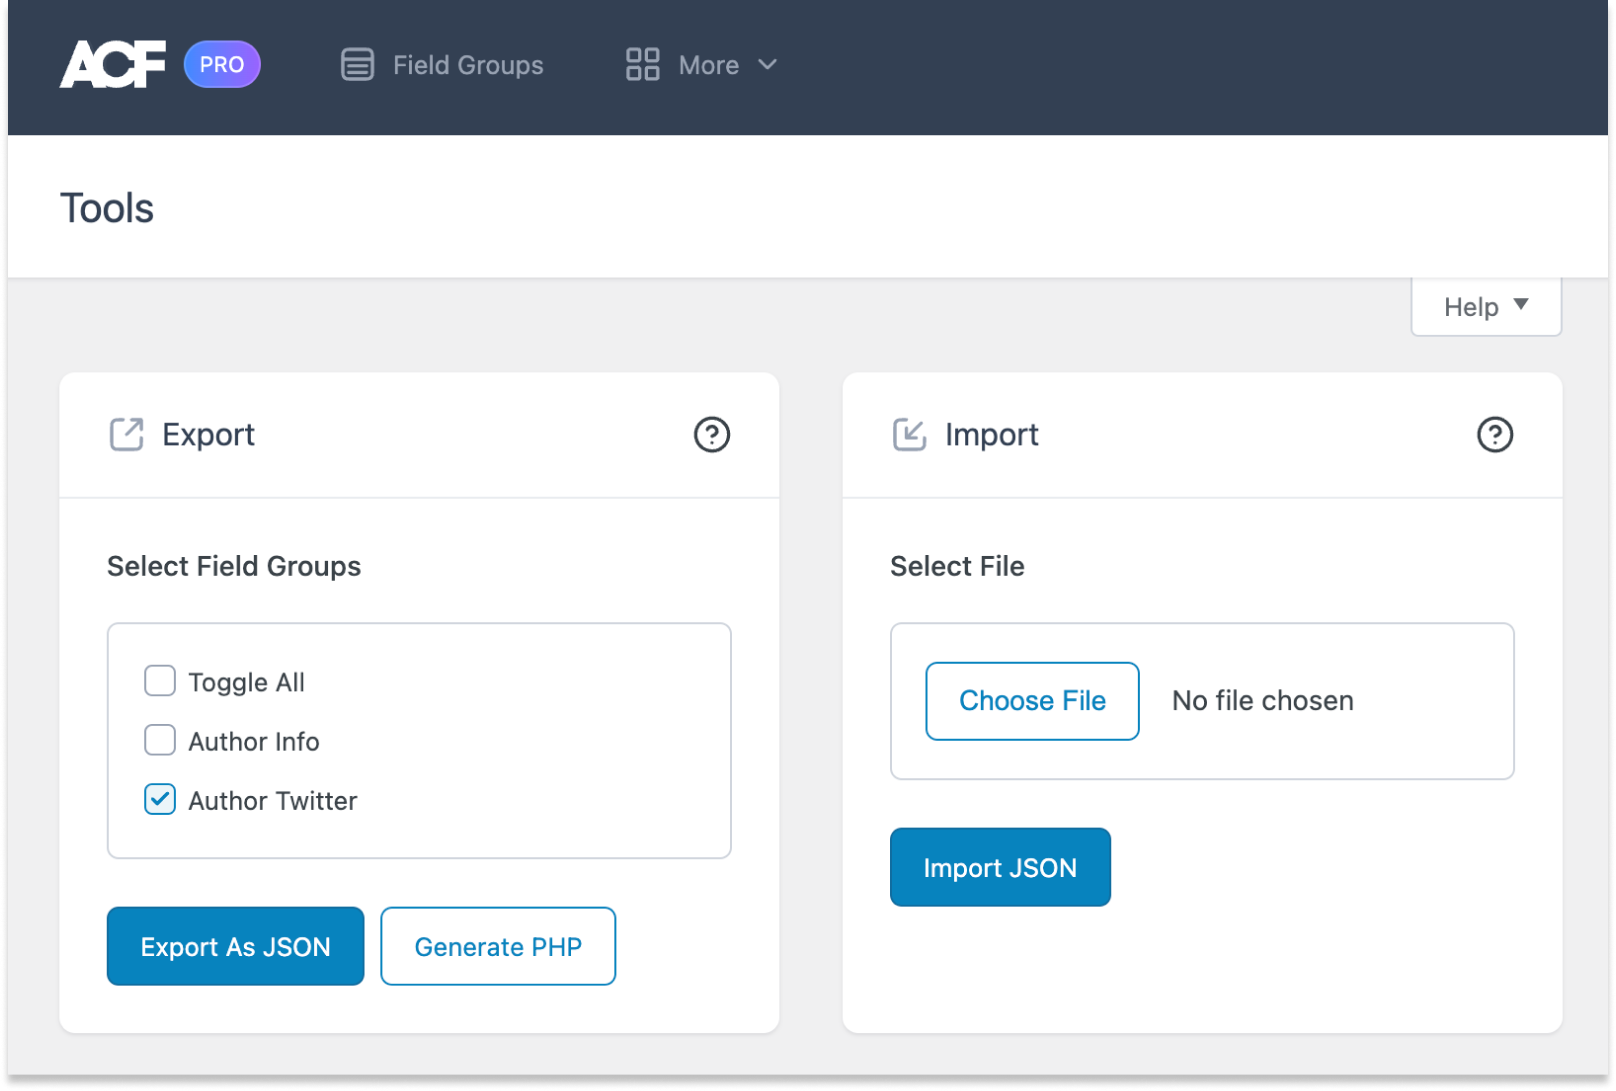
Click on Tools in the ACF menu, then select your Author Twitter field group and click Generate PHP. This will give you the code to drop right into your plugin.
Once you’ve added the generated code to your plugin’s author-info-block.php, you can go ahead and delete the field group that you created in ACF’s UI, because it is now registered with code.
wp-content/plugins/author-info-block/author-info-block.php
<?php
/**
 * Register our Author Twitter field group
 * directly in our PHP for portability.
 *
 * @link https://www.advancedcustomfields.com/resources/register-fields-via-php/
 */
add_action(
    'acf/include_fields',
    function() {
        if ( ! function_exists( 'acf_add_local_field_group' ) ) {
            return;
        }

        acf_add_local_field_group(
            array(
                'key'      => 'group_64e3e09959e8f',
                'title'    => 'Author Twitter',
                'fields'   => array(
                    array(
                        'key'          => 'field_64e3e09a7a544',
                        'label'        => 'Twitter',
                        'name'         => 'twitter',
                        'type'         => 'text',
                        'instructions' => 'https://twitter.com/[username]',
                        'prepend'      => 'https://twitter.com/',
                    ),
                ),
                'location' => array(
                    array(
                        array(
                            'param'    => 'block',
                            'operator' => '==',
                            'value'    => 'acf/author-twitter',
                        ),
                    ),
                ),
            )
        );
    }
);
We’ve gone ahead and streamlined the output above, because not all options are totally necessary. ACF will use defaults for the omitted options. As mentioned previously, it’s entirely possible to skip registering the fields in the UI, and just write the PHP code needed. The Author Info block is controlled by the PHP in author-info-block.php, not the selections made in the admin UI.
4. Create display logic with InnerBlocks and block template
At this point, you have two blocks registered, but there is no display logic for either of them. This is where we utilize InnerBlocks and pass down a block template string to assign and automatically populate the Author Info block upon creation.
First, we’ll set up our display logic for our Author Twitter block, which is outputting the Author Twitter field group we created in the last step.
Open the Author Twitter block’s author-info-block/blocks/author-twitter/template.php and insert the following code.
blocks/author-twitter/template.php
<?php
/**
 * Author Twitter (child) block.
 * This block is only available as a child
 * block within the parent Author Info block.
 */

// Grab our ACF field.
$twitter_handle = get_field( 'twitter' );
?>

<?php if ( empty( $twitter_handle ) ) : ?>
    <p>Please enter a Twitter handle.</p>
<?php else : ?>
    <p>
        <svg height="0.95rem" width="0.95rem" xmlns="http://www.w3.org/2000/svg" fill="none" stroke="currentColor" stroke-linecap="round" stroke-linejoin="round" stroke-width="2" class="icon icon-twitter" viewBox="0 0 24 24"><path d="M22 4s-.7 2.1-2 3.4c1.6 10-9.4 17.3-18 11.6 2.2.1 4.4-.6 6-2C3 15.5.5 9.6 3 5c2.2 2.6 5.6 4.1 9 4-.9-4.2 4-6.6 7-3.8 1.1 0 3-1.2 3-1.2z"/></svg>
        <a href="https://twitter.com/<?php echo esc_html( $twitter_handle ); ?>">
            @<?php echo esc_html( $twitter_handle ); ?>
        </a>
    </p>
<?php endif; ?>
This will check for our Twitter field value and display it if there is one available.
Next, we’ll add the Author Info block’s display logic in the corresponding demo-acf-plugin/blocks/author-info/template.php file.
blocks/author-info/template.php
<?php
/**
 * Author Info block (parent).
 *
 * @param array  $block The block settings and attributes.
 * @param string $content The block inner HTML (empty).
 * @param bool   $is_preview True during backend preview render.
 * @param int    $post_id The post ID the block is rendering content against.
 *                     This is either the post ID currently being displayed inside a query loop,
 *                     or the post ID of the post hosting this block.
 * @param array $context The context provided to the block by the post or its parent block.
 */

// Support custom id values.
$block_id = '';
if ( ! empty( $block['anchor'] ) ) {
    $block_id = esc_attr( $block['anchor'] );
}

// Create class attribute allowing for custom "className".
$class_name = 'demo-author-block-acf';
if ( ! empty( $block['className'] ) ) {
    $class_name .= ' ' . $block['className'];
}

/**
 * A template string of blocks.
 * Need help converting block HTML markup to an array?
 * 👉 https://happyprime.github.io/wphtml-converter/
 *
 * @link https://developer.wordpress.org/block-editor/reference-guides/block-api/block-templates/
 */
$inner_blocks_template = array(
    array(
        'core/columns',
        array(
            'verticalAlignment' => 'center',
            'style'             => array(
                'spacing' => array(
                    'padding' => array(
                        'top'    => 'var:preset|spacing|30',
                        'right'  => 'var:preset|spacing|30',
                        'bottom' => 'var:preset|spacing|30',
                        'left'   => 'var:preset|spacing|30',
                    ),
                ),
            ),
        ),
        array(
            array(
                'core/column',
                array(
                    'verticalAlignment' => 'center',
                    'width'             => '120px',
                ),
                array(
                    array(
                        'core/image',
                        array(
                            'align'           => 'center',
                            'sizeSlug'        => 'thumbnail',
                            'linkDestination' => 'none',
                            'className'       => 'is-style-rounded',
                            'url'             => 'https://i.pravatar.cc/120',
                        ),
                        array(),
                    ),
                ),
            ),
            array(
                'core/column',
                array(
                    'verticalAlignment' => 'center',
                    'width'             => '',
                ),
                array(
                    array(
                        'core/paragraph',
                        array(
                            'fontSize' => 'large',
                            'content'  => 'Taylor Swift',
                        ),
                        array(),
                    ),
                    array(
                        'core/paragraph',
                        array(
                            'style'    => array(
                                'spacing' => array(
                                    'margin' => array(
                                        'bottom' => '0',
                                        'top'    => '0',
                                    ),
                                ),
                            ),
                            'fontSize' => 'small',
                            'content'  => 'Ea qui voluptate irure nulla aliquip nulla anim laborum exercitation eu incididunt.',
                        ),
                        array(),
                    ),
                    array(
                        'acf/author-twitter-v1',
                        array(
                            'name' => 'acf/author-twitter-v1',
                            'data' => array(
                                'twitter' => 'wp_acf',
                            ),
                            'mode' => 'auto',
                        ),
                        array(),
                    ),
                ),
            ),
        ),
    ),
);

?>

<?php if ( ! $is_preview ) { ?>
    <div
        <?php
        echo wp_kses_data(
            get_block_wrapper_attributes(
                array(
                    'id'    => $block_id,
                    'class' => esc_attr( $class_name ),
                )
            )
        );
        ?>
    >
<?php } ?>

    <InnerBlocks
        class="demo-author-block-acf__innerblocks"
        template="<?php echo esc_attr( wp_json_encode( $inner_blocks_template ) ); ?>"
    />

<?php if ( ! $is_preview ) { ?>
    </div>
<?php } ?>
There is a lot going on in the code snippet above. Let’s break it down. The biggest piece of this snippet is the $inner_blocks_template (near the top), a variable we assign to our template property within <InnerBlocks> (near the bottom). The $inner_blocks_template variable consists of an array of blocks and their attributes, with further nested blocks within those. Near the bottom of the long nested array you’ll see that we’re passing our custom acf/author-twitter block with a default twitter field value of wp_acf. This will help pre-populate the field when the Author Info block is added in a new post.
The nesting and proper syntax to get these complex template strings correct can be pretty hard to figure out. The array that defines the $inner_blocks_template has over 30 more arrays nested within it. The first array is core/columns, a WordPress core block that allows us to display multiple columns that each contain blocks. Diving a little deeper into the core/columns array, we see it’s a further array containing style values:
$inner_blocks_template = array(
    array(
        'core/columns',
        array(
            'verticalAlignment' => 'center',
            'style'             => array(
                'spacing' => array(
                    'padding' => array(
                        'top'    => 'var:preset|spacing|30',
                        'right'  => 'var:preset|spacing|30',
                        'bottom' => 'var:preset|spacing|30',
                        'left'   => 'var:preset|spacing|30',
                    ),
                ),
            ),
        ),
This nesting quickly becomes complex, even for relatively simple uses of InnerBlocks. The easiest way to create an array like this is to create the layout and design within the block editor, and then switch to “List View” and click the three dots to the right of your block. Click Copy block to copy the WordPress block HTML to your clipboard. Finally, paste it into a tool like WPHTML Converter to convert the markup into the proper array format.
Below is a video demonstrating the conversion process.
If you’ve been following along, your final, full plugin code should match our version: author-info-block-v1.zip
Wrapping Up
This tutorial illustrates how to create an Author Info block and integrate InnerBlocks with ACF Blocks to create nested blocks with parent/child relationships. However, there is still much more to explore.
In the next tutorial, we’ll show you how to use block and template locking to lock down key blocks in your markup and set editorial conditions. This helps ensure your editors only edit what they need to, setting them up for the best editorial experience.
Supercharge Your Website With Premium Features Using ACF PRO
Speed up your workflow and unlock features to better develop websites using ACF Blocks and Options Pages, with the Flexible Content, Repeater, Clone, Gallery Fields & More.
Related
- ACF Blocks: ACF Blocks: How to Use Block Locking
- ACF Blocks: Extending ACF Blocks With Block Supports
- ACF Blocks: Using Context With ACF Blocks
- ACF Blocks: Create Your First ACF Block
- ACF Blocks: Compiling Multiple ACF Blocks With Scripts
