
Key points:
- WooCommerce custom fields are simple to use but require coding to display and lack flexibility for more complex product data.
- Advanced Custom Fields (ACF®) supports a wider range of field types and allows for frontend data input, making it more versatile for creating interactive product pages.
- ACF integrates with page builders, allowing you to display custom field values without any coding.
Custom fields in WooCommerce let you add specific details – like custom engraving options, personalized sizes, or unique product specifications – directly to product pages.
While WooCommerce’s built-in tool for custom fields works for basic needs, it can be limiting when you want more flexibility or a cleaner layout. For more control, Advanced Custom Fields (ACF®) offers a powerful alternative.
ACF makes it easy to add and display custom data in a way that integrates smoothly with your existing product pages, allowing for a more tailored experience.
We’ll show you how to use custom fields to expand your product page’s functionality, allowing you to create more customized, engaging shopping experiences that match your store’s unique offerings.
Best methods for adding custom fields to WooCommerce
There are two main methods for customizing your WooCommerce product pages with custom fields: using the built-in functionality and using a third-party tool like ACF.
Method 1: Add WooCommerce fields using the built-in tools
WooCommerce lets you add simple custom fields to your products for more personalized data that wouldn’t fit into the predetermined fields.
Unlike product attributes, which categorize products broadly (e.g., size, color), custom fields provide item-specific information.
Here’s how to add one to an existing product:
- From your admin dashboard, go to Products > All Products.
- Find the product you want to add a custom field to and click Edit.
- Expand the Screen Options dropdown at the top right corner of the screen.
- Check the box marked Custom Fields.
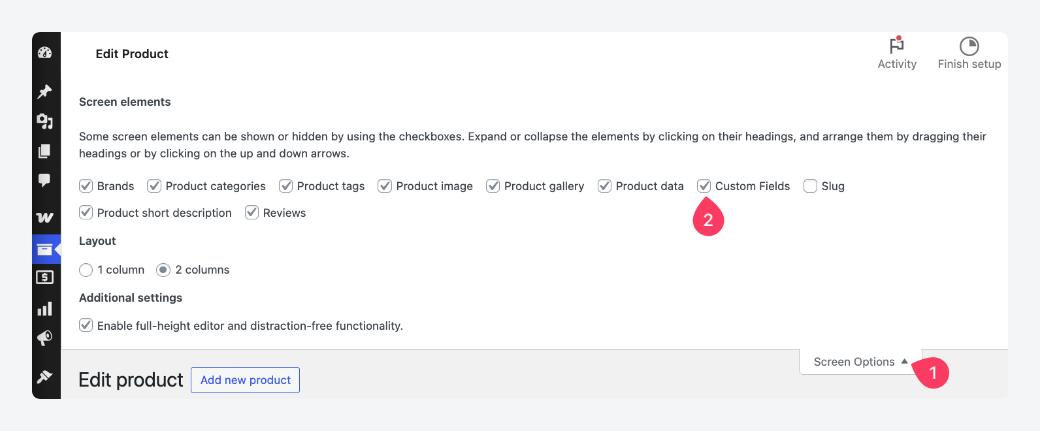
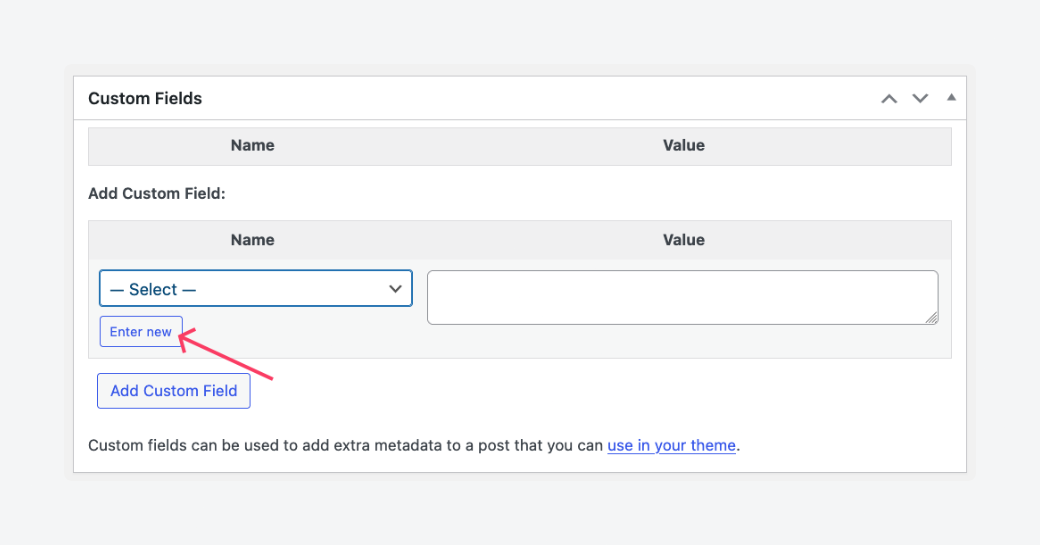
- Scroll down until you reach the newly revealed Custom Fields section and click Enter New to create a new one.
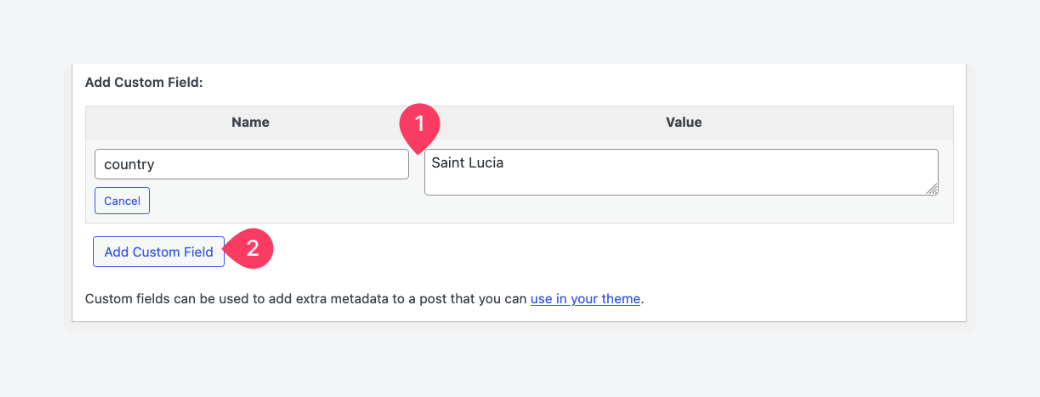
- Enter the field name and value in the Name and Value fields, respectively, then click Add Custom Field. For this walkthrough, we’re going to add a country of origin.
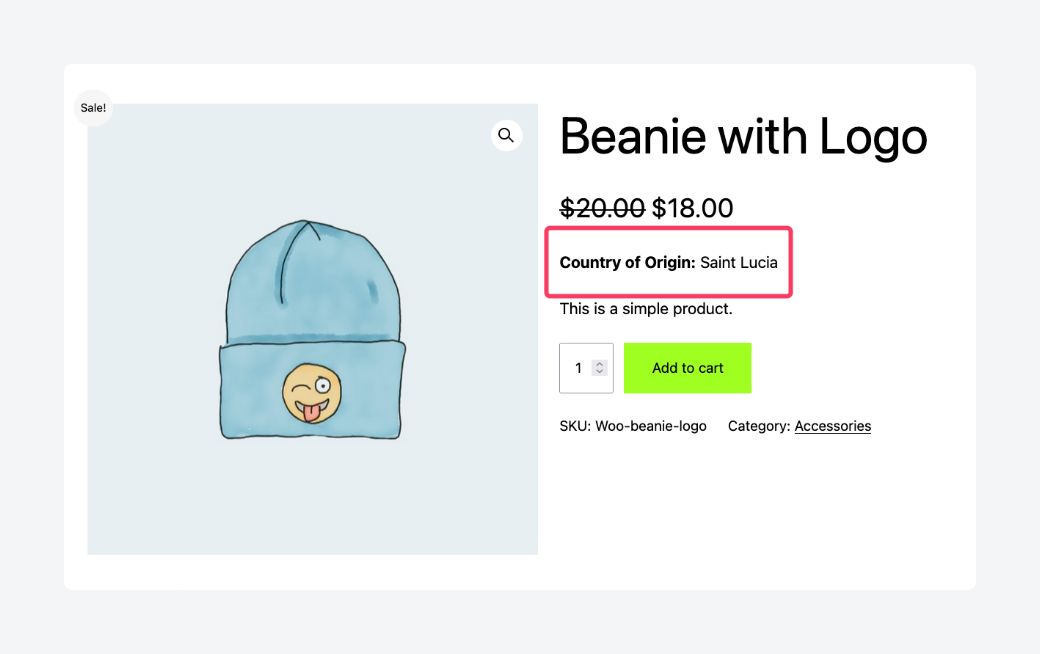
To display this new field value on the frontend, you’ll need to edit your theme files. Here’s a simple snippet to output it after the price:
add_action( 'woocommerce_single_product_summary', 'display_country_of_origin', 25 );

function display_country_of_origin() {
    // Get the 'country' custom field value
    $country = get_post_meta( get_the_ID(), 'country', true );

    if ( ! empty( $country ) ) {
        echo '<p class="product-country-of-origin"><strong>Country of Origin:</strong> ' . esc_html( $country ) . '</p>';
    }
}
And here’s what it looks like on the frontend:
If you’ve been following along closely or tried doing it yourself, you might have noticed a few shortcomings with this method:
- It only works with simple text.
- It requires coding to output on the frontend.
Overall, it’s very barebones and not exactly scalable. Fortunately, ACF fills these gaps and then some, which is why it’s the go-to choice for millions of WordPress site admins. Let’s check it out.
Method 2: Add custom WooCommerce fields using plugins
ACF goes one step further in enhancing content management by allowing you to easily add and display custom fields, including text, images, and videos.
Unlike WooCommerce’s built-in custom fields, ACF allows both backend and frontend input, meaning customers can also provide data directly on product pages.
It also integrates with page builders, like Elementor and Divi, allowing you to output custom fields and their data without coding if that’s how you prefer to work.
If you’re after maximum control and would rather use code, ACF doesn’t take that from you: its the_field() function outputs custom field data on the frontend, while get_field() retrieves custom field data.
Let’s go over how to output data on your shop and how to collect input from your customers using ACF and WooCommerce.
How to add ACF fields to WooCommerce
WooCommerce’s built-in custom field tool only supports text, but ACF opens the door to so much more. Here’s how to use it to add a self-hosted video to your product pages:
- First, create a custom field group from your dashboard by going to ACF > Field Groups > Add New.
- Give the field group a name, then add a File field type so you can select a file directly from your media library or upload from your device. Be very keen on what Name you assign to the field, as this is what you’ll use to access its data later.
- Scroll down to the Settings section and, under Location Rules, set it to show the field group if Post is equal to Product. This connects the field directly to WooCommerce products. Here’s what the field group should look like:
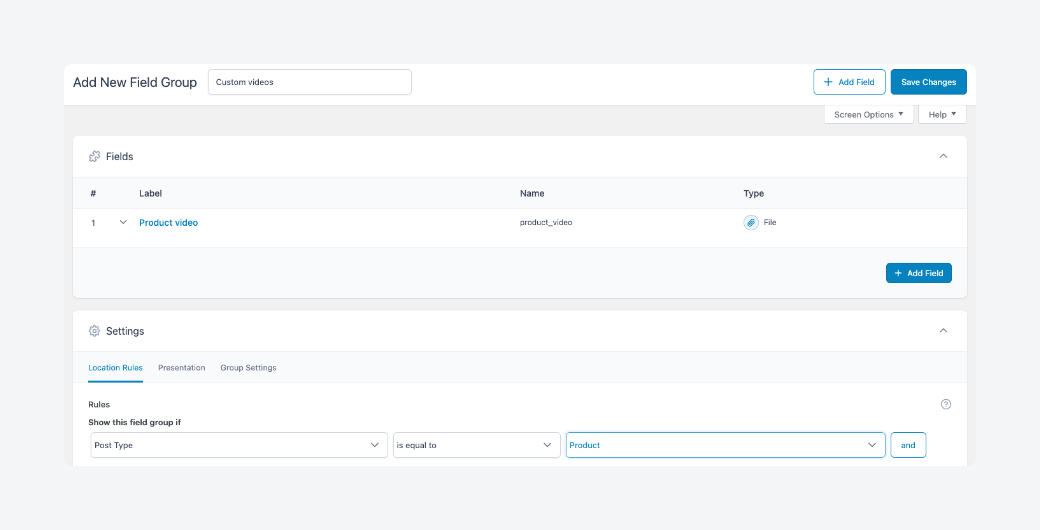
- Save the changes.
The next part of the process is uploading the video for a new or existing product:
- Go to Products > Add New to add a new product or Products > All Products and edit an existing product.
- Scroll down to the new custom field group section, which should appear right below the editor.
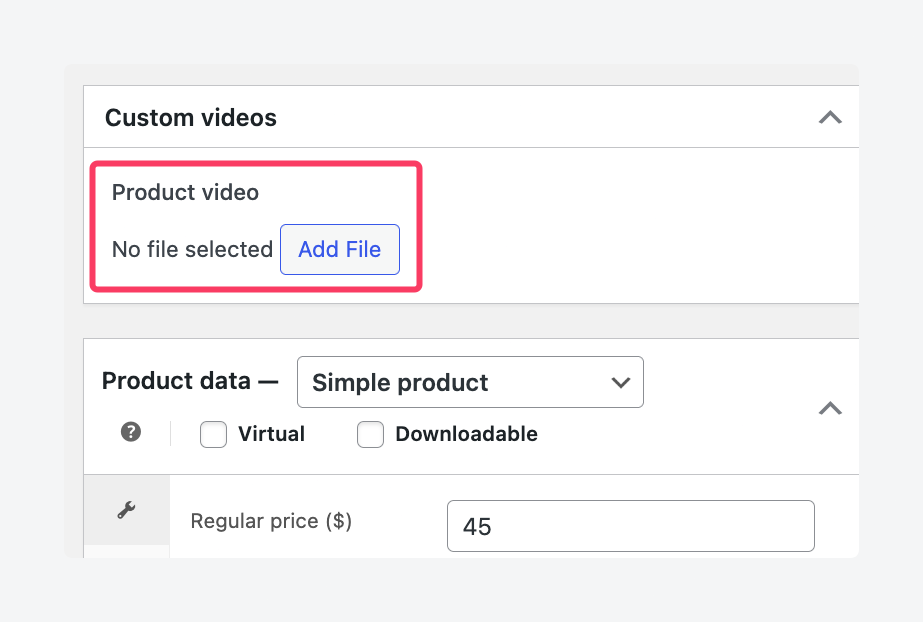
- Upload the file or choose one from your library.
- Save your changes by publishing or updating the product.
Finally, you’ll need to output the file on the product page. Previously, you needed to edit your theme files, but with ACF, you can also use a page builder and avoid code entirely. Whatever your preferred method, you’ll need to access the video via its custom field name. Here’s what it should look like:

Impressive, right? And that’s just the free version of ACF. There’s so much more you can do with ACF PRO. For example, you could:
- Use a repeater field to create a structured list of items – like a “What’s in the box” section – where each row includes fields like item name, quantity, and image.
- Use a flexible content field to build modular product pages with blocks like banners, FAQs, and spec tables that editors can add, remove, or reorder.
- Use a gallery field to create variation-specific galleries (e.g., different image sets for each color) and display the correct one when a variation is selected. WooCommerce only allows for one static gallery per product.
- Use a clone field to reuse a shared “Tech Specs” field group across multiple product types. You edit the fields once, and changes apply everywhere they’re cloned.
Supercharge Your Website With Premium Features Using ACF PRO
Speed up your workflow and unlock features to better develop websites using ACF Blocks and Options Pages, with the Flexible Content, Repeater, Clone, Gallery Fields & More.
How to collect user input on WooCommerce with ACF
Let’s kick things up a notch: How do you add a custom field to your WooCommerce product page where users can input data as additional information for their orders?
With ACF, it’s very straightforward with a well-placed custom field and a little bit of code:
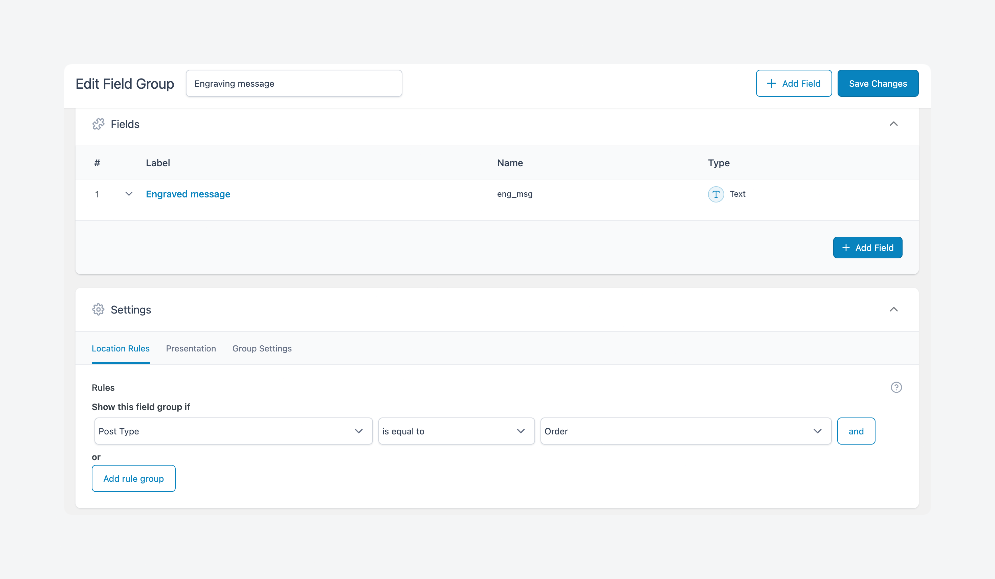
- Create a custom field using ACF and set its location rules to show if Post Type is equal to Order. For this walkthrough, we’ll use a field where customers can enter a name or message they want to have engraved on a keychain.
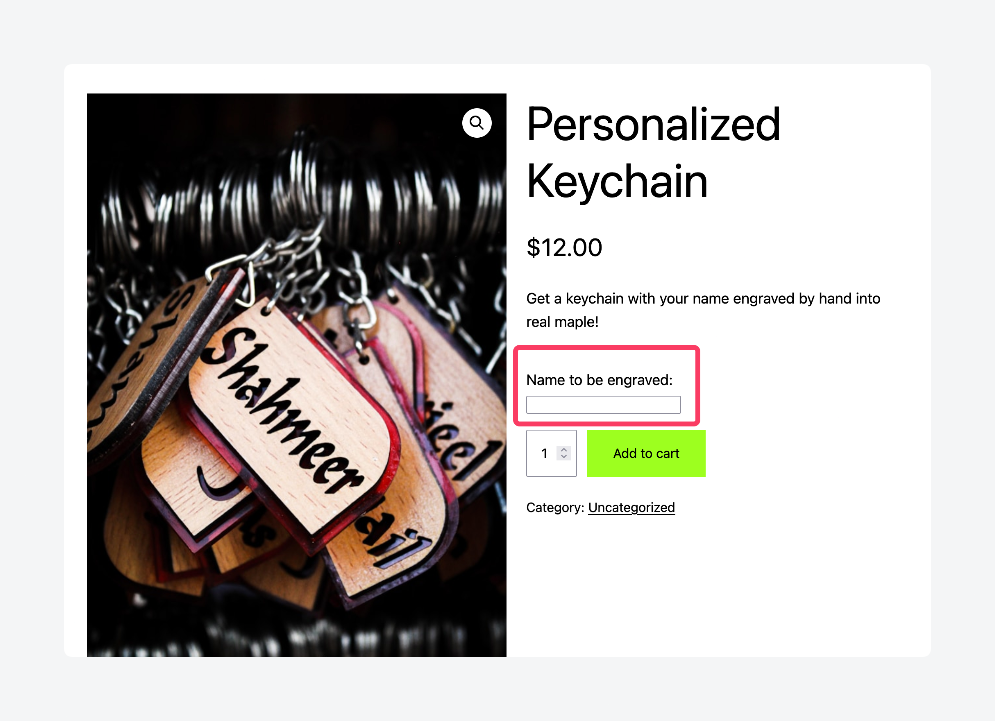
- Next, build your code. Start by adding a custom text field to the WooCommerce product page:
add_action('woocommerce_before_add_to_cart_button', 'add_custom_text_field');
function add_custom_text_field() {
    echo '<p><label>Name to be engraved:</label><br><input type="text" name="custom_text_field" /></p>';
}
- Take the customer’s input and carry it over to the cart so they can see it before they check out:
add_filter('woocommerce_add_cart_item_data', 'add_custom_text_to_cart', 10, 3);
function add_custom_text_to_cart($cart_item_data, $product_id, $variation_id) {
    if (!empty($_POST['custom_text_field'])) {
        $cart_item_data['custom_text'] = sanitize_text_field($_POST['custom_text_field']);
    }
    return $cart_item_data;
}- Save the data to the ACF field when the customer places an order:
add_action('woocommerce_new_order', 'save_to_acf_field');
function save_to_acf_field($order_id) {
    $order = wc_get_order($order_id);
    foreach ($order->get_items() as $item) {
        $product_id = $item->get_product_id();
        $cart_item_key = array_search($item, $order->get_items());

        // Get custom text from cart item data stored in order
        $cart_item_data = $item->get_meta('_cart_item_data');
        if ($cart_item_data && isset($cart_item_data['custom_text'])) {
            update_field('eng_msg', $cart_item_data['custom_text'], $order_id);
        }
    }
}- Finally, store the input in the order meta so you can see it on the backend:
add_action('woocommerce_checkout_create_order_line_item', 'store_cart_data_in_order', 10, 4);
function store_cart_data_in_order($item, $cart_item_key, $values, $order) {
    if (isset($values['custom_text'])) {
        $item->add_meta_data('_cart_item_data', $values);
    }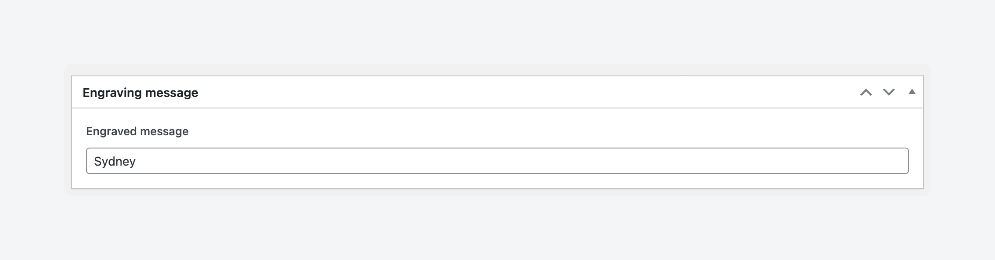
}- Place a new order via your store and enter a name – we’re going to do “Sydney” – and check out.
- From the admin dashboard, go to WooCommerce > Orders and click on the one you just created.
- Scroll down until you see your input already filled in as the custom field data.
Take your WooCommerce store to the next level with ACF PRO
Adding custom fields to your WooCommerce products can significantly enhance the shopping experience by allowing you to display unique, detailed product information.
While WooCommerce’s built-in custom fields are sufficient for basic needs, they come with limitations in flexibility, interactivity, and ease of use.
ACF offers a more powerful alternative that expands your ability to manage custom data, simplifies frontend display, and improves customer interaction with a variety of field types, as well as native integration with page builders.
Both methods can help you create a more personalized and dynamic online store. If you’re looking for a more complete and scalable solution, though, ACF is the way to go, allowing for endless customization without the need for complex coding.
Transform your product pages into personalized, dynamic showcases with ACF PRO. Check it out today!


For plugin support, please contact our support team directly, as comments aren't actively monitored.