
Key points:
- Decide if a plugin is truly needed, or if alternatives like ACF Blocks can deliver the same functionality more simply.
- Build your plugin step by step, from basic structure to enqueuing assets, adding admin options, and handling dynamic data.
- Distribute it properly by packaging, documenting, following security/versioning best practices, and sharing via the WordPress plugin directory or your own site.
When you need to extend a WordPress site, creating a custom plugin is often the safest and most flexible option. Unlike editing your theme’s functions.php, a plugin keeps your code separate, reducing the risk of breaking your site and ensuring your customizations survive theme updates or changes.
Plugins also give you full control – turn them on or off as needed – and can even be shared with others who face the same challenges.
We’ll help you decide whether building a plugin is the right solution, explore practical alternatives, and then walk through the process of creating one. You’ll see how to approach plugin development in a structured way that makes your WordPress site easier to maintain and extend.
Is a custom plugin the right choice for you?
Custom plugins are great for offering control and keeping your customizations safe from theme updates. They’re especially useful when you want functionality that can be toggled on and off or when you plan to distribute your solution.
However, they aren’t always the best choice, particularly if the task can be solved more simply. Sometimes, building a plugin can be overkill or require more technical knowledge than necessary.
For instance, a common use case for custom plugins is adding dynamic or reactive content to the frontend, often relying on React on the frontend and PHP on the backend. While this offers flexibility, it also requires expertise in both PHP and React, with the latter demanding a significant amount of setup and integration within WordPress.
A smarter, more practical alternative here involves using ACF Blocks from Advanced Custom Fields (ACF®). ACF Blocks allow you to create dynamic, reactive content using just PHP, all accessible through the Gutenberg editor.
For example, you can configure queries directly in block fields – selecting post types, categories, or sorting orders – while PHP handles the backend logic and markup. This approach gives you a lightweight solution that’s both easy to maintain and extend.
Other use cases for ACF Blocks include powering reusable sections, like FAQ sections, where PHP handles everything from storing questions and answers in repeater fields to automatically outputting semantic HTML and JSON-LD for SEO.
Here’s a handy table to help you decide whether or not a custom plugin is the right path:
| A custom plugin makes sense when | A custom plugin doesn’t make sense when |
|---|---|
| You need functionality that no existing tool or plugin provides | A reliable plugin or built-in WordPress feature already solves it |
| You want features that stay safe through theme changes and updates | A quick tweak is all that’s needed |
| You need control – the ability to switch features on/off easily | It’s just a one-time change you won’t revisit |
| You plan to share or distribute your solution with others | The feature is only for your own site and won’t be reused |
| Your project requires dynamic or complex behavior | Simpler methods (like custom fields, blocks, or settings) can handle it |
| You can commit to maintaining and updating it | You don’t have time to support, patch, or secure it long-term |
Build your first working plugin
If you’ve found that a custom plugin is the best way to solve your problem, here’s where you learn how to build one from scratch.
We’ll start with basic functionality and move on to advanced features like accessing files and creating an admin dashboard entry.
💡 For best results, we recommend using LocalWP as your local WordPress development tool. It provides a safe testing environment and lets you access your setup directly through your IDE, streamlining the development and debugging process.
Create the plugin’s basic structure and functionality
The first step involves setting up the core files and folders, then adding the basic functionality to make your plugin work.
We’re going to create a simple plugin that changes the background color of the homepage to a predefined value.
In wp-content/plugins, create a new folder with your plugin name. Inside this folder, add a .php file, ideally with the same name as the folder.
Open the .php file and add a header that contains your plugin’s details, including its name, version, and author.
Here’s a guide to help you build the perfect header:
| Field | Inclusion | Description | Example |
|---|---|---|---|
| Plugin name | Mandatory | The only truly required field. Without this, WordPress won’t recognize your file as a plugin. | Plugin Name: My Custom Plugin |
| Description | Should Include | Brief explanation of what your plugin does. Shows up in the admin area. | Description: Does bespoke things for your WordPress site. |
| Version | Recommended | Critical for updates and compatibility tracking. | Version: 1.0.0 |
| Author | Recommended | Your name or organization. Builds credibility and allows users to find your other work. | Author: Your Name |
| Plugin URI | Optional | Link to your plugin’s homepage or repository | Plugin URI: https://example.com/my-plugin |
| Author URI | Optional | Your website or profile | Author URI: https://yourwebsite.com |
| Text domain | Optional | For internationalization (should match your plugin folder name) | Text Domain: my-custom-plugin |
| Domain path | Optional | Where translation files are stored | Domain Path: /languages |
| Requires at least | Optional | Minimum WordPress version | Requires at least: 5.0 |
| Tested up to | Optional | Latest WordPress version you’ve tested | Tested up to: 6.3 |
| Requires PHP | Optional | Minimum PHP version | Requires PHP: 7.4 |
| License | Optional | Legal stuff (GPL v2+ is standard for WordPress) | License: GPL v2 or later |
| Network | Optional | Set to true if it’s a multisite plugin | Network: false |
And here’s the header we’re using for the custom plugin we’re building:
<?php
/**
 * Plugin Name: Homepage Background Color Changer
 * Description: A simple plugin that changes the background color of the homepage.
 * Version: 1.0
 * Author: ACF Content Team
 * License: GPL2
 */
⚠️ Keep the header comment at the very top of your main plugin file – WordPress only reads the first 8 kilobytes when scanning for plugin headers.
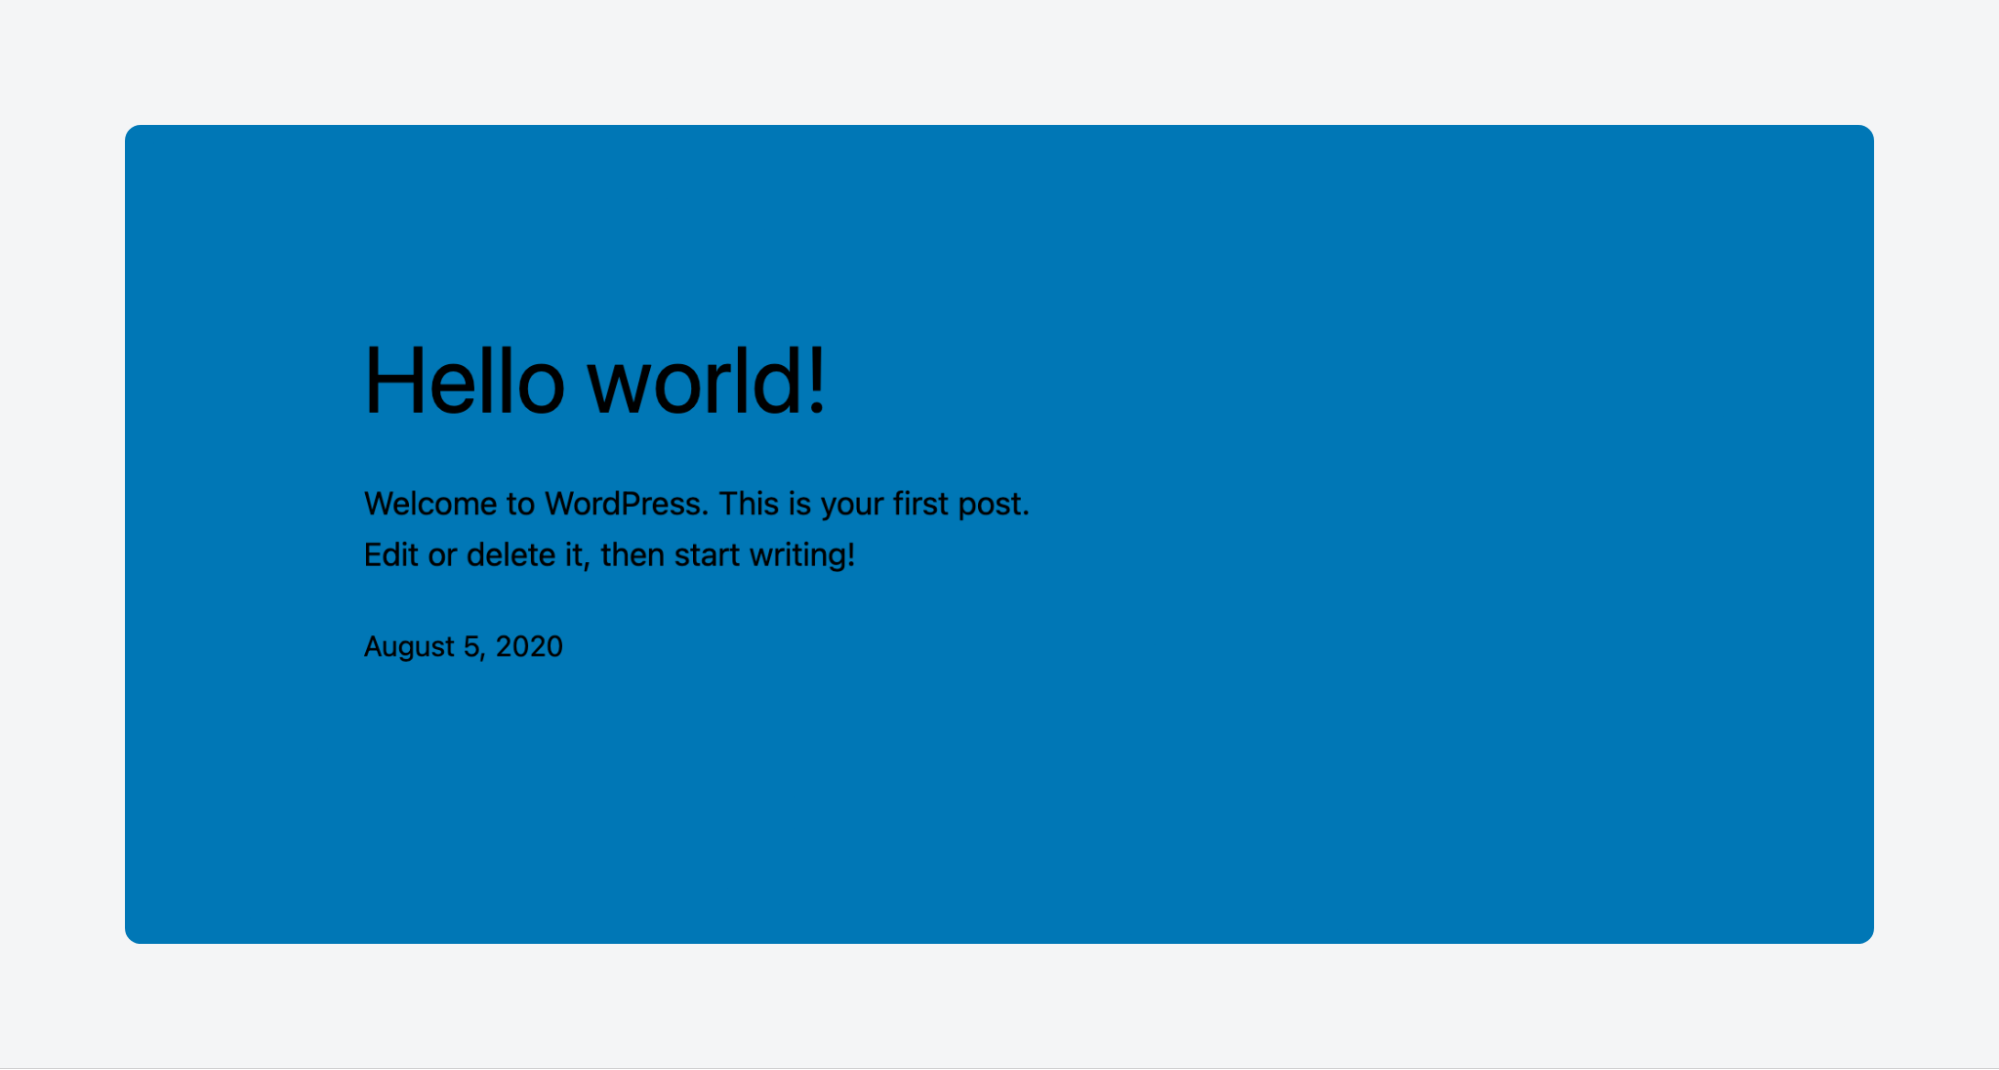
Finally, add the functionality for changing the homepage color to a predefined value:
// Hook into the 'wp_head' action to inject custom styles
function hbcc_change_homepage_background() {
    // Check if we're on the homepage
    if ( is_front_page() ) {
        echo '<style>body { background-color: #0077b6; }</style>';
    }
}
add_action( 'wp_head', 'hbcc_change_homepage_background' );
Save the changes to the .php file, then verify that the plugin is available from your admin dashboard via Plugins > Installed Plugins.

Activate it, then load up your homepage and here’s what you should see:
Enqueue external scripts and styles
Adding functionality to the .php file is just the beginning. The next step in mastering custom WordPress plugins is learning how to enqueue external files.
Enqueuing external styles
If all the changes you need to make are purely stylistic/visual – colors, font sizes, spacing, animations, etc. – you can place them into a CSS stylesheet that you reference within the main PHP file:
- Deactivate the plugin in the admin dashboard.
- Create a CSS file in your plugin folder and give it a clear name like style.css.
- Add your styles to the file. For this walkthrough, we’ll make it an animation that changes the color between predefined values:
@keyframes backgroundColorChange {
    0% {
        background-color: #57cc99;
    }
    50% {
        background-color: #9d4edd;
    }
    100% {
        background-color: #57cc99;
    }
}

body {
    animation: backgroundColorChange 3s infinite;
}- Update your PHP file so it enforces the custom stylesheet on the homepage:
function hbcc_enqueue_styles() {
    // Check if we're on the homepage
    if ( is_front_page() ) {
        wp_enqueue_style( 'homepage-background-animation', plugin_dir_url( __FILE__ ) . 'style.css' );
    }
}
add_action( 'wp_enqueue_scripts', 'hbcc_enqueue_styles' );- Save your changes, activate the plugin, and load up your homepage.

Enqueuing external scripts
Enqueuing an external JavaScript file adds interactivity to your plugin by enabling it to respond to user input and focus events.
Here’s how to make the plugin cycle between predefined homepage background colors when a user clicks:
- Deactivate your plugin.
- In the plugin’s root folder, add a JS file – we’ll call ours script.js – with the logic for the interactivity:
document.addEventListener('DOMContentLoaded', function () {
    const colors = ["#820263", "#d90368", "#eadeda", "#2e294e", "#ffd400"];
    let currentColorIndex = 0;

    // Function to change background color
    function changeBackgroundColor() {
        currentColorIndex = (currentColorIndex + 1) % colors.length;
        document.body.style.backgroundColor = colors[currentColorIndex];
    }

    // Attach click event to body
    document.body.addEventListener('click', changeBackgroundColor);
});- Update your PHP file to locate and execute the JS file on the homepage:
function hbcc_enqueue_scripts() {
    // Check if we're on the homepage
    if ( is_front_page() ) {
        wp_enqueue_script( 'homepage-background-color-click', plugin_dir_url( __FILE__ ) . 'script.js', array(), '1.0', true );
    }
}
add_action( 'wp_enqueue_scripts', 'hbcc_enqueue_scripts' );- Save your changes, load up your homepage, and click away:
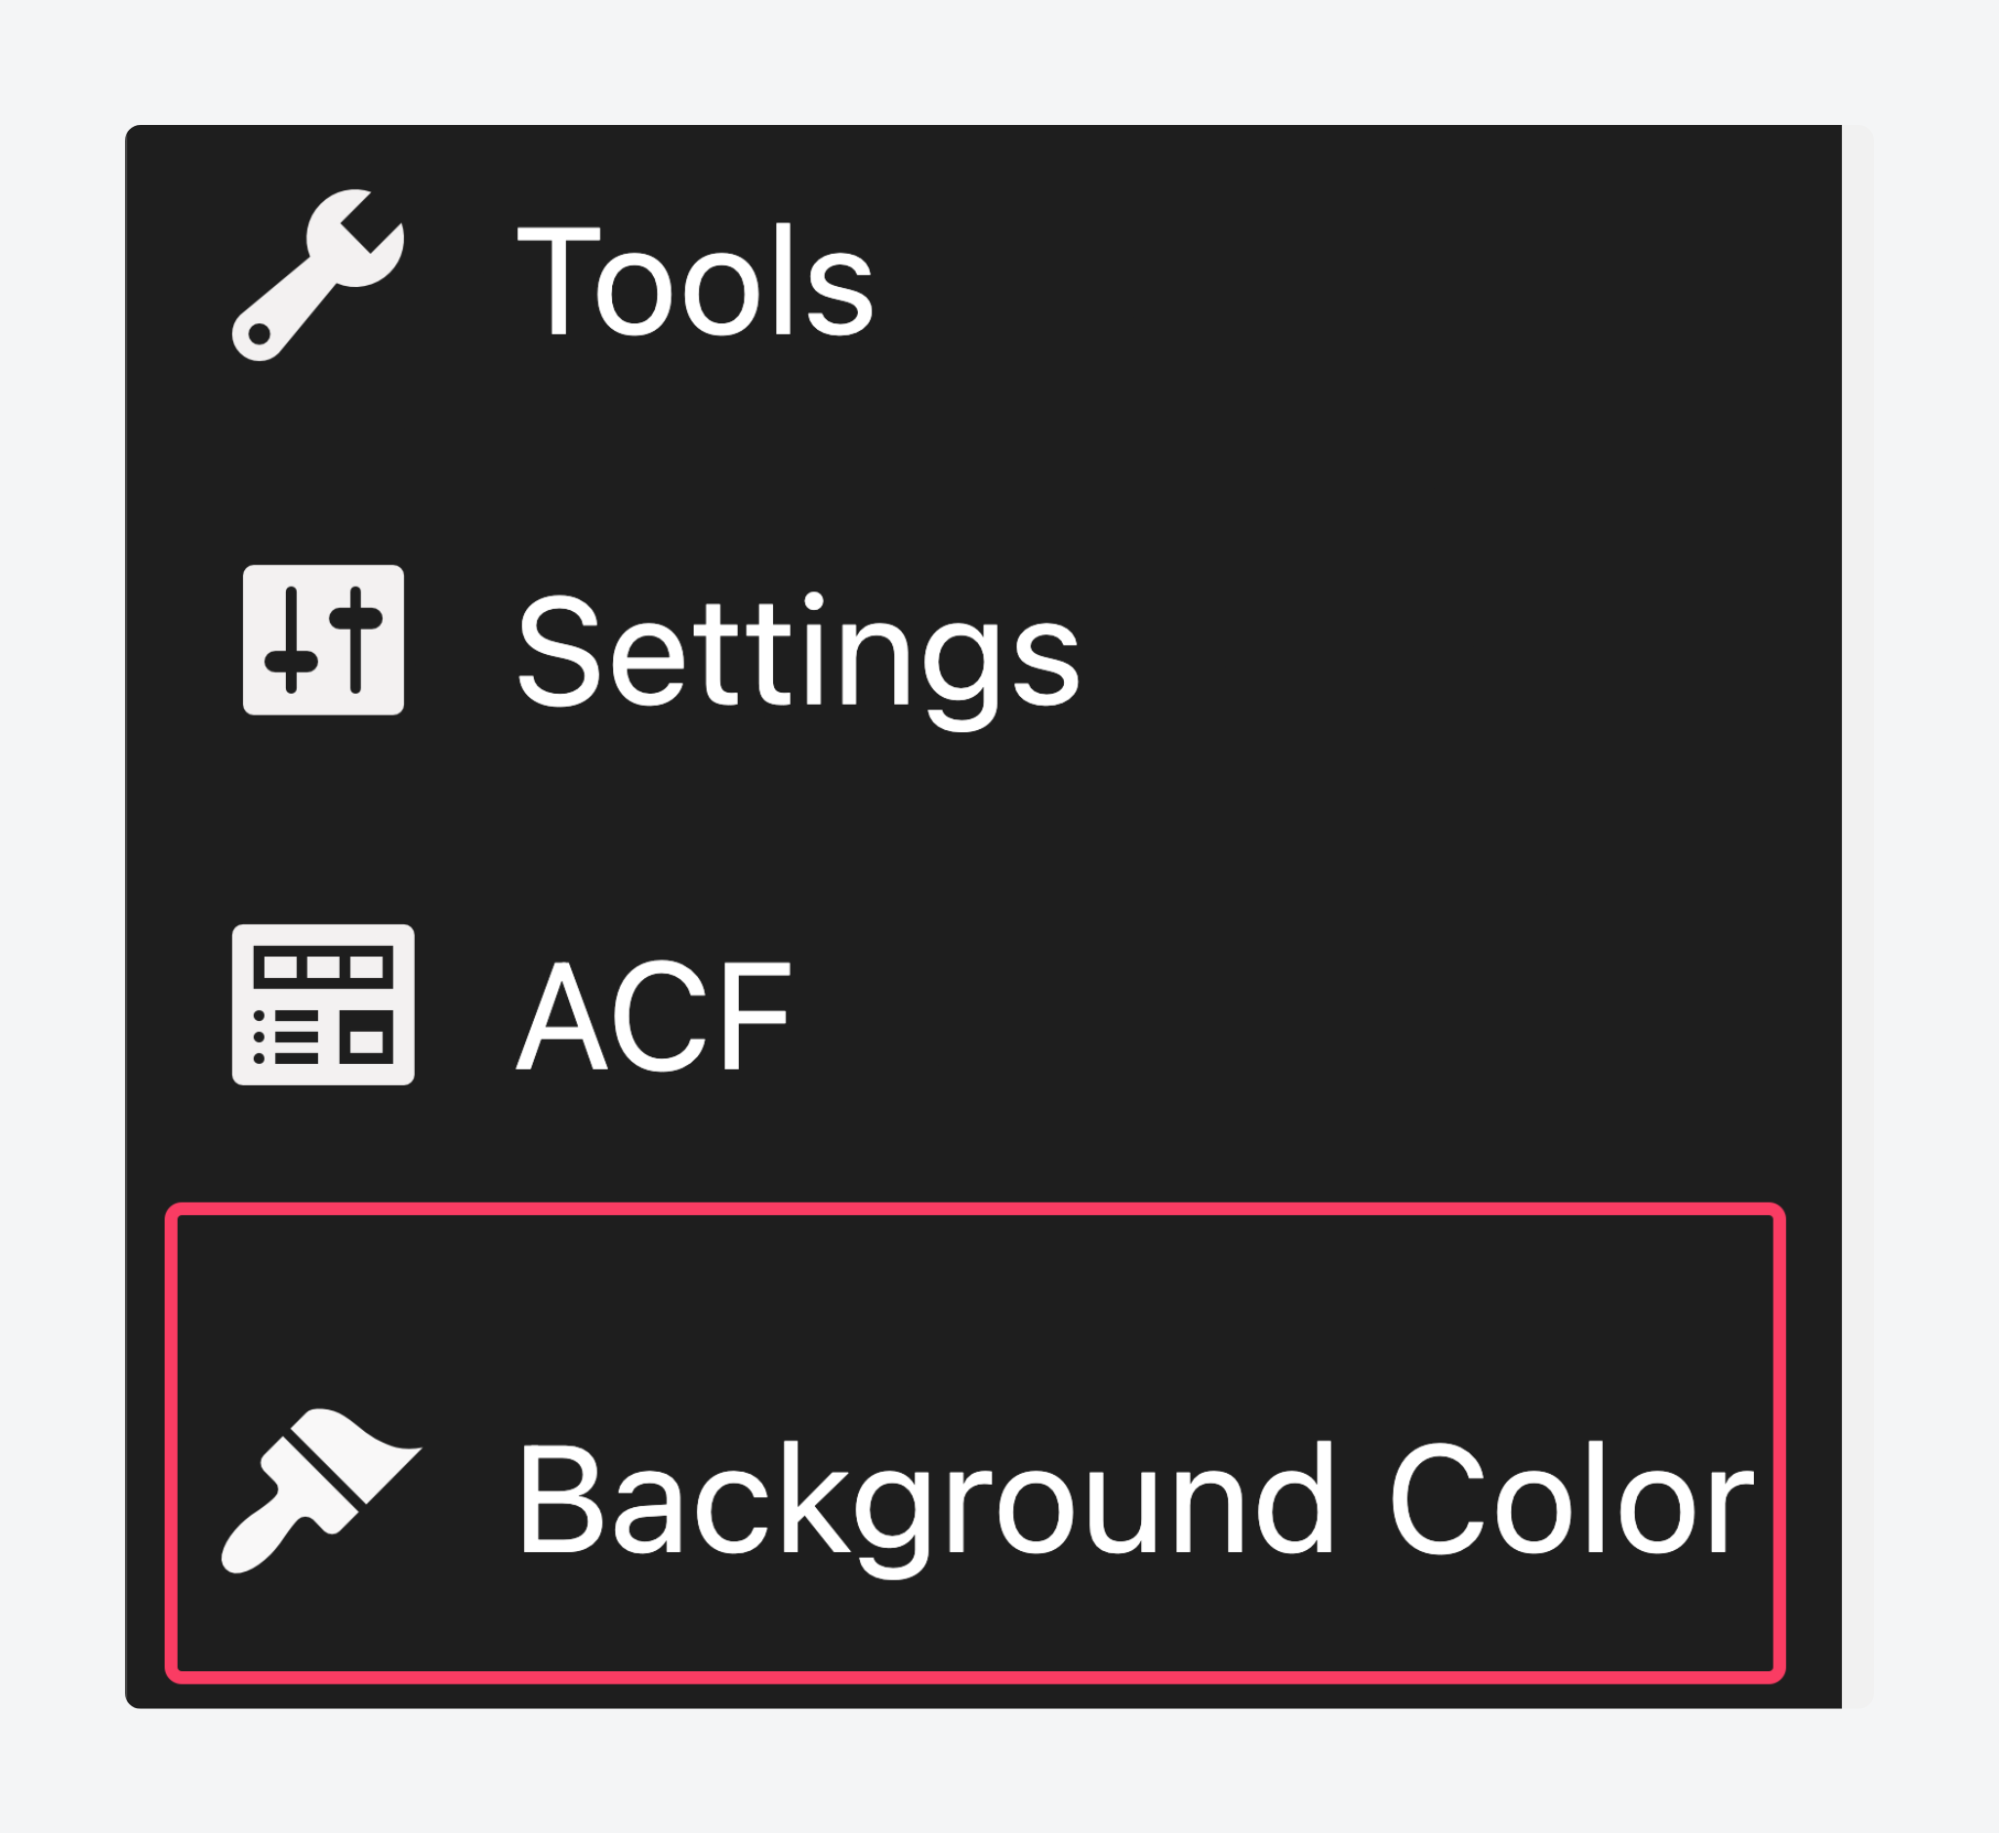
Add an admin dashboard menu for advanced controls and options
For even more control, let’s create an admin menu to allow users to manage and configure your plugin’s settings.
In this case, we’ll let users pick the homepage background color from a list of predefined values. Here’s what you need in your PHP file after the header:
- Add a new menu item in the admin dashboard:
function hbc_selector_menu() {
    add_menu_page(
        'Background Color Selector',  // Page title
        'Background Color',           // Menu title
        'manage_options',             // Capability
        'background_color_selector',  // Menu slug
        'hbc_selector_page',          // Function to display the settings page
        'dashicons-admin-appearance'  // Icon
    );
}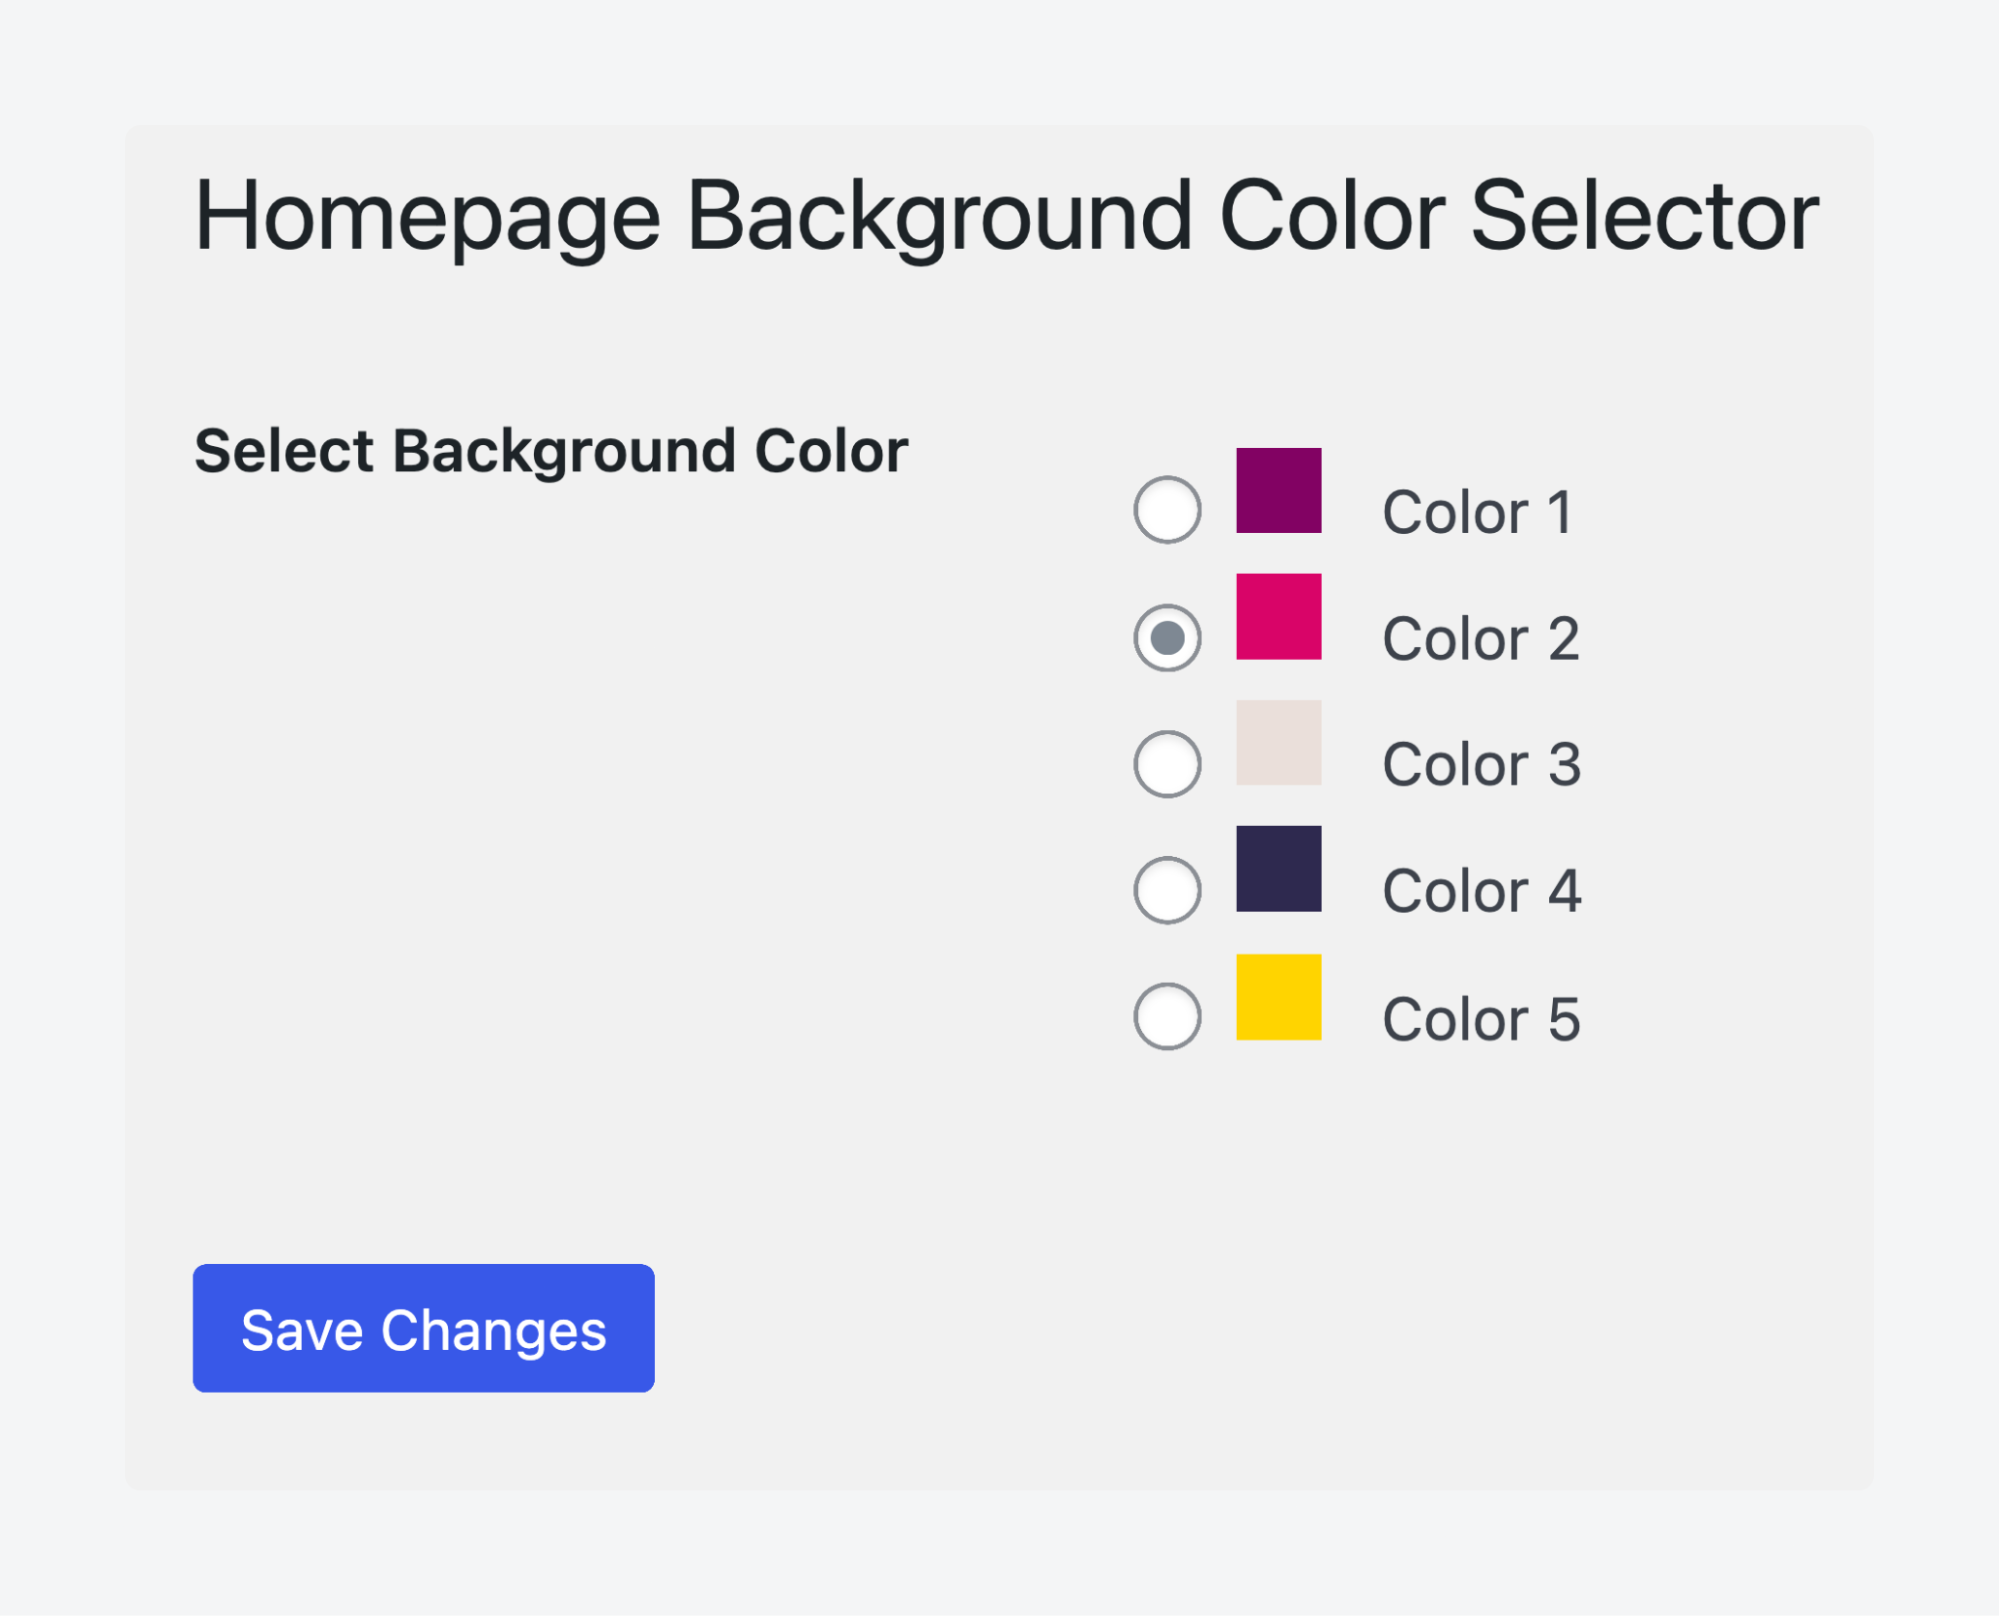
add_action('admin_menu', 'hbc_selector_menu');- Create and display the settings page in the admin panel with radios for color selection. This section uses HTML tags, which might look complex at first glance, but the logic is straightforward and should be easy to follow, especially in an IDE:
function hbc_selector_page() {
    ?>
    <div class="wrap">
        <h1>Homepage Background Color Selector</h1>
        <form method="post" action="options.php">
            <?php
            settings_fields('hbc_selector_options_group');
            do_settings_sections('background_color_selector');
            ?>
            <table class="form-table">
                <tr valign="top">
                    <th scope="row">Select Background Color</th>
                    <td>
                        <ul>
                            <li>
                                <label>
                                    <input type="radio" name="hbc_background_color" value="#820263" <?php checked(get_option('hbc_background_color'), '#820263'); ?>>
                                    <span style="background-color: #820263; width: 20px; height: 20px; display: inline-block; margin-right: 10px;"></span>
                                    Color 1
                                </label>
                            </li>
                            <li>
                                <label>
                                    <input type="radio" name="hbc_background_color" value="#d90368" <?php checked(get_option('hbc_background_color'), '#d90368'); ?>>
                                    <span style="background-color: #d90368; width: 20px; height: 20px; display: inline-block; margin-right: 10px;"></span>
                                    Color 2
                                </label>
                            </li>
                            <li>
                                <label>
                                    <input type="radio" name="hbc_background_color" value="#eadeda" <?php checked(get_option('hbc_background_color'), '#eadeda'); ?>>
                                    <span style="background-color: #eadeda; width: 20px; height: 20px; display: inline-block; margin-right: 10px;"></span>
                                    Color 3
                                </label>
                            </li>
                            <li>
                                <label>
                                    <input type="radio" name="hbc_background_color" value="#2e294e" <?php checked(get_option('hbc_background_color'), '#2e294e'); ?>>
                                    <span style="background-color: #2e294e; width: 20px; height: 20px; display: inline-block; margin-right: 10px;"></span>
                                    Color 4
                                </label>
                            </li>
                            <li>
                                <label>
                                    <input type="radio" name="hbc_background_color" value="#ffd400" <?php checked(get_option('hbc_background_color'), '#ffd400'); ?>>
                                    <span style="background-color: #ffd400; width: 20px; height: 20px; display: inline-block; margin-right: 10px;"></span>
                                    Color 5
                                </label>
                            </li>
                        </ul>
                    </td>
                </tr>
            </table>
            <?php submit_button(); ?>
        </form>
    </div>
    <?php
}- Register the setting to save the selected color:
function hbc_selector_register_settings() {
    register_setting('hbc_selector_options_group', 'hbc_background_color');
}
add_action('admin_init', 'hbc_selector_register_settings');- Retrieve the saved color and apply it to the homepage background. Include a fallback value just in case:
function hbc_apply_background_color() {
    $color = get_option('hbc_background_color', '#ffffff'); // Default to white if no color is selected
    if (is_front_page()) {
        echo "<style>body { background-color: $color; }</style>";
    }
}
add_action('wp_head', 'hbc_apply_background_color');- Activate the plugin and check your admin menu for a new item.
- Click it, choose a color from the list, and save your changes.
- Load up your homepage and check out its new look.
How to work with custom data for dynamic plugins
Many dynamic plugins need to handle constantly evolving data, like user-generated content, settings, or media files.
For such plugins, ACF provides an efficient, scalable solution that avoids adding unnecessary complexity to your site. ACF simplifies the process of managing custom data by allowing you to define custom fields for posts, pages, or custom post types.
With ACF, you can manage various data types, such as text, images, files, and relationships between different content elements. The plugin’s built-in functions make it easy to retrieve and manipulate this data wherever needed in your plugin.
For example, you can use get_field() to retrieve data from a custom field or the_field() to display it within templates.
ACF lets you integrate custom data management into your plugin without manually building complex database structures. It also helps maintain good performance and compatibility with WordPress updates.
Supercharge Your Website With Premium Features Using ACF PRO
Speed up your workflow and unlock features to better develop websites using ACF Blocks and Options Pages, with the Flexible Content, Repeater, Clone, Gallery Fields & More.
How to use ACF for custom data without the complexity
ACF gives you several ways of getting custom field data into your site, including entering it into posts, capturing input from frontend forms, and importing it in formats like XML and JSON.
For this walkthrough, though, we’re going to introduce you to ACF’s Options Pages, one of its most convenient data management features.
Options Pages, available in ACF PRO, let you create a dedicated area for managing/updating/editing custom field values that you can then reuse across your site.
Let’s demonstrate how you can use one to supercharge your site’s functionality by passing custom field values into your plugin and using them there. In this final section, we’re using ACF’s color picker field to choose a color then use that in the plugin to restyle the homepage.
Step 1: Create the Options Page
We’ll start by creating a dedicated page where we can manage custom fields:
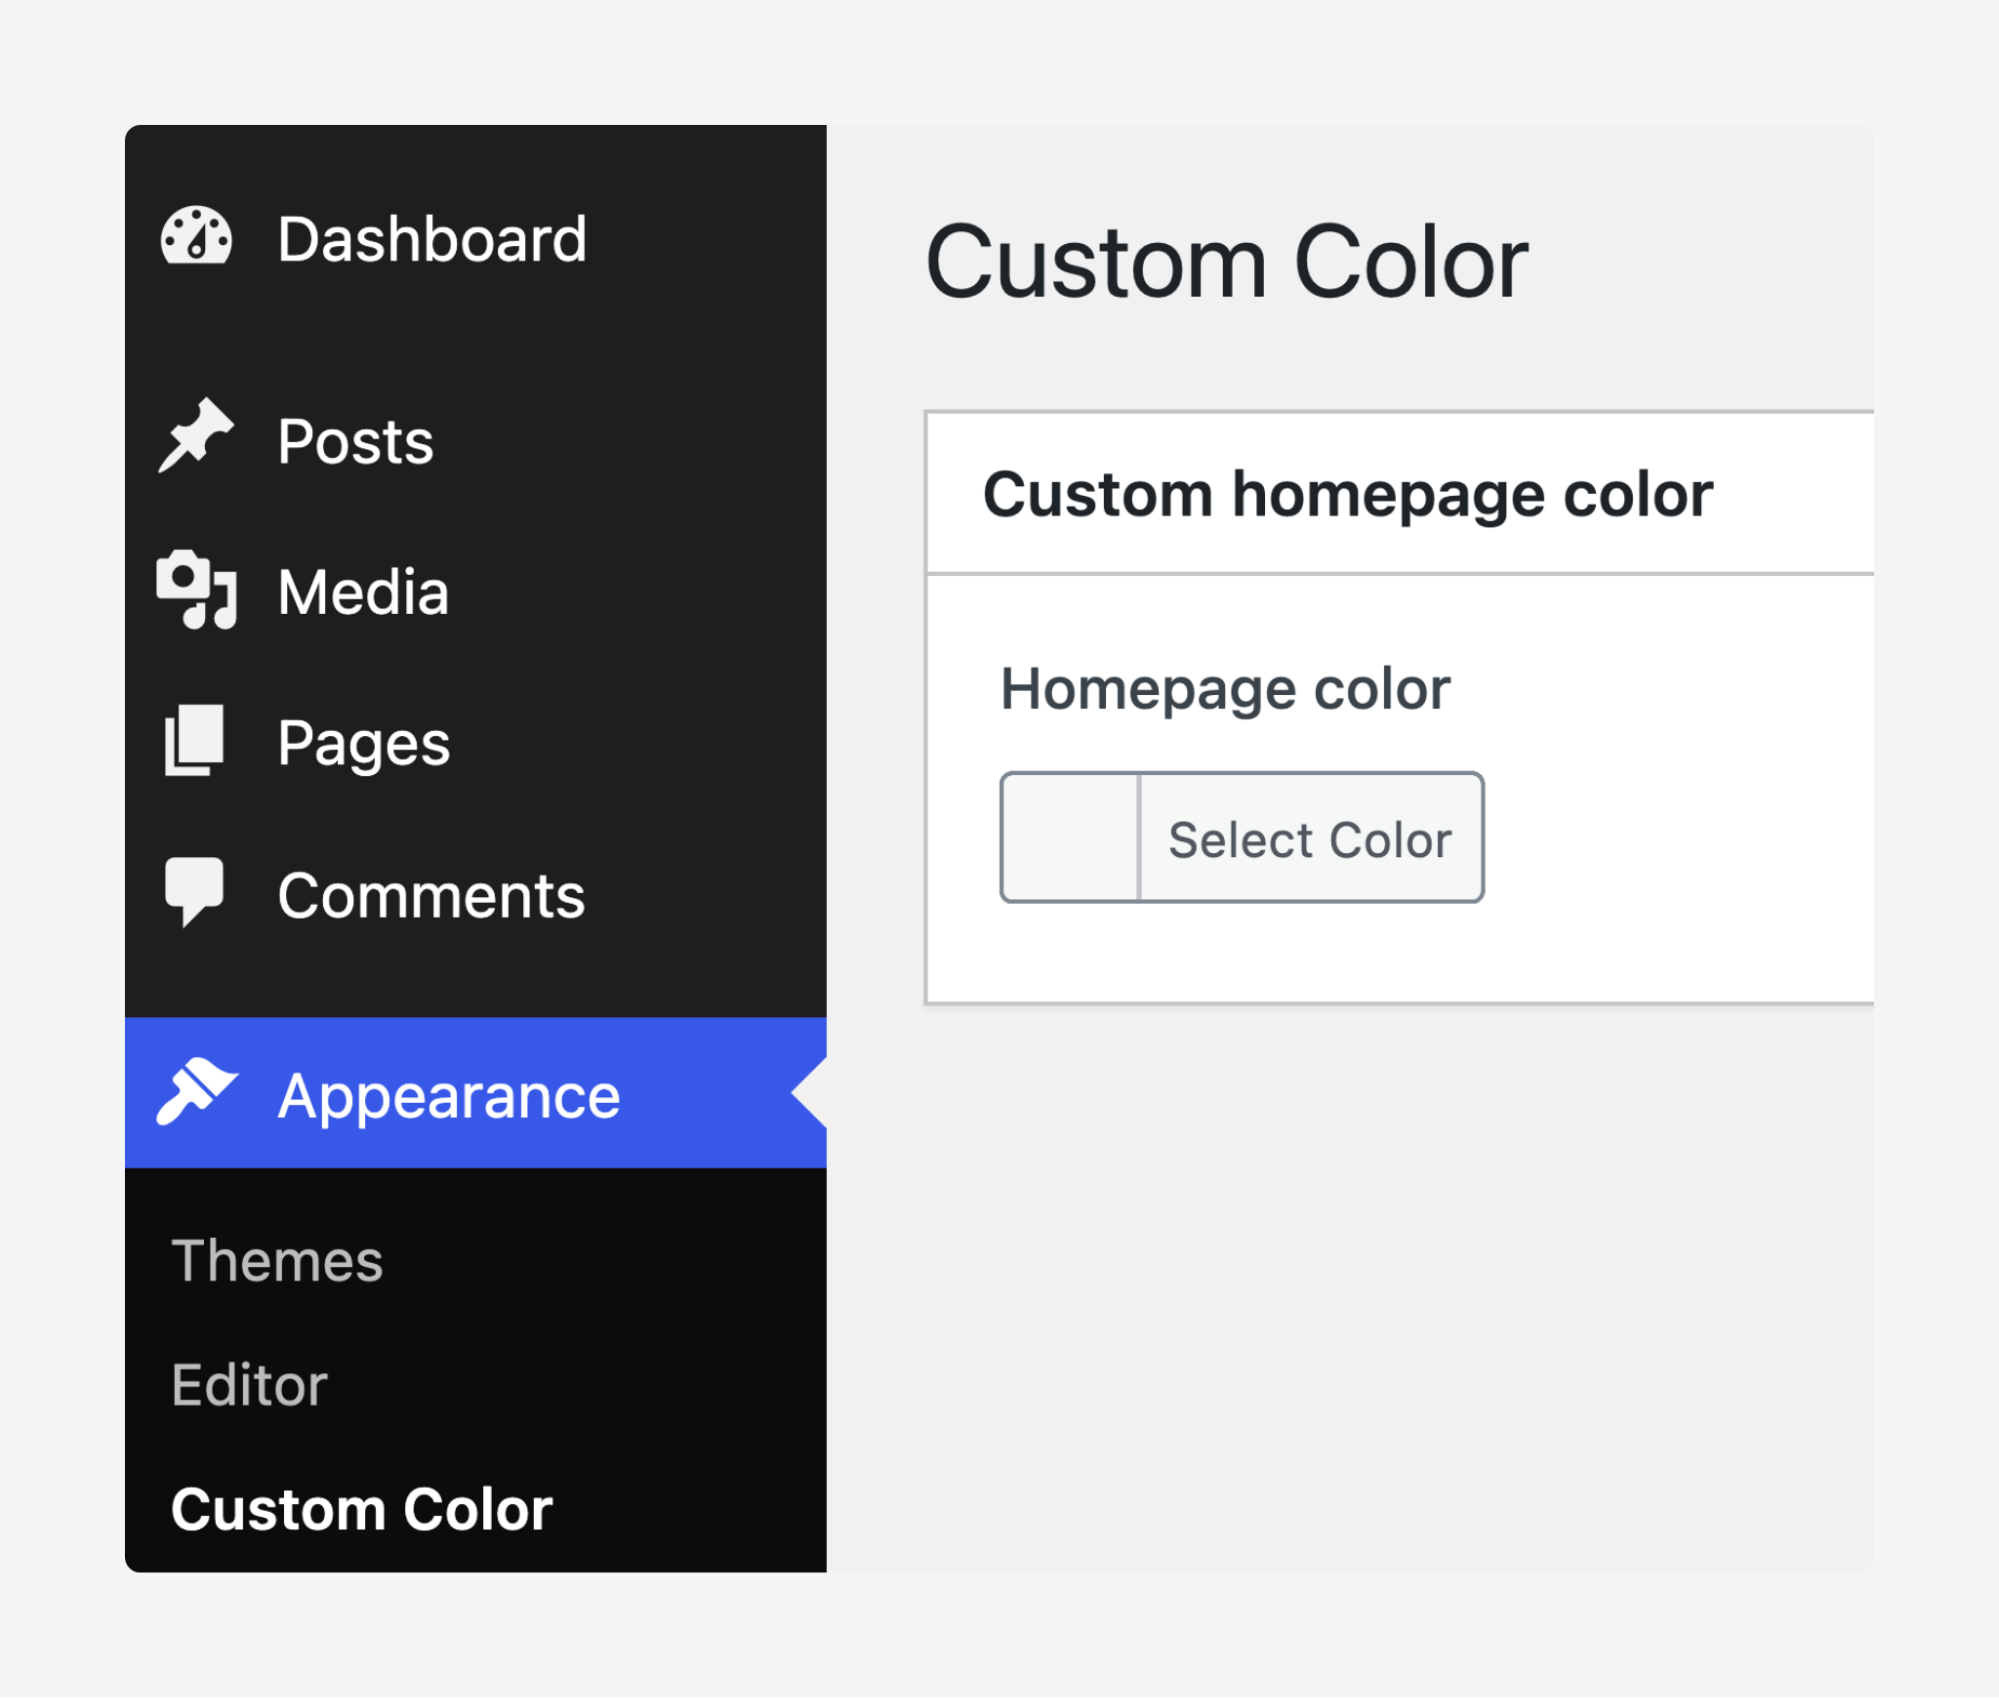
- From your admin dashboard, go to ACF > Options Pages.
- Click Add New.
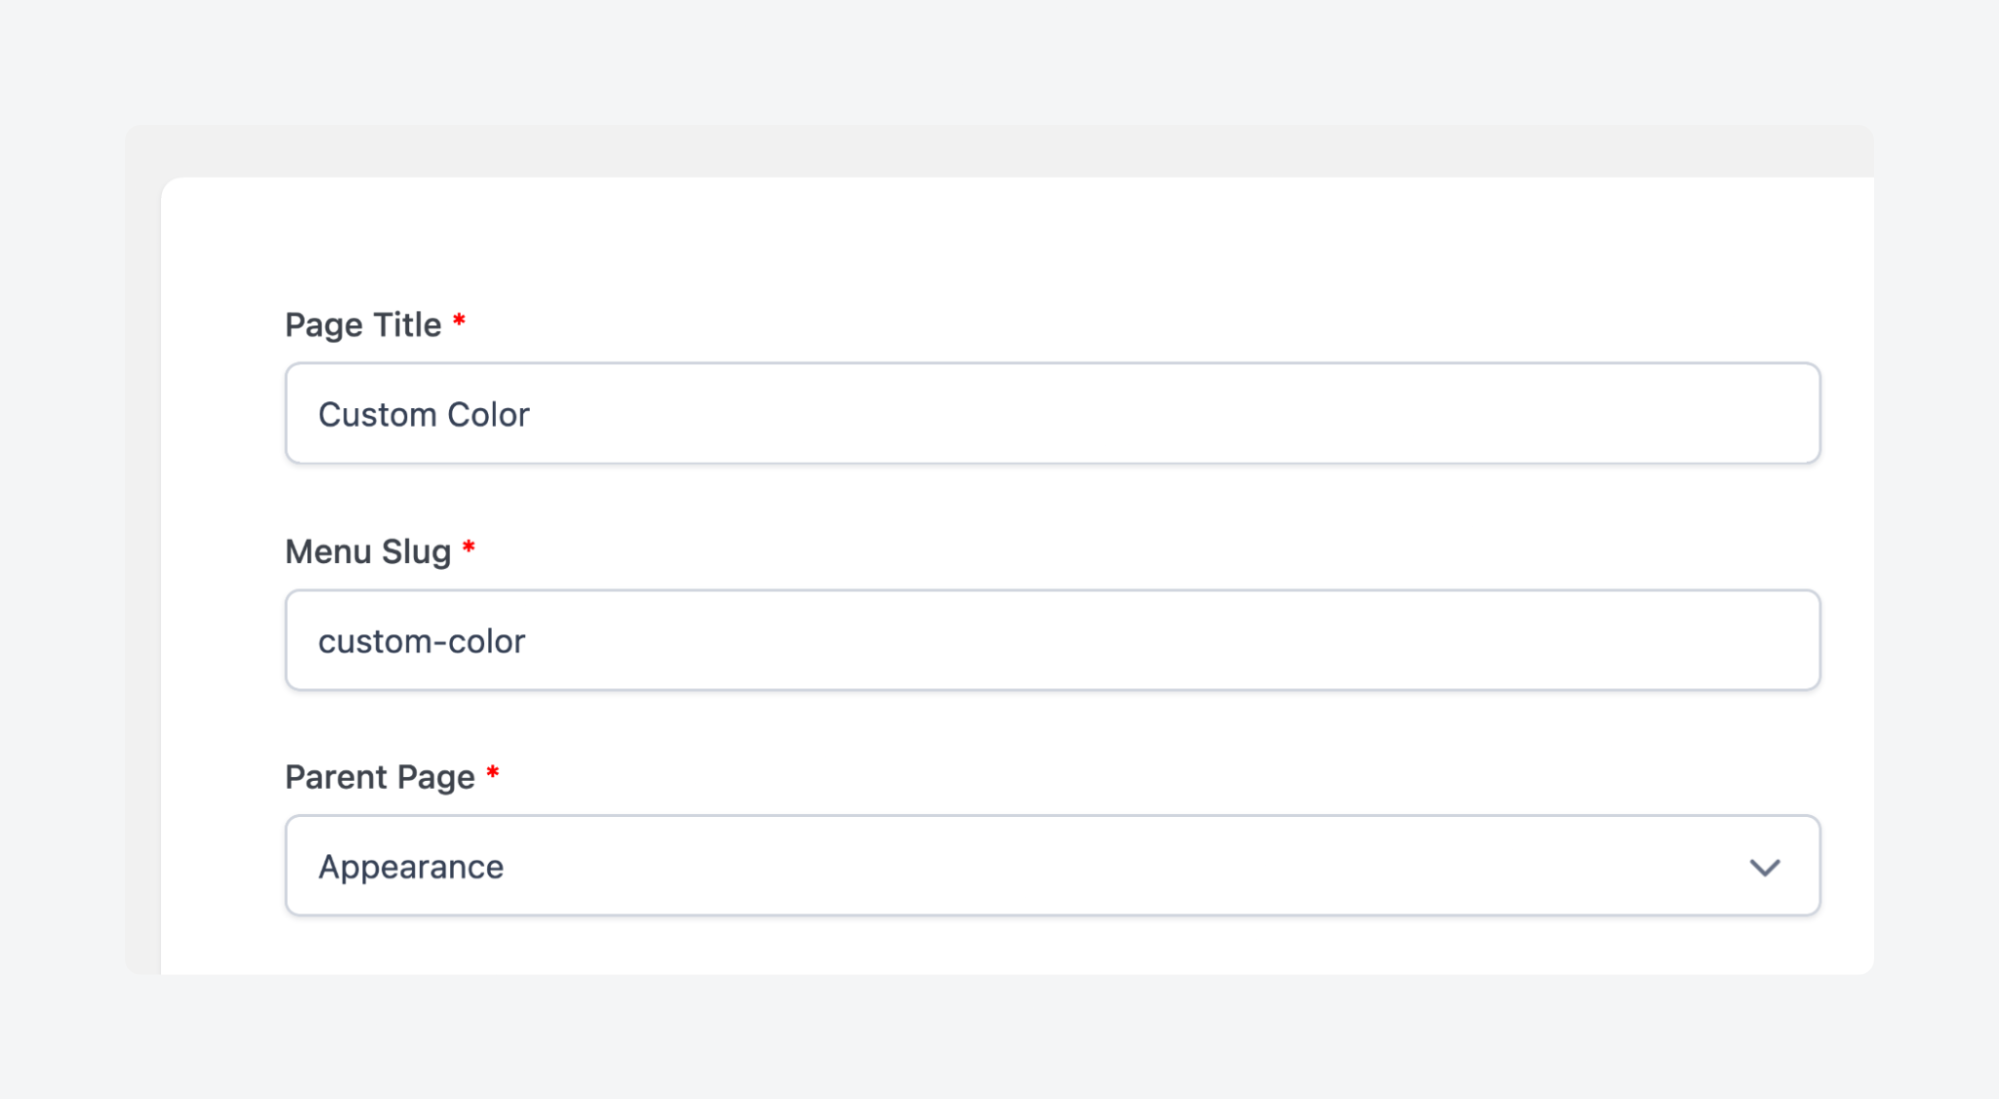
- Give your Options Page a name and slug. The page determines how it appears in the admin menu on the left. Give it a parent if you want it to appear as an option in an existing menu item. We’re going with Appearance for the parent here.
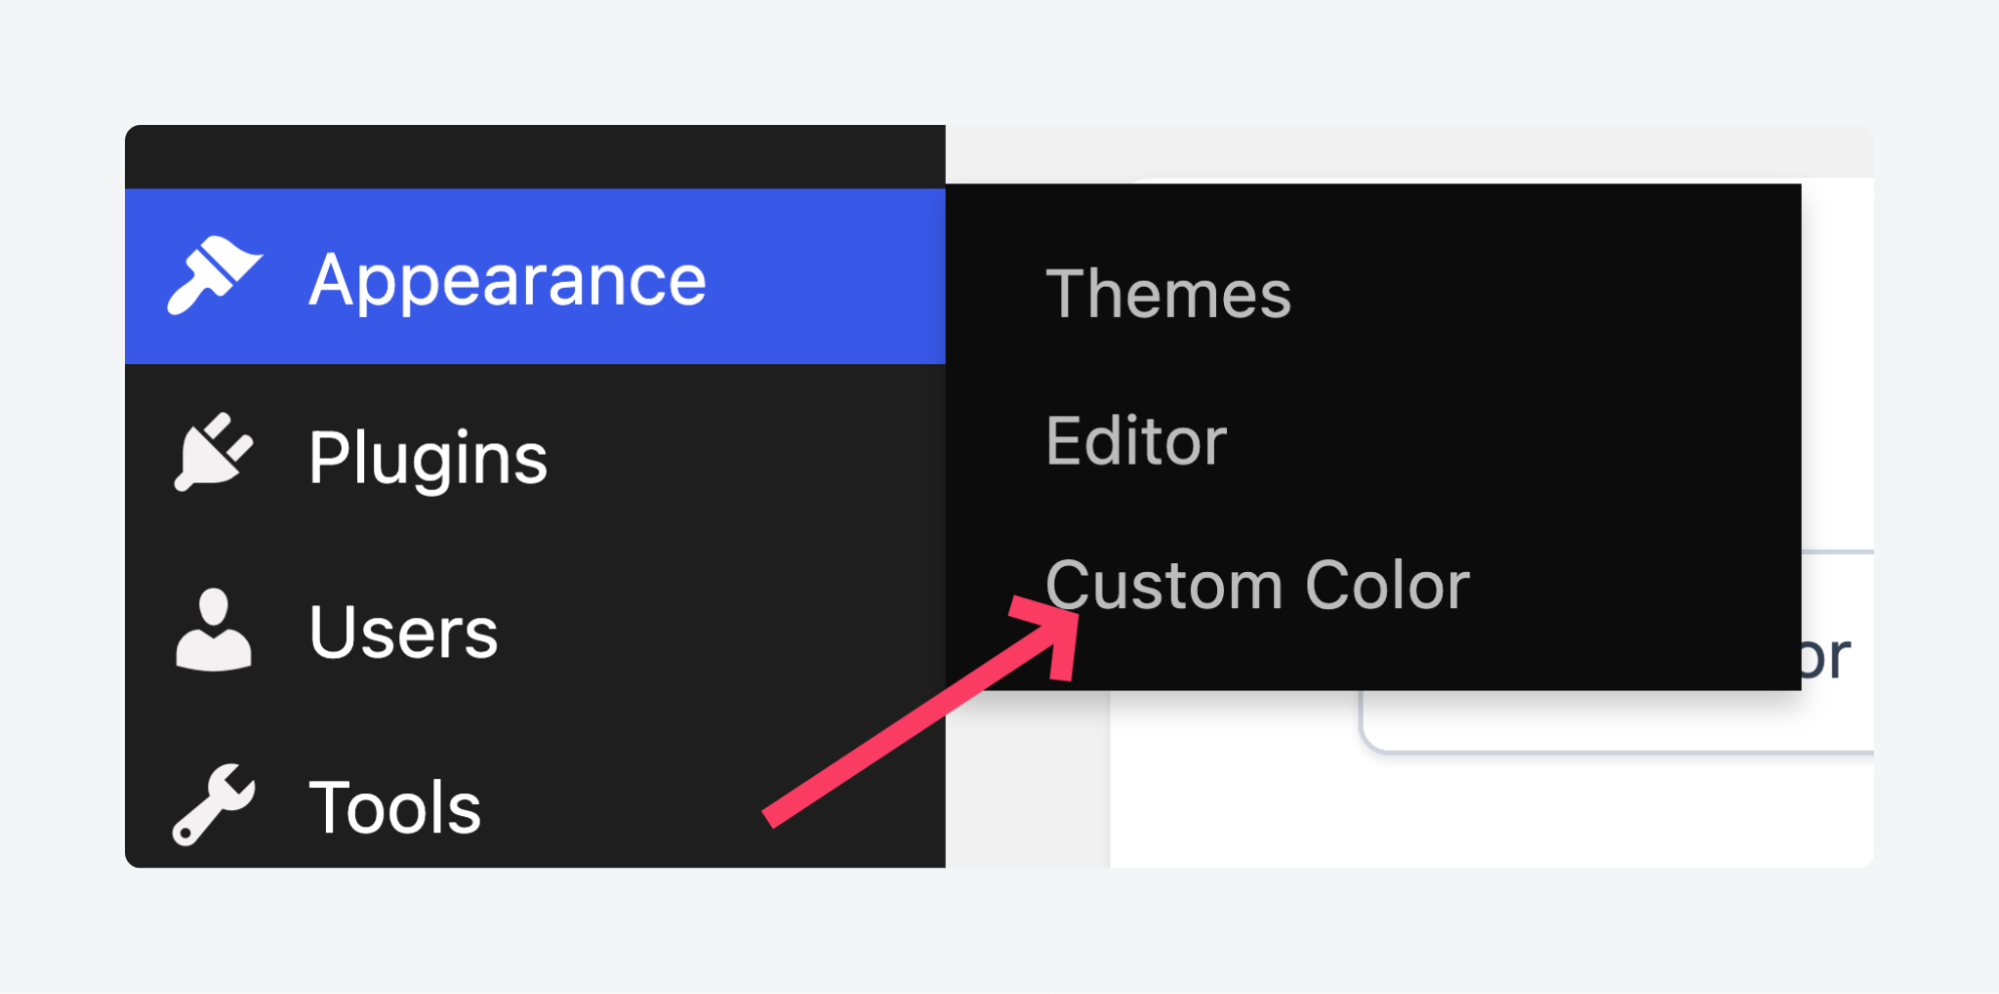
- Save the Options Page and check that it shows up where you expect it to in the menu. Ours should appear when hovering over Appearance.
Step 2: Create your custom field group
Next, create the custom field group that you’ll manage using the Options Page:
- From the dashboard, go to ACF > Field Groups > Add New.
- Add a color picker field and fill in all the necessary details.
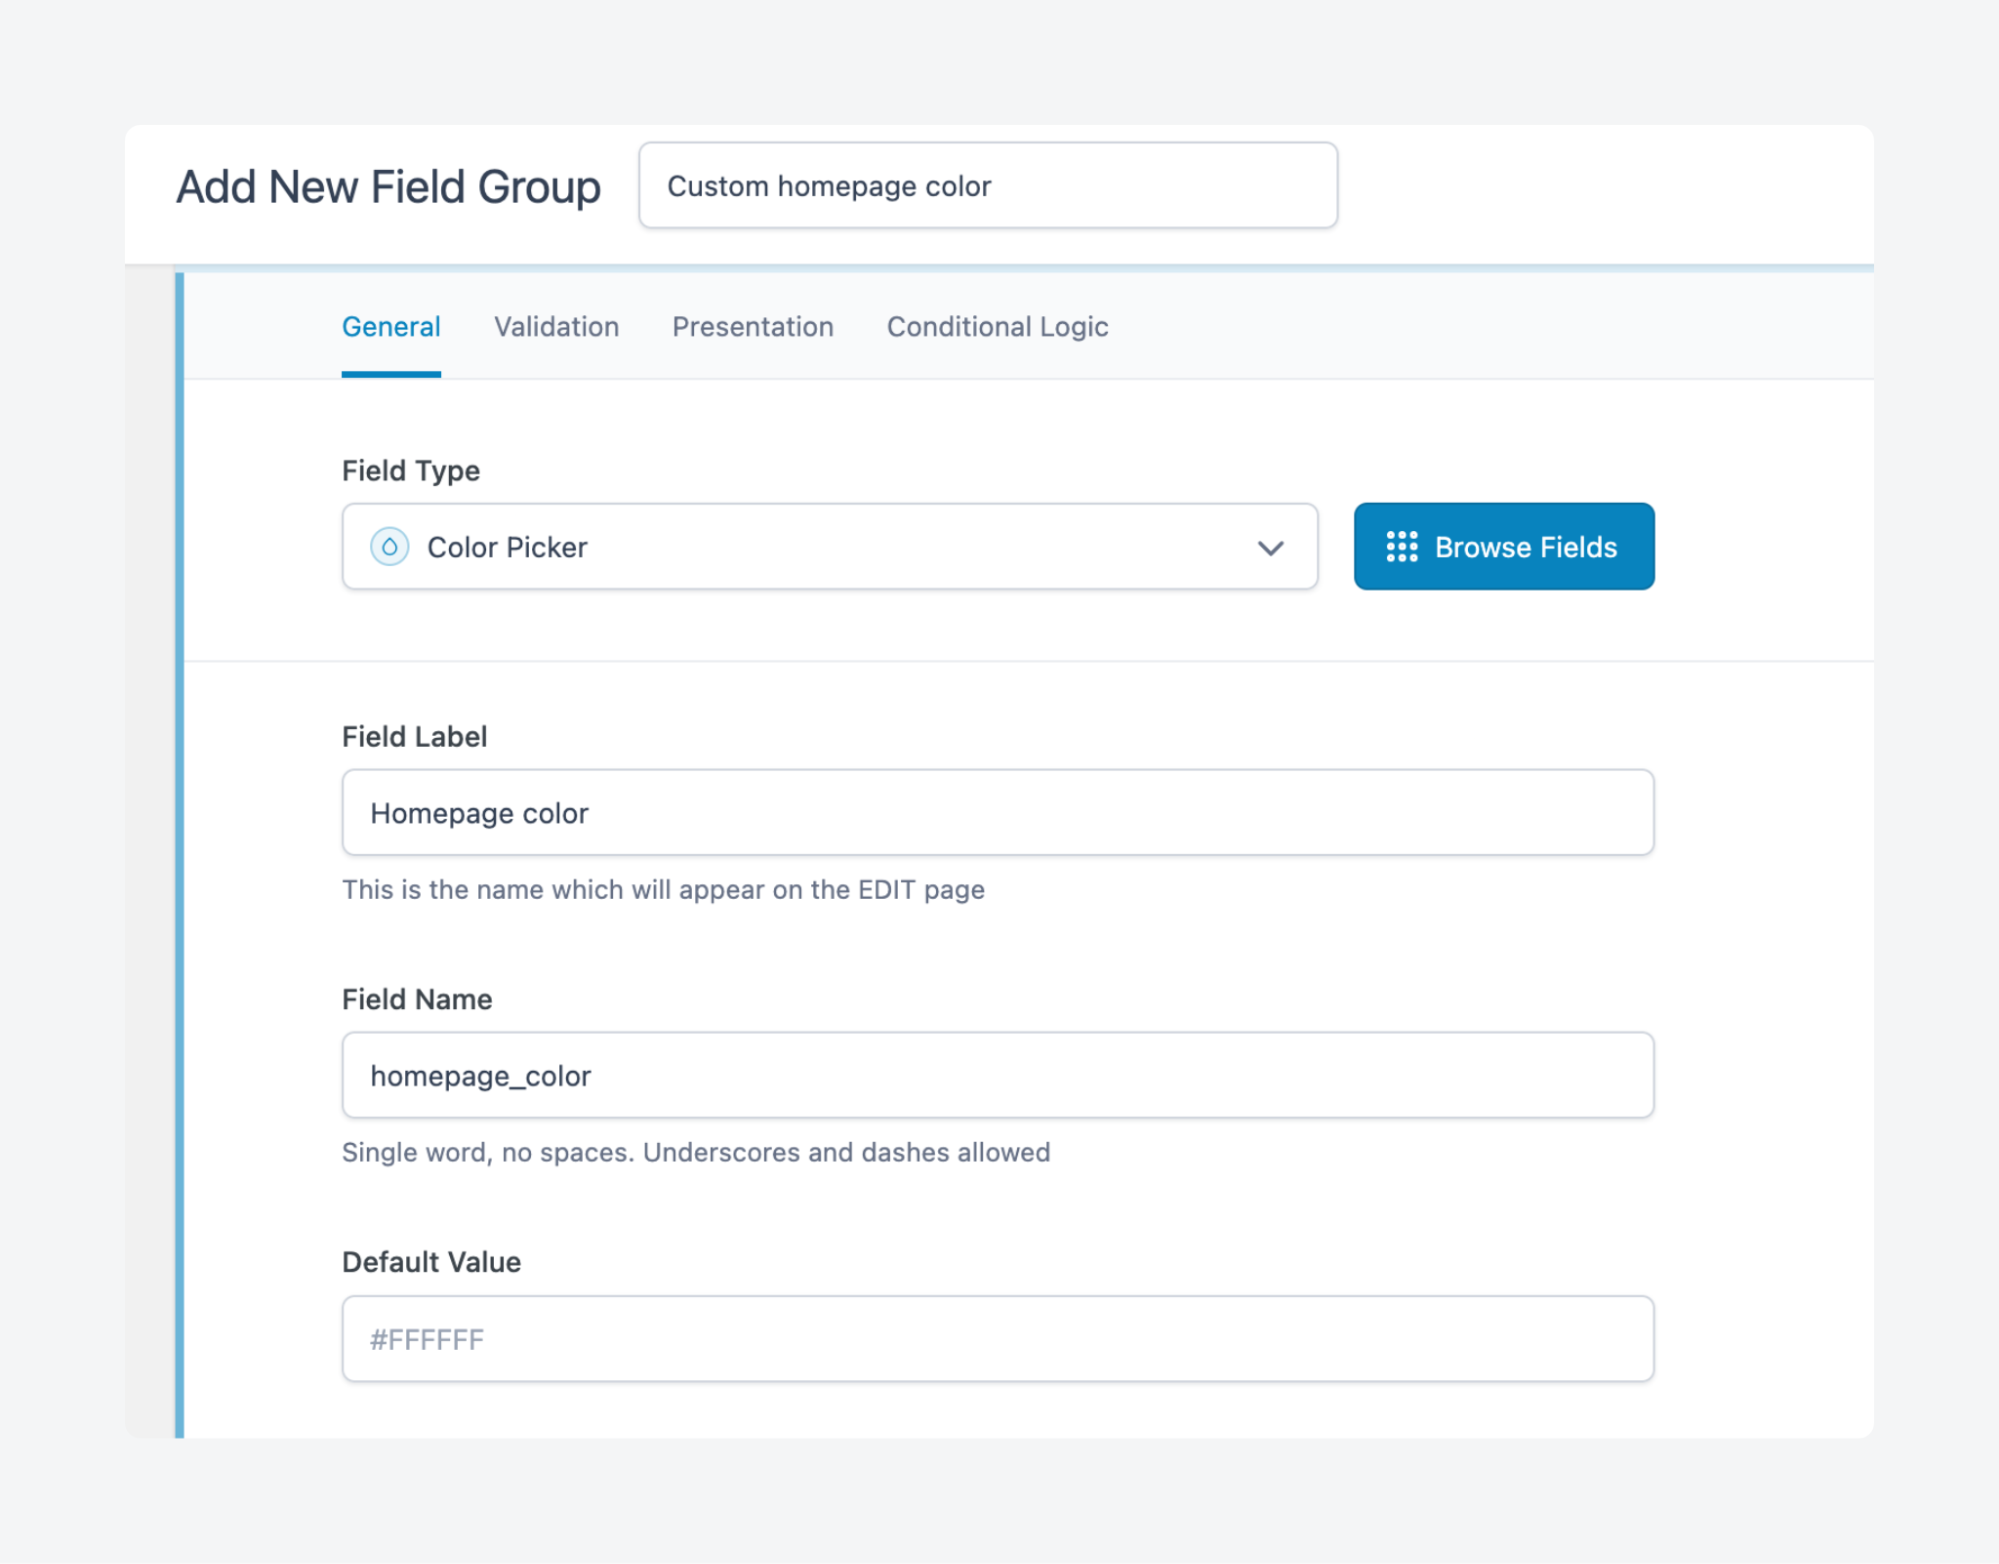
- Scroll down to the Settings section and, under Location Rules, set it to show when the Options Page is equal to the one you created above.
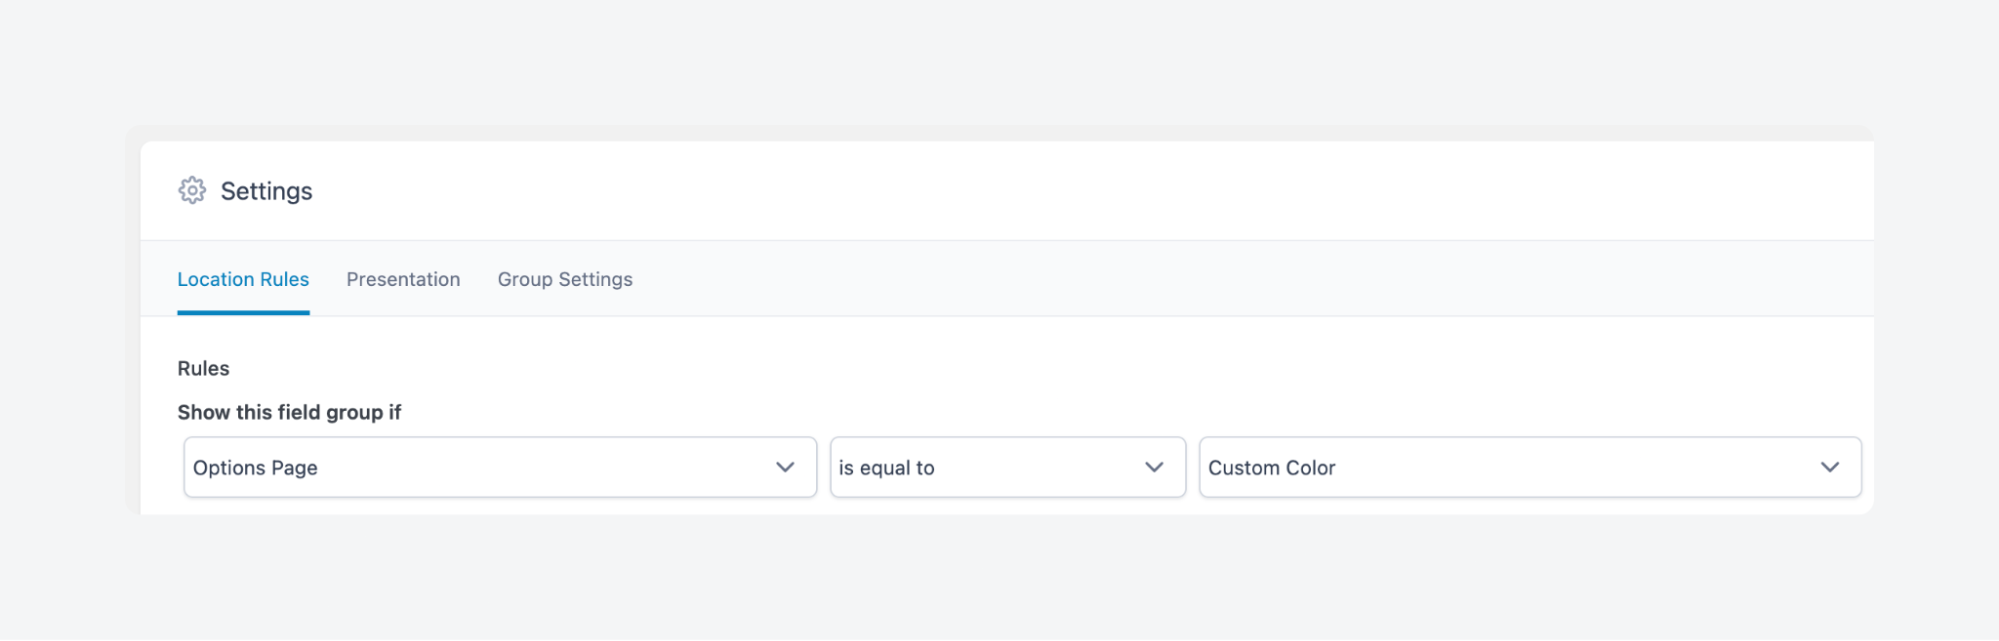
- Save your changes and go back to the Options Page to verify that the color picker field shows up.
Step 3: Create the plugin and link it to ACF
All that’s left is updating your plugin to grab the color value using ACF’s get_field() function:
function hbc_acf_background_color() {
// Check if we're on the homepage
if (is_front_page()) {
// Get the value of the ACF color picker field
$background_color = get_field('homepage_color');
// If the field has a value, apply it as background color
if ($background_color) {
echo "<style>body { background-color: $background_color; }</style>";
}
}
}
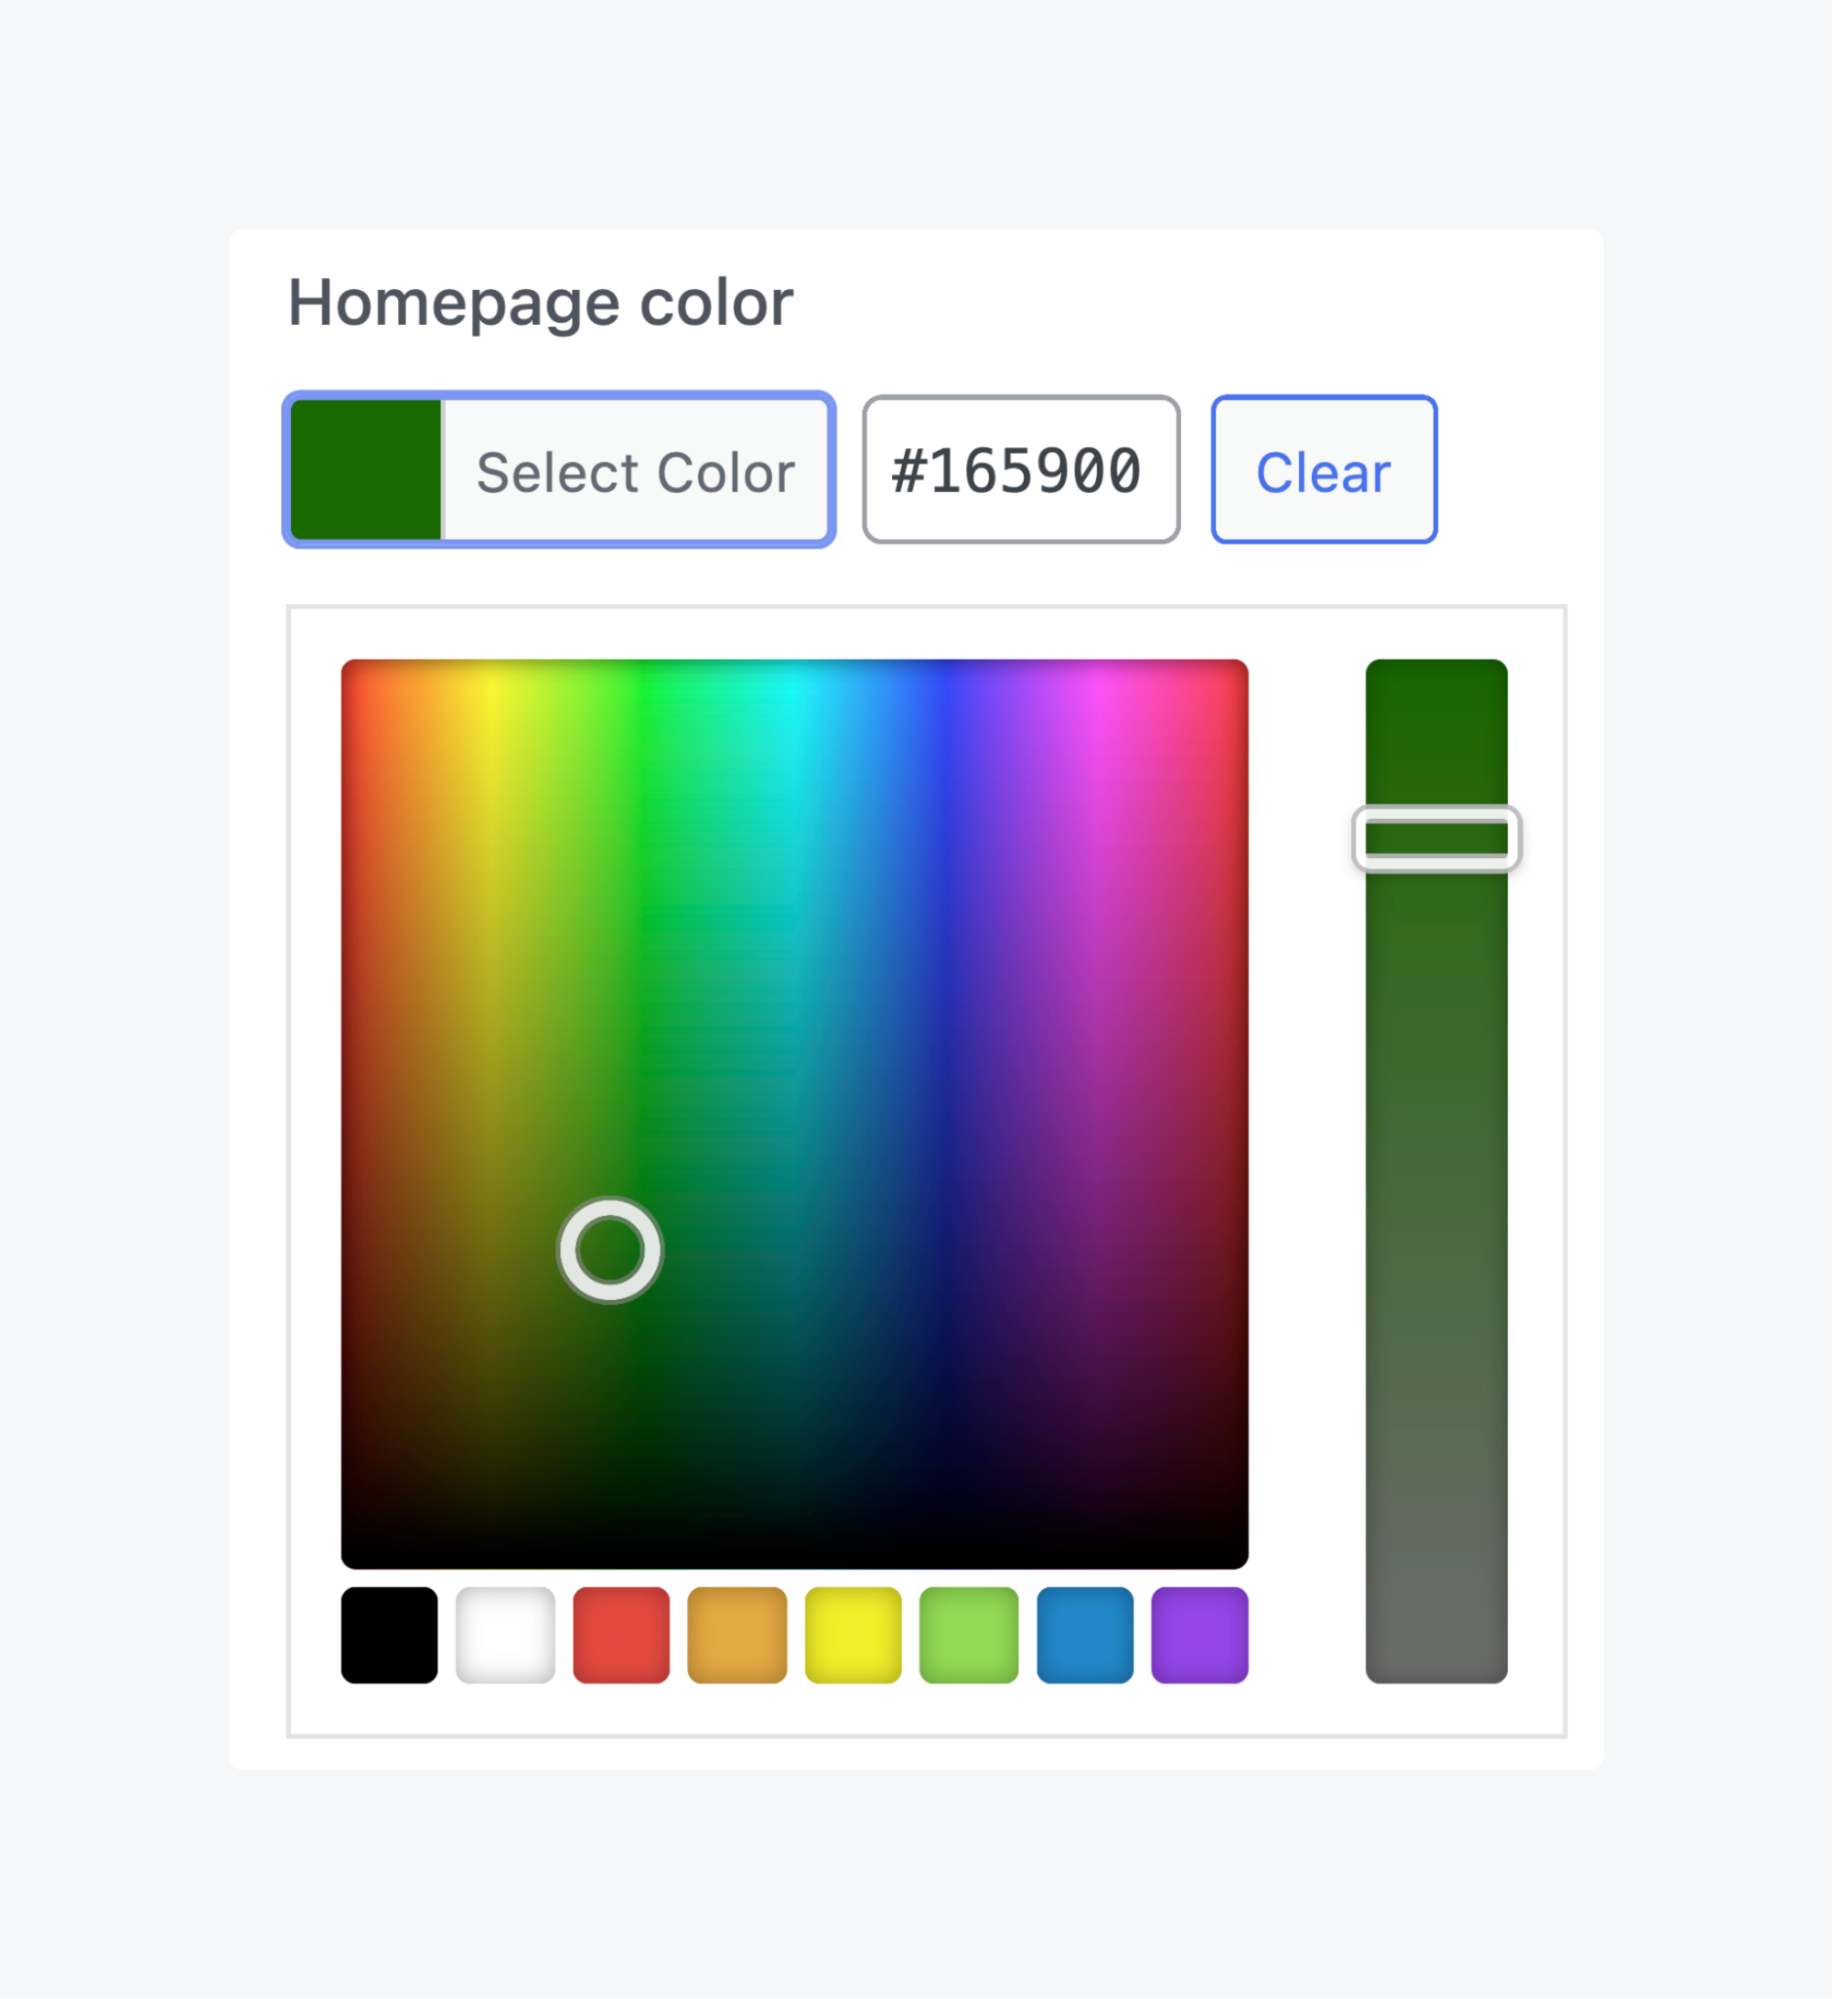
add_action('wp_head', 'hbc_acf_background_color');Open your Options Page and choose a new color – we just closed our eyes and clicked at random.
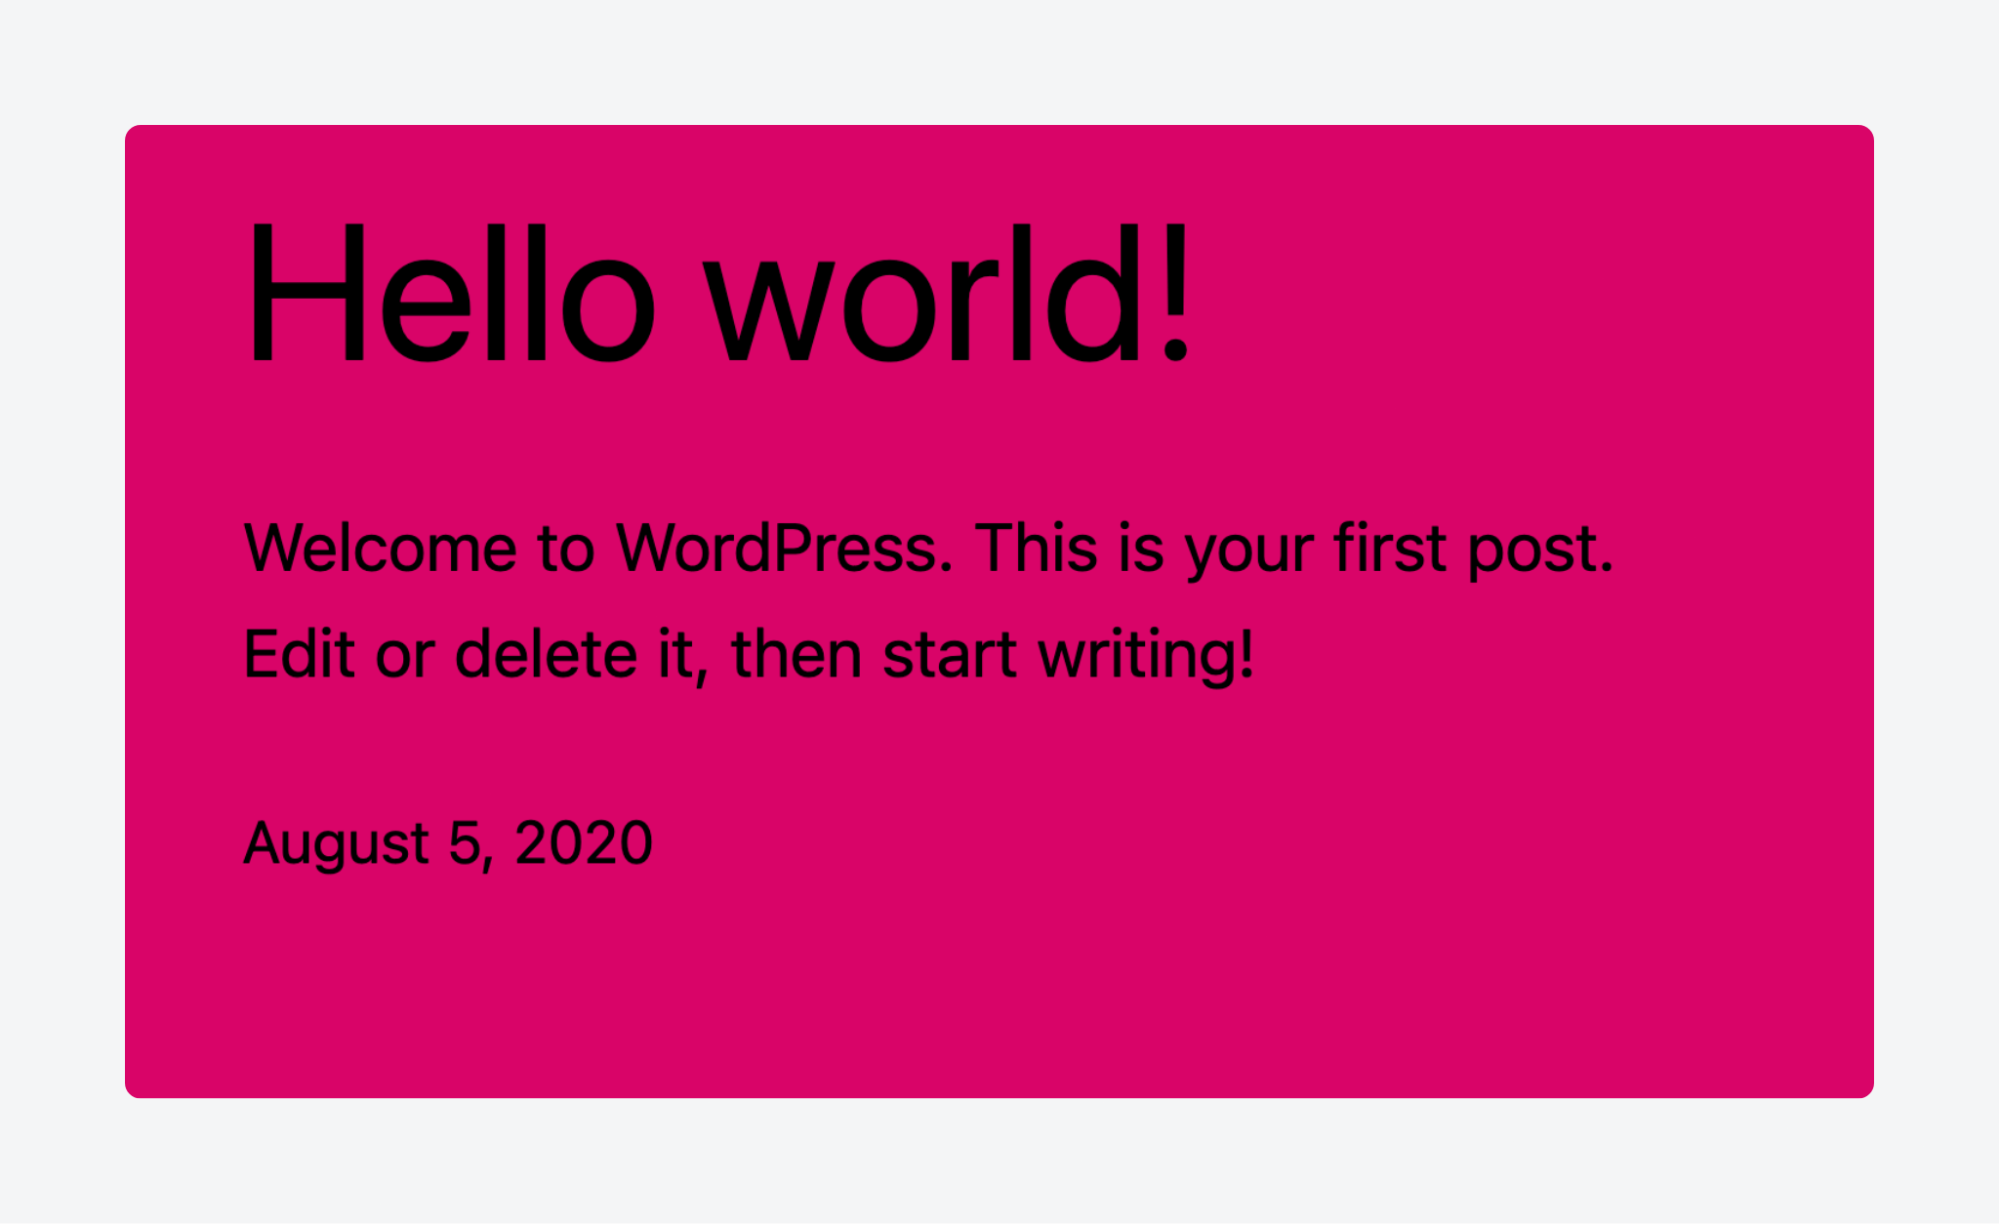
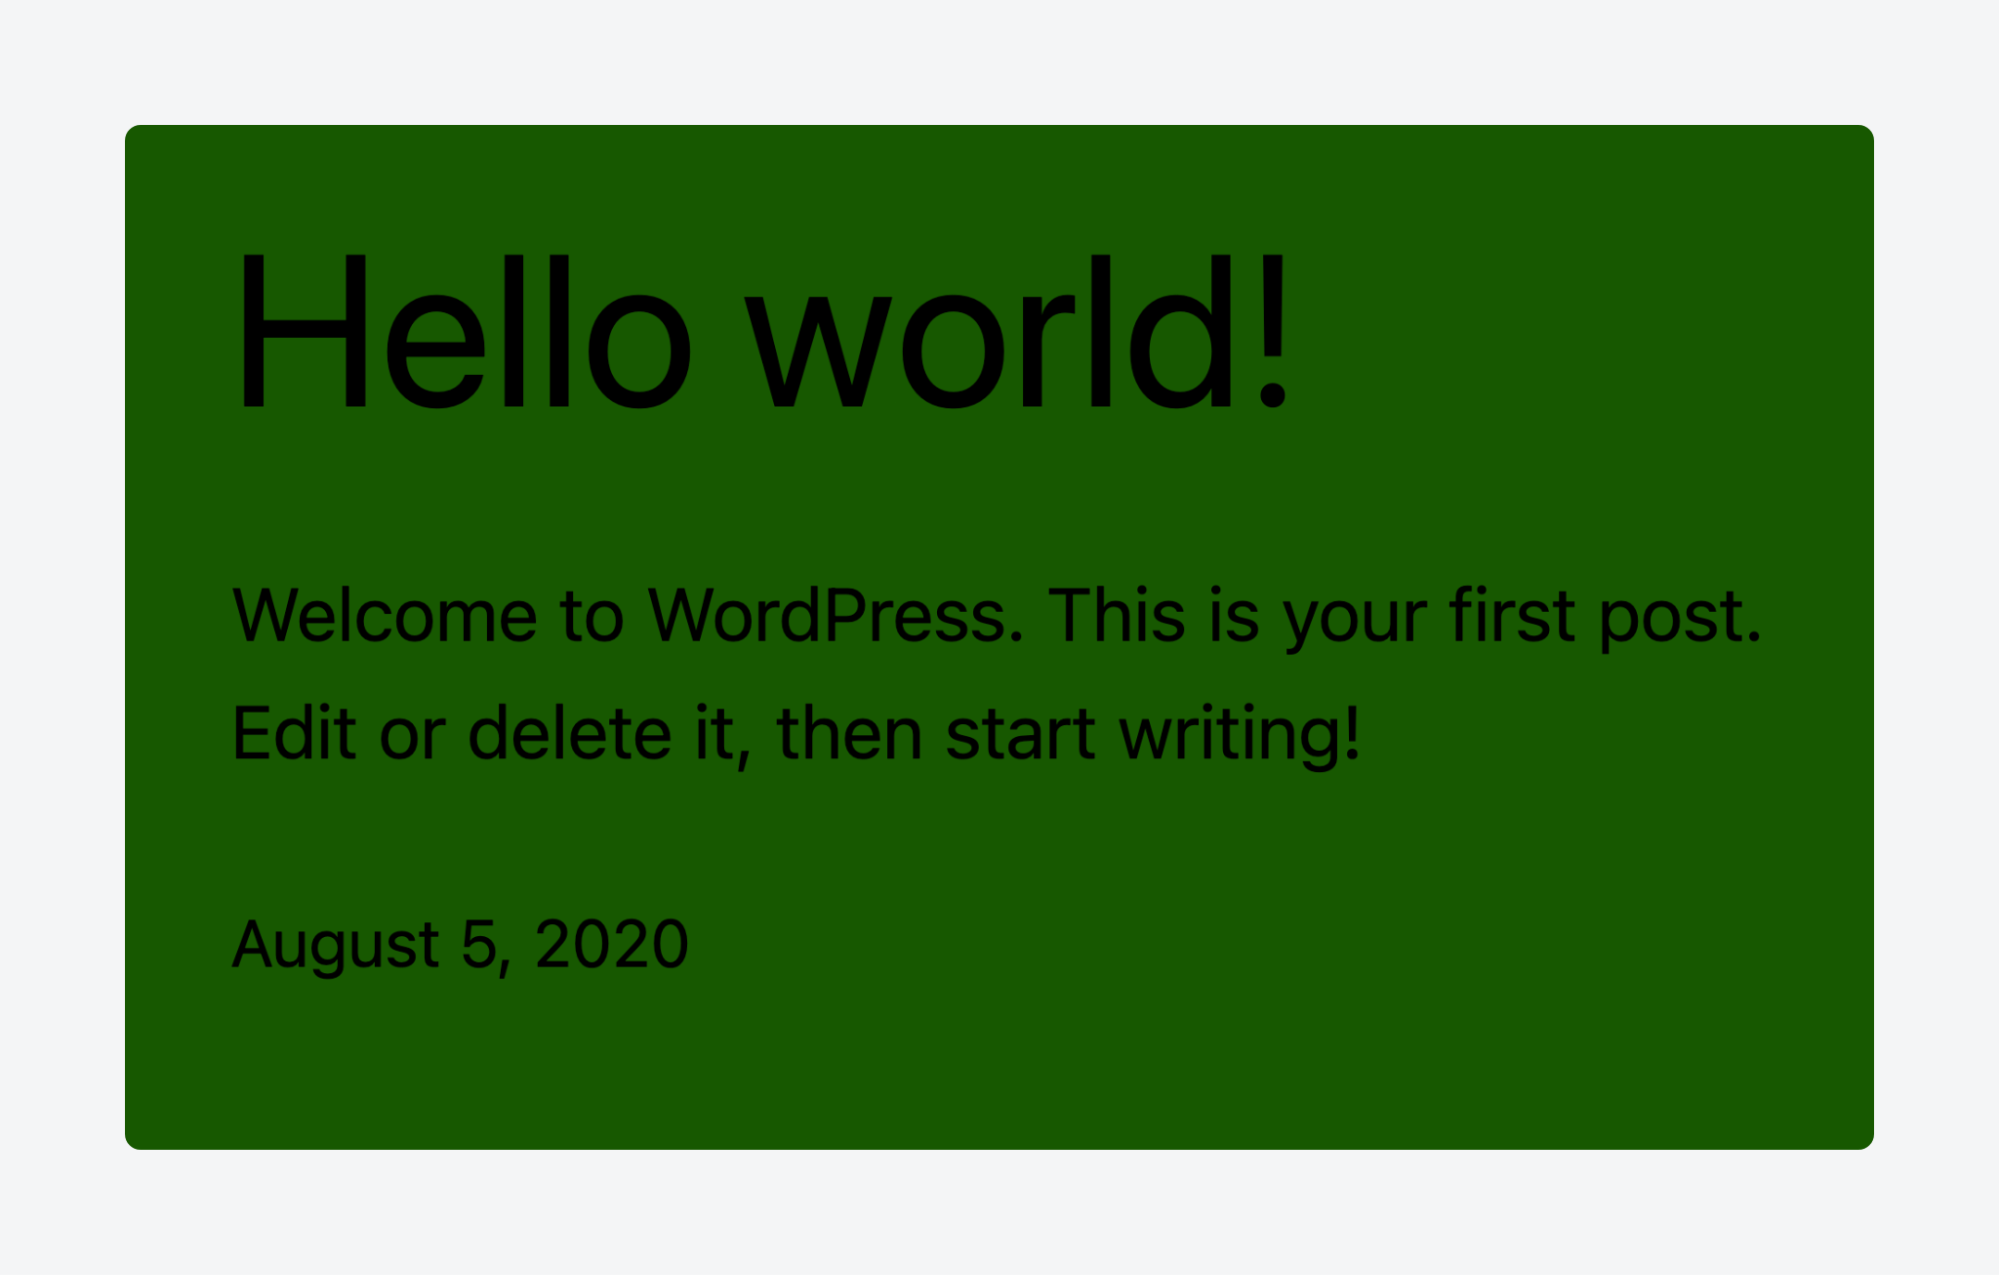
Now load up your homepage and you should see the color applied:
Distribute your plugin to the world
Once your plugin is complete, it’s time to share it with the world. Proper distribution ensures that others can use and benefit from your work. Follow these tips before putting your plugin out there:
- Bundle everything into a zip archive to make it easy for users to download, install, and activate your plugin. A zip file is the standard format for WordPress plugin installations.
- Add at least one clear screenshot that showcases how the plugin works or what it changes. Screenshots help users understand your plugin’s functionality and attract more downloads.
- Use semantic versioning in the header with version numbers in the format “major.minor.patch” in the plugin header. This allows users to easily track updates and manage compatibility.
- Keep a human-readable changelog to provide transparency and help users stay informed about updates.
- Follow security basics like nonces, capability checks, input sanitization, output escaping, and prepared SQL queries. These practices protect users from potential vulnerabilities.
- Clearly specify the minimum required versions for both WordPress and PHP. This ensures that users are aware of compatibility issues before installation.
You have several avenues for distributing the plugin:
- Submit it to the WordPress plugin directory, where it can reach a large audience.
- Create a dedicated website or web page for your plugin to provide detailed information and updates.
- Share the zip file directly with others, allowing them to install it manually.
Take full control of your WordPress website with ACF
ACF gives you the flexibility to add custom fields and options, allowing your site to function exactly how you need it, rather than relying on WordPress’s default setup.
You can easily replace many small “helper plugins” by creating your own fields, blocks, and layouts tailored to your workflow. With simple functions like get_field() and PHP templates, you maintain control over your data, design, and performance while keeping coding overhead minimal.
ACF empowers you to customize your site without the need for complex coding or bloated plugins.
For even more advanced features and support, consider upgrading to ACF PRO, which offers additional functionality like repeater fields, flexible content, and more, helping you unlock the full potential of your WordPress projects.


For plugin support, please contact our support team directly, as comments aren't actively monitored.