
Key points:
- WPGraphQL replaces REST limitations by letting you request exactly the data you need in a single query, avoiding over-fetching, under-fetching, and multiple API calls.
- Setup is straightforward, and the built-in GraphiQL IDE allows you to test and explore queries immediately.
- Custom Post Types must be explicitly enabled in the GraphQL schema (via PHP, filters, or UI tools), giving you full control over what data is queryable.
- Advanced Custom Fields integrates via WPGraphQL for ACF, exposing field groups as structured GraphQL types so you can query flexible, nested content cleanly.
If you’re building a headless WordPress®¹ site with Custom Post Types (CPTs) and you’re using Advanced Custom Fields (ACF®), you’ve likely run into the REST API’s limits – multiple requests to assemble related data and responses filled with fields you don’t need. That overhead adds up fast as your content model grows.
Read on to learn what WPGraphQL is, why it works better than REST for complex setups, how to install it, test queries in GraphiQL, register custom post types, expose ACF fields, and handle caching and authentication for production.
How WPGraphQL works and why developers use it instead of the WordPress REST API
WPGraphQL is a free, open-source plugin that adds a GraphQL API to your WordPress® site. It gives you a single /graphql endpoint where you define exactly what data you want – and get only that back.
With the WordPress® REST API, each endpoint (i.e., /wp-json/wp/v2/posts) returns a fixed structure. This means you either get too much data (over-fetching) or not enough (under-fetching).
WPGraphQL solves these two problems by letting you define the shape of the response. You can describe exactly what you need in a query, and the API returns only that.
For example, instead of making three REST calls to fetch a post, its author, and the author’s avatar, you can request everything in a single query with WPGraphQL – structured exactly for your frontend component. This becomes especially valuable when working with nested data or reusable UI components.
There’s also a long-term architectural benefit.
As Jason Bahl, creator and principal maintainer of WPGraphQL, explains in an ACF Chat Fridays session:
“The effort involved in maintaining custom REST endpoints, in my opinion, is a lot more difficult, a lot more work over time. It might be easier initially, but over time it’s more difficult, especially if you have multiple clients that have different needs.”
“If you have multiple clients that have different needs and you’re building REST endpoints for each client’s needs, then that becomes a pretty big maintenance burden for whoever is maintaining the endpoints. And if, let’s say, both client applications were consuming the same endpoint because they had the same needs, if client B asks for a feature that client A doesn’t need, you either have to build a new endpoint just for client B to differentiate from client A, or you start adding features that both clients are getting, but now you’re sending unnecessary data to a client who doesn’t need it.”
Not to mention, in one benchmark, fetching 100 posts via REST returned 335 KB in 7.91 seconds, while the equivalent GraphQL query returned 6.4 KB in 67 milliseconds.
Supercharge Your Website With Premium Features Using ACF PRO
Speed up your workflow and unlock features to better develop websites using ACF Blocks and Options Pages, with the Flexible Content, Repeater, Clone, Gallery Fields & More.
Installing WPGraphQL and testing queries in GraphiQL
Getting started with WPGraphQL takes only a few minutes, and you can validate your entire setup immediately using GraphiQL (the in-browser IDE that ships with the plugin).
Install the WPGraphQL plugin
Method 1: WordPress® dashboard (quickest path)
From your WordPress® admin:
- Go to Plugins → Add New.
- Search for “WPGraphQL”.
- Install and activate the plugin.
Method 2: Composer via WPackagist (recommended for structured projects)
If you’re managing WordPress® as code, install the WPGraphQL plugin via Composer using
composer require wpackagist-plugin/wp-graphql
Then activate the plugin from the admin dashboard or via WP-CLI. This approach keeps dependencies versioned and consistent across environments.
Once activated, there’s one small but important configuration detail. WordPress® defaults to “Plain” permalinks, which exposes GraphQL at /index.php?graphql.
Switching to any other permalink structure (like “Post name”) from Settings → Permalinks gives you the cleaner, expected endpoint, which is /graphql.
Run your first query with the built-in GraphiQL IDE
After activation, you’ll notice a GraphiQL IDE button in the WordPress® admin bar. This opens an in-browser IDE where you can explore the schema and run queries immediately.
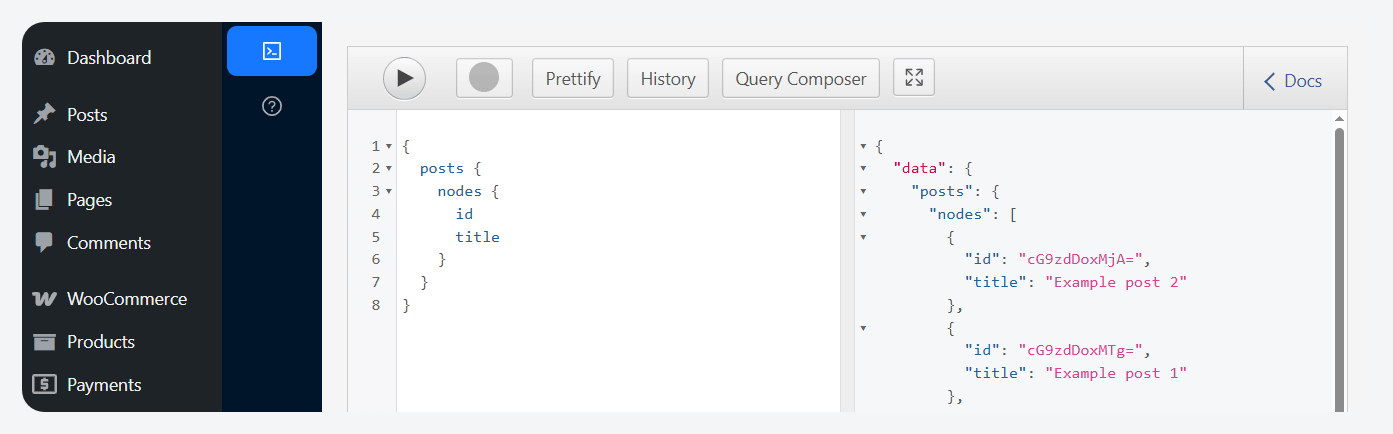
Run a simple query like:
{
  posts {
    nodes {
      id
      title
    }
  }
}
This will return a list of your WordPress® posts, including each post’s ID and title, confirming your GraphQL endpoint is working and giving you a first look at how queries are structured.
From here, GraphiQL becomes your primary tool for exploring and testing your data layer. Two features are especially useful as you move forward:
- Public/authenticated toggle: This switch lets you execute queries either as the logged-in user or as an unauthenticated visitor. It’s critical for testing visibility – what data is publicly accessible versus restricted behind authentication.
- Query Composer: This is a checkbox-based interface that lets you build queries without writing GraphQL manually. You can expand types, select fields, and generate valid queries visually – ideal when you’re learning the schema or debugging.

Registering custom post types for the GraphQL schema
By default, CPTs and taxonomies do not appear in the WPGraphQL schema, and this is intentional. WordPress® registers many internal post types (revisions, nav items, etc.), and exposing everything automatically would clutter the schema and make it harder to work with.
Instead, WPGraphQL uses an opt-in model – you explicitly choose what becomes queryable.
Here are three common ways to do this, depending on how your project is structured.
Option 1: Registering CPTs via PHP
When defining a custom post type in code, you enable GraphQL support by adding three arguments:
register_post_type('book', [
  'label' => 'Books',
  'public' => true,

  // WPGraphQL settings
  'show_in_graphql' => true,
  'graphql_single_name' => 'book',
  'graphql_plural_name' => 'books',
]);
Let’s break this down:
show_in_graphql(required) enables the post type in the schema.graphql_single_name(required) is the singular name used in queries.graphql_plural_name(optional but highly recommended) defaults toall${graphql_single_name}if omitted.
The same pattern applies to taxonomies:
register_taxonomy('genre', 'book', [
  'label' => 'Genres',

  // WPGraphQL settings
  'show_in_graphql' => true,
  'graphql_single_name' => 'genre',
  'graphql_plural_name' => 'genres',
]);
Option 2: Adding GraphQL support to existing post types
If a third-party plugin registers a post type without GraphQL support, you don’t need to modify its code. Instead, use the register_post_type_args filter, which lets you modify how a post type is registered at runtime:
add_filter('register_post_type_args', function ($args, $post_type) {
  if ($post_type === 'event') {
    $args['show_in_graphql'] = true;
    $args['graphql_single_name'] = 'event';
    $args['graphql_plural_name'] = 'events';
  }
  return $args;
}, 10, 2);
This snippet hooks into WordPress® when post types are registered and modifies their arguments. It checks for a specific post type (event) and programmatically enables GraphQL support by adding the required fields (show_in_graphql, graphql_single_name, graphql_plural_name).
This approach is critical in real-world builds, where much of your data model comes from plugins you don’t control.
Option 3: Using Custom Post Type UI (no-code setup)
If you’re using Custom Post Type UI, you don’t need to write any PHP at all.
When you create or edit a custom post type in the plugin, you’ll see a WPGraphQL section in the settings. All you do is:
- Turn on “Show in GraphQL”.
- Enter a singular name (e.g., book).
- Enter a plural name (e.g., books).
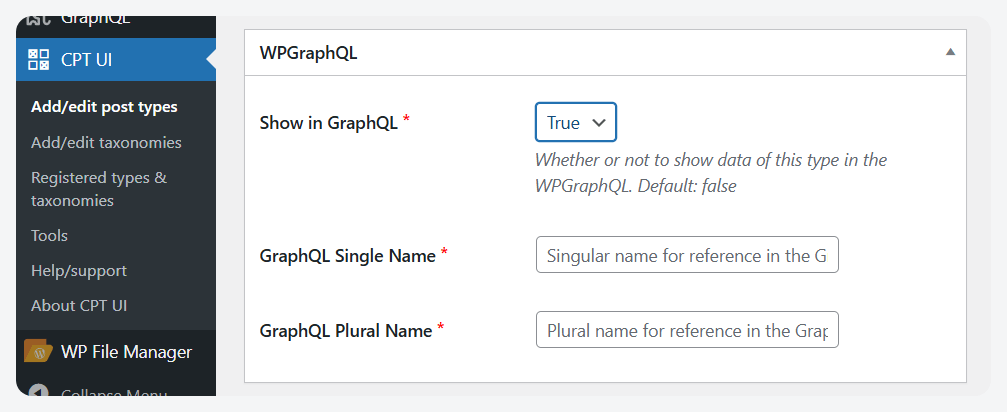
Save the post type, and that’s it. It will immediately show up in the WPGraphQL schema and be queryable in GraphiQL.
Exposing field groups with WPGraphQL for ACF
The real power of WPGraphQL shows up when you connect it to ACF, now at version 6.8. This is handled through WPGraphQL for ACF, a free, open-source plugin that exposes ACF field groups (including custom post type fields assigned to CPTs) directly in the GraphQL schema.
Once you install and activate the WPGraphQL for ACF, exposing fields is straightforward:
- Open any ACF field group.
- Go to the Settings tab.
- Enable “Show in GraphQL”.
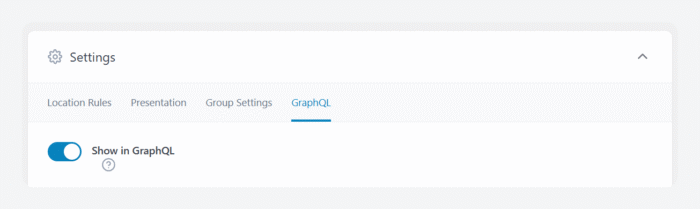
That’s it. The same applies to PHP-registered or JSON-synced field groups – just ensure show_in_graphql is set to true.
How ACF fields appear in the schema
Each exposed ACF field group is represented in the schema with GraphQL types and interfaces. The field group itself becomes a GraphQL object type that implements the shared AcfFieldGroup interface, while the WordPress® types that can use that field group implement a generated WithAcf* interface.
For example (assuming you have a custom post type called Book and an ACF field group called Book Details assigned to that post type):
... on WithAcfBookDetails {
  bookDetails {
    authorName
    publishYear
  }
}
The WithAcfBookDetails fragment tells GraphQL, “Only apply this part of the query to content types that have access to the Book Details field group.” The bookDetails field then resolves to the ACF field group object, and inside it you can request the individual ACF fields you need.
WPGraphQL for ACF usually determines where to attach a field group from its ACF location rules. For a simple rule like Post Type is equal to Book, the Book type can implement the generated WithAcfBookDetails interface automatically. For more specific or conditional location rules, you may need to manually choose which GraphQL types the field group should appear on.
This fragment-based approach keeps frontend queries modular. A component can define the exact ACF fields it needs, and if that component later needs another field, you update the fragment instead of rewriting every query across the app.
How ACF PRO field types map to GraphQL
WPGraphQL for ACF also maps fields into structured types:
- Repeater fields expose rows as lists of structured objects, where each object contains the repeater’s subfields.
- Flexible Content fields expose a list of layout objects, with each layout represented as its own GraphQL type so frontend code can query different layouts with inline fragments.
- Gallery fields resolve as an
AcfMediaItemConnection, which lets you query selected images asMediaItemnodes rather than treating them as a plain array. - Options Pages can also be exposed as root-level fields when configured to show in GraphQL.
Free ACF field types are fully supported as well, so you’re not limited to ACF PRO features.
Supercharge Your Website With Premium Features Using ACF PRO
Speed up your workflow and unlock features to better develop websites using ACF Blocks and Options Pages, with the Flexible Content, Repeater, Clone, Gallery Fields & More.
Querying ACF data with pagination
WPGraphQL uses the Relay connection model for lists, which introduces a consistent structure for pagination:
query GetBooksWithAcfFields {
  books(first: 10) {
    edges {
      cursor
      node {
        title
        ... on WithAcfBookDetails {
          bookDetails {
            authorName
            publishYear
          }
        }
      }
    }
    pageInfo {
      hasNextPage
      endCursor
    }
  }
}
Here’s how it works:
nodeis the actual content item inside each edge, such as a Book post.edgeswrap each node and include a cursor, which marks that item’s position in the connection.pageInfotells the client whether more results exist withhasNextPageand where to continue withendCursor.
Keep in mind that there are two important constraints when working with ACF in GraphQL:
- No filtering or sorting by ACF fields: WPGraphQL does not support meta queries for ACF values. These queries are expensive at scale.
- No mutations for ACF field data (yet): Writing ACF data via GraphQL isn’t currently supported.
Caching and deploying WPGraphQL in production
Once your schema is working, two production concerns show up quickly: caching and authentication. Both are different from traditional REST setups because of how GraphQL works.
The caching problem (and how to solve it)
GraphQL queries are typically sent as POST requests, which most CDNs and edge caches don’t cache by default. That means every request hits your origin server – fine for development, but inefficient at scale.
WPGraphQL supports GET requests for read-only queries, which makes them cacheable. The catch is that GraphQL queries can get long, and URLs have length limits – so this approach doesn’t scale cleanly on its own.
WPGraphQL Smart Cache solves caching in two key ways:
- Persisted queries (cache-friendly requests): Instead of sending the full query every time, you store the query on the server, reference it by a short hash/ID, and send a compact GET request like
/graphql?queryId=abc123. Now your requests are small, cacheable, and CDN-friendly. - Tag-based cache invalidation (precision purging): Each response includes an X-GraphQL-Keys header that tags it with the content it depends on (post IDs, types, etc.). When content changes, like a post update, only the relevant cached responses are purged.
This avoids the common “clear everything” approach and keeps cache hit rates high without serving stale data.
There’s also a security and performance layer built in. With “Allow only specific queries” enabled, the server will reject any query that hasn’t been pre-registered. This prevents arbitrary or expensive queries from being executed in production.
Authentication for headless frontends
Authentication works differently in headless setups, especially across domains. By design, WPGraphQL sends Access-Control-Allow-Origin: * but does not allow credentials (cookies). This is intentional to prevent CSRF attacks.
The result is that browsers cannot send WordPress® cookies cross-origin and you must use token-based authentication for headless frontends.
There are two main approaches:
- Application Passwords (server-to-server): Built into WordPress®, these work well when your frontend runs on the server (e.g., SSR or backend integrations). You send credentials with each request – simple and reliable.
- JWT authentication (browser-based frontends): For client-side apps, use a plugin like WPGraphQL JWT Authentication. This lets users log in and receive a token, which is then sent with each request.
This is the standard approach for cross-origin headless builds.
If your frontend and WordPress® live on the same domain, you can still use cookies, but you must include a valid nonce via the X-WP-Nonce header. This maintains WordPress®’s built-in security model.
Get started with WPGraphQL and ACF
By this point, you’ve turned WordPress® into a structured, queryable data layer – custom post types are in the schema, ACF fields are fully typed, and your API is ready for real-world use with caching and secure access.
WPGraphQL gives you the flexibility to shape responses, while ACF defines the content model that makes those responses meaningful. The result is a setup that scales cleanly across headless frontends, component-driven UIs, and modern data pipelines.

For plugin support, please contact our support team directly, as comments aren't actively monitored.