
Overview
Since ACF 6.0, we recommend you register blocks with the new block.json syntax syntax rather than the deprecated acf_register_block_type() detailed here.
Functionality detailed in this documentation may not work with modern versions of WordPress.
Description
Registers a custom block type in the Gutenberg editor.
Blocks are the fundamental element of the Gutenberg editor. WordPress provides many default block types such as paragraph, heading and image. The acf_register_block_type() function can be used to add new block types via PHP.
Once registered, your block will appear in the “Block” location rules when editing a field group. This allows you to map fields to your block and define the content.
To render the block, create a PHP template (or callback function) to output the block HTML using PHP functions like get_field() and the_field().
Note: Block type registration should be done within the acf/init action. This is not required, but is a safe way to ensure that ACF is fully initialized.
Block types can support any number of built-in core features such as name, icon, description, category and more. See the $settings argument for a complete list of supported features.
Additionally, all properties from the WordPress Block Supports API may be used.
Parameters
acf_register_block_type( $settings );
$settings
(array) (Required) Array of arguments for registering a block type. Any argument from the JavaScript registerBlockType() function may also be used.
name (String) A unique name that identifies the block (without namespace). For example ‘testimonial’. Note: A block name can only contain lowercase alphanumeric characters and dashes, and must begin with a letter.
'name' => 'testimonial',title
(String) The display title for your block. For example ‘Testimonial’.'title' => __('Testimonial'),description
(String) (Optional) This is a short description for your block.'description' => __('My testimonial block.'),category
(String) Blocks are grouped into categories to help users browse and discover them. The core provided categories are [ common | formatting | layout | widgets | embed ]. Plugins and Themes can also register custom block categories.'category' => 'embed',icon
(String|Array) (Optional) An icon property can be specified to make it easier to identify a block. These can be any of WordPress’ Dashicons, or a custom svg element.// Specifying a dashicon for the block 'icon' => 'book-alt', // Specifying a custom HTML svg for the block 'icon' => '<svg viewBox="0 0 24 24" xmlns="http://www.w3.org/2000/svg"><path fill="none" d="M0 0h24v24H0V0z" /><path d="M19 13H5v-2h14v2z" /></svg>', // Specifying colors 'icon' => array( // Specifying a background color to appear with the icon e.g.: in the inserter. 'background' => '#7e70af', // Specifying a color for the icon (optional: if not set, a readable color will be automatically defined) 'foreground' => '#fff', // Specifying a dashicon for the block 'src' => 'book-alt', ),keywords
(Array) (Optional) An array of search terms to help user discover the block while searching.'keywords' => array('quote', 'mention', 'cite'),post_types
(Array) (Optional) An array of post types to restrict this block type to.'post_types' => array('post', 'page'),mode
Note. When in “preview” or “edit” modes, an icon will appear in the block toolbar to toggle between modes.
(String) (Optional) The display mode for your block. Available settings are “auto”, “preview” and “edit”. Defaults to “preview”. auto: Preview is shown by default but changes to edit form when block is selected. preview: Preview is always shown. Edit form appears in sidebar when block is selected. edit: Edit form is always shown.'mode' => 'auto',align
(String) (Optional) The default block alignment. Available settings are “left”, “center”, “right”, “wide” and “full”. Defaults to an empty string.'align' => 'full',align_text
(String) (Optional) The default block text alignment (see supports setting for more info). Available settings are “left”, “center” and “right”. Defaults to the current language’s text alignment.'align_text' => 'center',align_content
(String) (Optional) The default block content alignment (see supports setting for more info). Available settings are “top”, “center” and “bottom”. When utilising the “Matrix” control type, additional settings are available to specify all 9 positions from “top left” to “bottom right”. Defaults to “top”.'align_content' => 'center',render_template
(String) The path to a template file used to render the block HTML. This can either be a relative path to a file within the active theme or a full path to any file.// Specifying a relative path within the active theme 'render_template' => 'template-parts/blocks/testimonial/testimonial.php', // Specifying an absolute path 'render_template' => plugin_dir_path( __FILE__ ) . 'template-parts/blocks/testimonial/testimonial.php',render_callback
(Callable) (Optional) Instead of providing a render_template, a callback function name may be specified to output the block’s HTML.// Specifying a function 'render_callback' => 'my_acf_block_render_callback', // Specifying a class method 'render_callback' => array($this, 'block_render_callback'),enqueue_style
(String) (Optional) The url to a .css file to be enqueued whenever your block is displayed (front-end and back-end). Since WordPress 5.8, scripts and styles may not load correctly in block patterns, styles, and iframed previews. To resolve this, you’ll need to use the newblock.jsonformat with thescriptandstylekeys.'enqueue_style' => get_template_directory_uri() . '/template-parts/blocks/testimonial/testimonial.css',enqueue_script
(String) (Optional) The url to a .js file to be enqueued whenever your block is displayed (front-end and back-end). Since WordPress 5.8, scripts and styles may not load correctly in block patterns, styles, and iframed previews. To resolve this, you’ll need to use the newblock.jsonformat with thescriptandstylekeys.'enqueue_script' => get_template_directory_uri() . '/template-parts/blocks/testimonial/testimonial.js',enqueue_assets
(Callable) (Optional) A callback function that runs whenever your block is displayed (front-end and back-end) and enqueues scripts and/or styles.// Specifying a function name 'enqueue_assets' => 'my_acf_block_enqueue_assets', // Specifying a class method 'enqueue_assets' => array($this, 'block_enqueue_assets'), // Specifying an anonymous function 'enqueue_assets' => function(){ wp_enqueue_style( 'block-testimonial', get_template_directory_uri() . '/template-parts/blocks/testimonial/testimonial.css' ); wp_enqueue_script( 'block-testimonial', get_template_directory_uri() . '/template-parts/blocks/testimonial/testimonial.js', array('jquery'), '', true ); },supports
(Array) (Optional) An array of features to support. All properties from the JavaScript block supports documentation may be used. The following options are supported:'supports' => array( /* ... */ ),- align
This property enables a toolbar button to control the block’s alignment. Defaults totrue. Set tofalseto hide the alignment toolbar. Set to an array of specific alignment names to customize the toolbar.
// disable alignment toolbar 'align' => false, // customize alignment toolbar 'align' => array( 'left', 'right', 'full' ),- align_text
This property enables a toolbar button to control the block’s text alignment. Defaults tofalse. Set totrueto show the alignment toolbar button.
The current selected alignment value will be accessible within the render callback/template via$block['align_text'].
// Show text alignment toolbar. 'align_text' => true,- align_content
This property enables a toolbar button to control the block’s inner content alignment. Defaults tofalse. Set totrueto show the alignment toolbar button, or set to'matrix'to enable the full alignment matrix in the toolbar
The current selected alignment value will be accessible within the render callback/template via$block['align_content'].
// Show content alignment toolbar. 'align_content' => true, // Show full alignment matrix in toolbar. 'align_content' => 'matrix',- full_height
This property enables the full height button on the toolbar of a block and adds the$block[‘full_height’]property inside the render template/callback.$block[‘full_height’]will only be true if the full height button is enabled on the block in the editor. Defaults tofalse.
// enable full_height 'full_height' => true,- mode
This property allows the user to toggle between edit and preview modes via a button. Defaults totrue.
// disable preview/edit toggle 'mode' => false,- multiple
This property allows the block to be added multiple times. Defaults totrue.
'multiple' => false,- align
example
(Array) (Optional) An array of structured data used to construct a preview shown within the block-inserter. All values entered into the ‘data’ attribute array will become available within the block render template/callback via$block['data']orget_field().'example' => array( 'attributes' => array( 'mode' => 'preview', 'data' => array( 'testimonial' => "Your testimonial text here", 'author' => "John Smith" ) ) )acf_block_version
(Integer) (Optional) This property can be used to change between the various ACF block versions (1, 2, or 3). Defaults to2.// Switch to ACF Blocks v3. 'acf_block_version' => 3,
Return
(array) The validated and registered block settings.
Changelog
- Added in version 5.8.0
- Added “align_text” settings in version 5.9.0.
- Added “align_content” settings in version 5.9.0.
Examples
Registering a block with template
This example shows how to register a block using the render_template setting.
functions.php
add_action('acf/init', 'my_acf_blocks_init');
function my_acf_blocks_init() {

    // Check function exists.
    if( function_exists('acf_register_block_type') ) {

        // Register a testimonial block.
        acf_register_block_type(array(
            'name'              => 'testimonial',
            'title'             => __('Testimonial'),
            'description'       => __('A custom testimonial block.'),
            'render_template'   => 'template-parts/blocks/testimonial/testimonial.php',
            'category'          => 'formatting',
        ));
    }
}
template-parts/blocks/testimonial/testimonial.php
<?php

/**
 * Testimonial Block Template.
 *
 * @param   array $block The block settings and attributes.
 * @param   string $content The block inner HTML (empty).
 * @param   bool $is_preview True during AJAX preview.
 * @param   (int|string) $post_id The post ID this block is saved to.
 */

// Create id attribute allowing for custom "anchor" value.
$id = 'testimonial-' . $block['id'];
if( !empty($block['anchor']) ) {
    $id = $block['anchor'];
}

// Create class attribute allowing for custom "className" and "align" values.
$className = 'testimonial';
if( !empty($block['className']) ) {
    $className .= ' ' . $block['className'];
}
if( !empty($block['align']) ) {
    $className .= ' align' . $block['align'];
}

// Load values and handle defaults.
$text = get_field('testimonial') ?: 'Your testimonial here...';
$author = get_field('author') ?: 'Author name';
$role = get_field('role') ?: 'Author role';
$image = get_field('image') ?: 295;
$background_color = get_field('background_color');
$text_color = get_field('text_color');

?>
<div id="<?php echo esc_attr($id); ?>" class="<?php echo esc_attr($className); ?>">
    <blockquote class="testimonial-blockquote">
        <span class="testimonial-text"><?php echo $text; ?></span>
        <span class="testimonial-author"><?php echo $author; ?></span>
        <span class="testimonial-role"><?php echo $role; ?></span>
    </blockquote>
    <div class="testimonial-image">
        <?php echo wp_get_attachment_image( $image, 'full' ); ?>
    </div>
    <style type="text/css">
        #<?php echo $id; ?> {
            background: <?php echo $background_color; ?>;
            color: <?php echo $text_color; ?>;
        }
    </style>
</div>
Registering a block with callback
This example shows how to register a block using the render_callback setting.
functions.php
<?php
add_action('acf/init', 'my_register_blocks');
function my_register_blocks() {

    // check function exists.
    if( function_exists('acf_register_block_type') ) {

        // register a testimonial block.
        acf_register_block_type(array(
            'name'              => 'testimonial',
            'title'             => __('Testimonial'),
            'description'       => __('A custom testimonial block.'),
            'render_callback'   => 'my_acf_block_render_callback',
            'category'          => 'formatting',
        ));
    }
}

/**
 * Testimonial Block Callback Function.
 *
 * @param   array $block The block settings and attributes.
 * @param   string $content The block inner HTML (empty).
 * @param   bool $is_preview True during AJAX preview.
 * @param   (int|string) $post_id The post ID this block is saved to.
 */
function my_acf_block_render_callback( $block, $content = '', $is_preview = false, $post_id = 0, $wp_block = false, $context = false ) {

    // Create id attribute allowing for custom "anchor" value.
    $id = 'testimonial-' . $block['id'];
    if( !empty($block['anchor']) ) {
        $id = $block['anchor'];
    }

    // Create class attribute allowing for custom "className" and "align" values.
    $className = 'testimonial';
    if( !empty($block['className']) ) {
        $className .= ' ' . $block['className'];
    }
    if( !empty($block['align']) ) {
        $className .= ' align' . $block['align'];
    }

    // Load values and handle defaults.
    $text = get_field('testimonial') ?: 'Your testimonial here...';
    $author = get_field('author') ?: 'Author name';
    $role = get_field('role') ?: 'Author role';
    $image = get_field('image') ?: 295;
    $background_color = get_field('background_color');
    $text_color = get_field('text_color');

    ?>
    <div id="<?php echo esc_attr($id); ?>" class="<?php echo esc_attr($className); ?>">
        <blockquote class="testimonial-blockquote">
            <span class="testimonial-text"><?php echo $text; ?></span>
            <span class="testimonial-author"><?php echo $author; ?></span>
            <span class="testimonial-role"><?php echo $role; ?></span>
        </blockquote>
        <div class="testimonial-image">
            <?php echo wp_get_attachment_image( $image, 'full' ); ?>
        </div>
        <style type="text/css">
            #<?php echo $id; ?> {
                background: <?php echo $background_color; ?>;
                color: <?php echo $text_color; ?>;
            }
        </style>
    </div>
    <?php
}
Adding block styles 🎨
Since WordPress 5.8, scripts and styles may not load correctly in block patterns, styles, and iframed previews. To resolve this, you’ll need to use the new block.json format with the script and style keys.
To ensure your block is correctly styled in both the editor and front end, we recommend making use of either the enqueue_style or enqueue_assets settings like so:
functions.php
acf_register_block_type(array(
    'name'              => 'testimonial',
    'title'             => __('Testimonial'),
    'description'       => __('A custom testimonial block.'),
    'render_template'   => get_template_directory() . '/template-parts/blocks/testimonial/testimonial.php',
    'enqueue_style'     => get_template_directory_uri() . '/template-parts/blocks/testimonial/testimonial.css',
));
testimonial.php
<blockquote class="testimonial">
    ...
</blockquote>
testimonial.css
.testimonial {
    background: #00e4ba;
    color: #fff;
}
Note: If creating individual stylesheets is not your cup of tea, please take a look at the enqueue_block_assets and enqueue_block_editor_assets actions that WordPress provide to enqueue your styles.
Adding block scripts ⚡️
Since WordPress 5.8, scripts and styles may not load correctly in block patterns, styles, and iframed previews. To resolve this, you’ll need to use the new block.json format with the script and style keys.
Similar to styles, we recommend making use of either the enqueue_script or enqueue_assets settings to correctly enqueue JavaScript for your block.
For JavaScript to run as intended in both the editor and front-end, it is important to understand the lifecycle of a block when editing a post.
Depending on if the block preview is shown, and whether or not changes have been made, your block may be rendered multiple times during a single page load. In this case, the term “rendered” means that the block’s HTML has been updated/replaced via an AJAX call to your PHP template or callback function.
Each time a block is rendered, the previous HTML is discarded, and the new HTML is displayed. As a result, any JavaScript modifications to the previous DOM elements will also be lost.
To solve this problem, simply hook into our JS action “render_block_preview/type={$type}” and apply your JavaScript functionality as if the block was freshly painted.
This example demonstrates how to enqueue a script whilst providing compatibility with both the front-end and back-end states of a block.
functions.php
acf_register_block_type(array(
    'name'              => 'testimonial',
    'title'             => __('Testimonial'),
    'description'       => __('A custom testimonial block.'),
    'render_template'   => get_template_directory() . '/template-parts/blocks/testimonial/testimonial.php',
    'enqueue_script'    => get_template_directory_uri() . '/template-parts/blocks/testimonial/testimonial.js',
));
testimonial.php
<blockquote class="testimonial">
    <img src="..." />
    ...
</blockquote>
testimonial.js
(function($){

    /**
     * initializeBlock
     *
     * Adds custom JavaScript to the block HTML.
     *
     * @date    15/4/19
     * @since   1.0.0
     *
     * @param   object $block The block jQuery element.
     * @param   object attributes The block attributes (only available when editing).
     * @return  void
     */
    var initializeBlock = function( $block ) {
        $block.find('img').doSomething();
    }

    // Initialize each block on page load (front end).
    $(document).ready(function(){
        $('.testimonial').each(function(){
            initializeBlock( $(this) );
        });
    });

    // Initialize dynamic block preview (editor).
    if( window.acf ) {
        window.acf.addAction( 'render_block_preview/type=testimonial', initializeBlock );
    }

})(jQuery);
Adding block previews 🌄
Block previews offer an elegant solution for identifying and differentiating the various block types shown in the inserter panel.
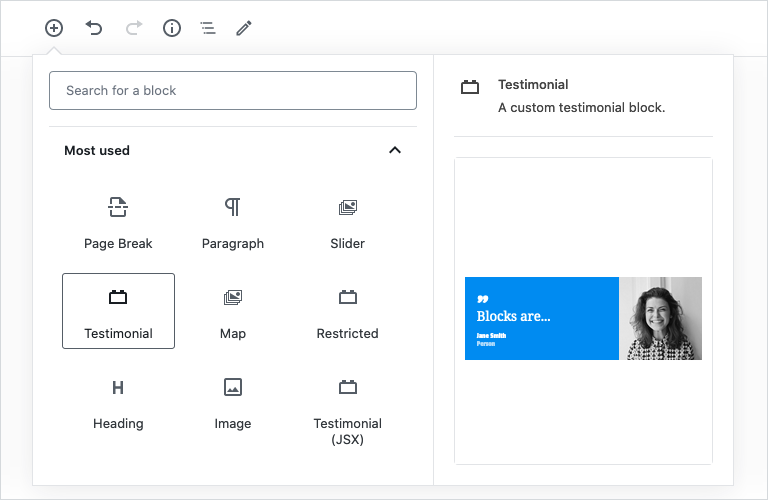
To add support for block previews, use the “example” setting to define an array of attributes used by WordPress to construct the preview as shown in the following example.
functions.php
acf_register_block_type(array(
    'name'              => 'testimonial',
    'title'             => __('Testimonial'),
    'description'       => __('A custom testimonial block.'),
    'example'           => array(
        'attributes' => array(
            'mode' => 'preview',
            'data' => array(
                'testimonial'   => "Blocks are...",
                'author'        => "Jane Smith",
                'role'          => "Person",
                'is_preview'    => true
            )
        )
    )
));
All values defined in the “data” attribute array will become available within the block render template/callback via $block['data'] or get_field().
In the example above, three values are defined matching the names of three existing custom fields (‘testimonial’, ‘author’ & ‘role’). An additional non-custom-field value (‘is_preview’) is defined which could be used within the renderer to display alternative markup.
👨💻 As previews are intended to communicate a visual design, we advise using the “preview” mode, however, it is also possible to set this to “edit” which will display the custom fields connected to that block.
Adding inner blocks 👩👧👦
The term “Inner Blocks” refers to the ability to enable nested content – blocks within blocks. This short video demonstrates how inner blocks can be used to create a date restricted block with only basic PHP.
To add support for inner blocks, use the <InnerBlocks /> Component within your render template/callback to define an editable area. This special element will be displayed as a native “block inserter area” when editing content, and the saved “inner blocks content” when viewing content.
Please note that only a single <InnerBlocks /> Component may be used per block.
In order for the <InnerBlocks /> Component to function within the React based block editor, your block HTML must first be parsed as JSX. This can easily be done by adding support for the jsx property.
The following example demonstrates how to create the previous mentioned “Restricted” content block.
functions.php
add_action('acf/init', 'my_acf_init_blocks');
function my_acf_init_blocks() {

    // Check function exists.
    if( function_exists('acf_register_block_type') ) {

        // Register a restricted block.
        acf_register_block_type(array(
            'name'              => 'restricted',
            'title'             => 'Restricted',
            'description'       => 'A restricted content block.',
            'category'          => 'formatting',
            'mode'              => 'preview',
            'supports'          => array(
                'align' => true,
                'mode' => false,
                'jsx' => true
            ),
            'render_template' => 'template-parts/blocks/restricted/restricted.php',
        ));
    }
}
template-parts/blocks/restricted/restricted.php
<?php
/**
 * Restricted Block Template.
 *
 * @param   array $block The block settings and attributes.
 * @param   string $content The block inner HTML (empty).
 * @param   bool $is_preview True during AJAX preview.
 * @param   (int|string) $post_id The post ID this block is saved to.
 */

// Create class attribute allowing for custom "className" and "align" values.
$classes = '';
if( !empty($block['className']) ) {
    $classes .= sprintf( ' %s', $block['className'] );
}
if( !empty($block['align']) ) {
    $classes .= sprintf( ' align%s', $block['align'] );
}

// Load custom field values.
$start_date = get_field('start_date');
$end_date = get_field('end_date');

// Restrict block output (front-end only).
if( !$is_preview ) {
    $now = time();
    if( $start_date && strtotime($start_date) > $now ) {
        echo sprintf( '<p>Content restricted until %s. Please check back later.</p>', $start_date );
        return;
    }
    if( $end_date && strtotime($end_date) < $now ) {
        echo sprintf( '<p>Content expired on %s.</p>', $end_date );
        return;
    }
}

// Define notification message shown when editing.
if( $start_date && $end_date ) {
    $notification = sprintf( 'Content visible from %s until %s.', $start_date, $end_date );
} elseif( $start_date ) {
    $notification = sprintf( 'Content visible from %s.', $start_date );
} elseif( $end_date ) {
    $notification = sprintf( 'Content visible until %s.', $end_date );
} else {
    $notification = 'Content unrestricted.';
}
?>
<div class="restricted-block <?php echo esc_attr($classes); ?>">
    <span class="restricted-block-notification"><?php echo esc_html( $notification ); ?></span>
    <InnerBlocks  />
</div>
The <InnerBlocks /> Component may also be customized with the following attributes as documented in the InnerBlocks Component Guide.
allowedBlocks
(Array) An array of block names that restricted the types of content that can be inserted.$allowed_blocks = array( 'core/image', 'core/paragraph' ); echo '<InnerBlocks allowedBlocks="' . esc_attr( wp_json_encode( $allowed_blocks ) ) . '" />';template
(Array) A structured array of block content as documented in the CPT block template guide. An additional attribute named templateLock may be used in conjunction to lock the template content.$template = array( array( 'core/paragraph', array( 'placeholder' => 'Add a root-level paragraph', ) ), array( 'core/columns', array(), array( array( 'core/column', array(), array( array( 'core/image', array() ), ) ), array( 'core/column', array(), array( array( 'core/paragraph', array( 'placeholder' => 'Add a inner paragraph' ) ), ) ), ) ) ); echo '<InnerBlocks template="' . esc_attr( wp_json_encode( $template ) ) . '" templateLock="all" />';- templateLock
(String) Locks the template content. Available settings are “all” or “insert”. See the InnerBlocks Component for further information.
Supercharge Your Website With Premium Features Using ACF PRO
Speed up your workflow and unlock features to better develop websites using ACF Blocks and Options Pages, with the Flexible Content, Repeater, Clone, Gallery Fields & More.
Related
- ACF Blocks: ACF Blocks Configuration via block.json
- ACF Blocks: ACF Blocks V3
- ACF Blocks: How To Upgrade a Legacy Block to block.json With ACF 6
- ACF Blocks: What’s New With ACF Blocks in ACF 6
- ACF Blocks: ACF Blocks
