
Overview
The Gallery field gives you the flexibility to display images in a wide variety of options such as carousels, sliders, and light boxes. However, the Gallery field’s greatest strength might be what it lets you offer content editors: a simple interface for uploading, arranging, and tagging their images, with rules set by you that ensure every image always meets specifications and editorial standards.
In this tutorial, we’ll show you how to register and set up your Gallery fields, enforce image specs and editorial flow by setting rules governing validation, location, and presentation, and add the fields to your templates. We’ll also cover how to use the WordPress ThickBox with your Gallery fields to further improve the content editing experience.

The Gallery field is one of the features in ACF PRO, which also includes other complex field types, options page support, and ACF Blocks.
Registering Fields and Field Setup
The Gallery field provides a straightforward means to attach a series of images and display them however you like. Typically, this lends itself nicely to a gallery display on the frontend of your site.
There is little you have to do to get your Gallery field registered. Just spin up a new Gallery field group in ACF, add a Gallery field, enter the Field Label, choose your Return Format, and decide if the images must be uploaded to the post or can be drawn from the whole Media Library.
The video below shows the entire process of creating a Gallery field, including populating it with content, and the template files used to render it.
As the video shows, the Gallery field is a great way to quickly and easily create stunning showcases of images in a wide variety of formats. It’s practically guaranteed to save you time, but the biggest advantage of the Gallery field may be what it allows you to offer site owners and editors.
Enforcing Editorial Quality and Standards
The initial setup just gives you a basic Gallery. Setting Validation restrictions, like allowed file types and minimums and maximums for dimensions and number of images, gives you greater control of the images that are actually used.
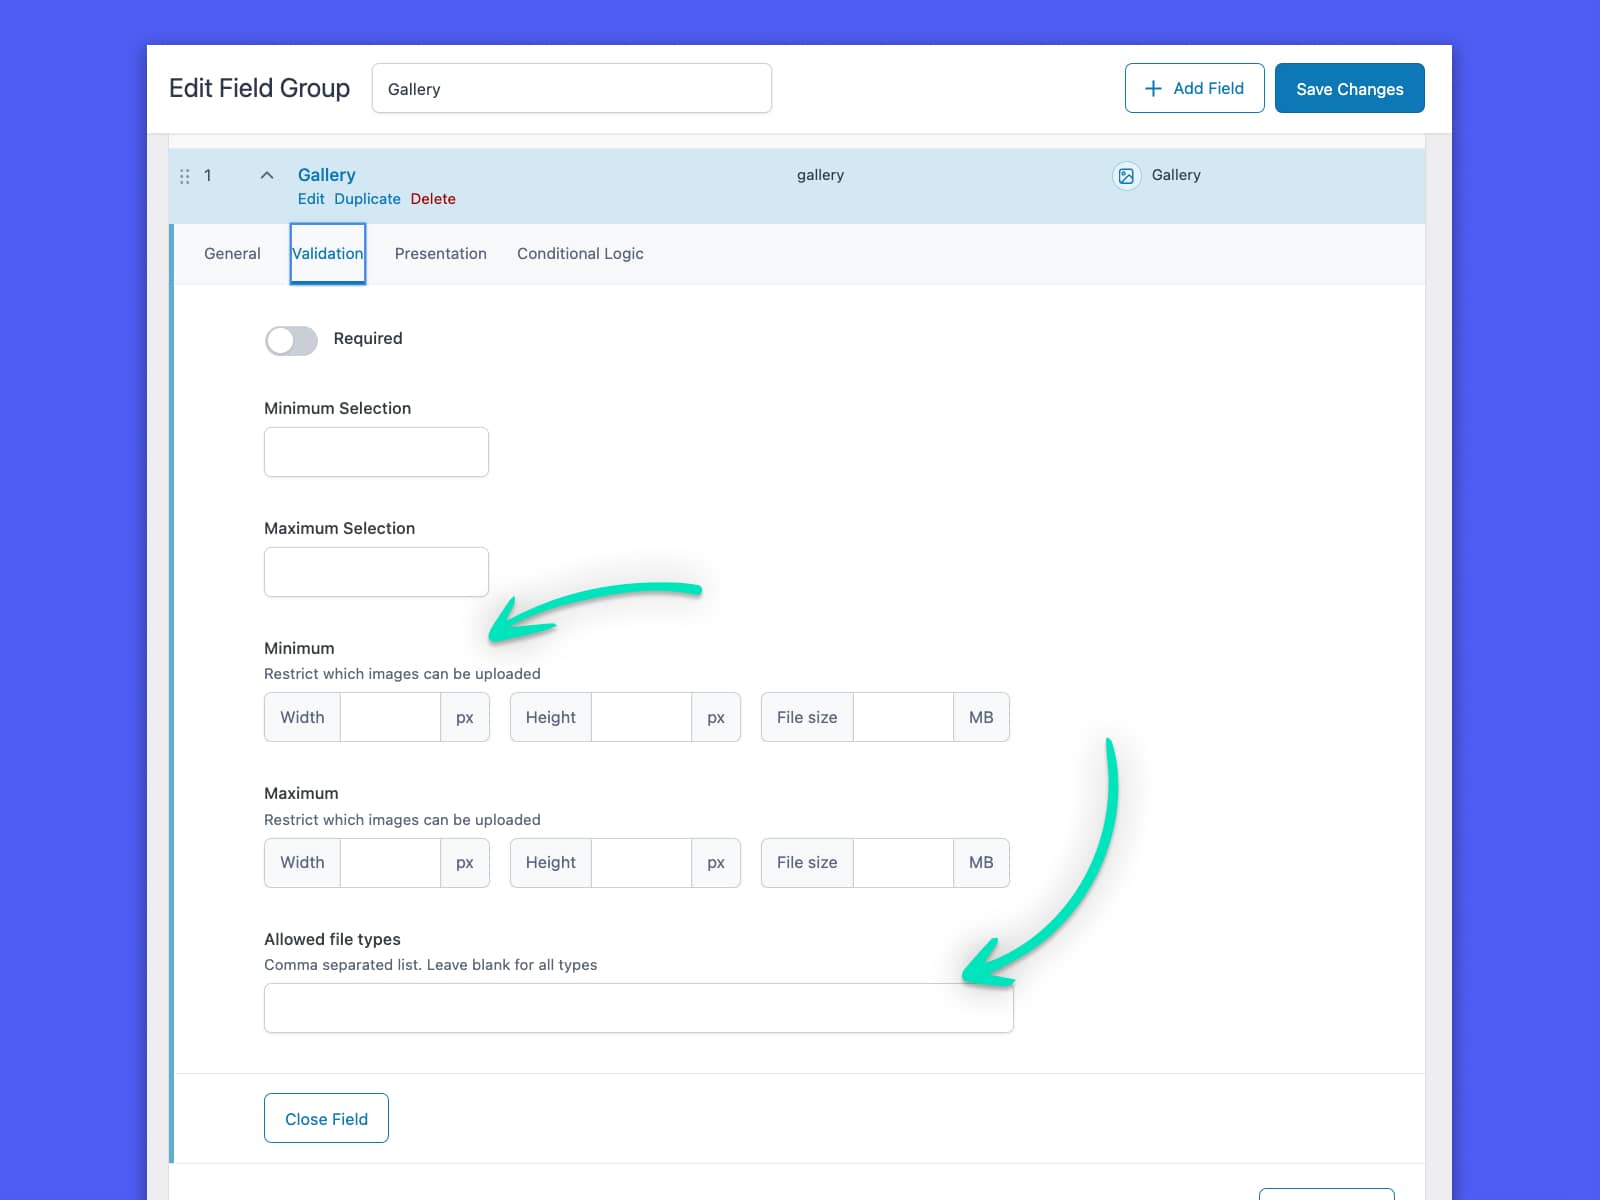
The Validation settings–and similar settings found in the Image field–are incredibly valuable for enforcing editorial standards. Many sites have editorial policies regarding image size, how many images are allowed in a gallery, and so on. Setting this up on the Validation tab means those policies are automatically enforced.
Site owners and content editors find this appealing. The site owner may set the policy, but it’s up to the content editors to enforce it. A properly configured ACF Gallery field removes that burden and ensures they’ll never upload photos that don’t match the specs.
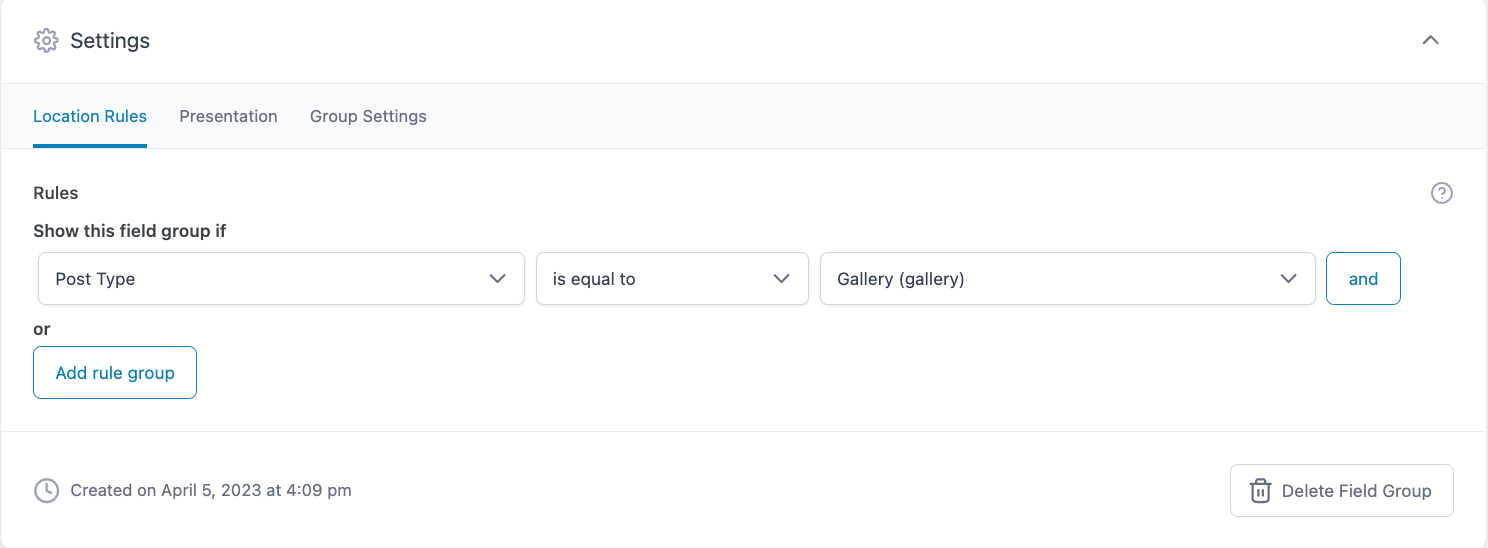
Location and Presentation
The Settings section in the Field Group Editor allows you to set rules that govern the entire field group. The types of rules you can set are the same from one field group to another, regardless of the fields used: Location Rules, Presentation, and Group Settings. With the right configuration, these settings help enforce editorial standards and let content editors focus on choosing the best images.
For example, you can easily set a Location Rule to only show the field group if the post type is equal to “Gallery,” a custom post type created specifically for photo galleries. In this case, there’s no way for a content editor to include a photo gallery on a post that doesn’t allow them, as the field group simply won’t be displayed.
Editing and Inputting Data

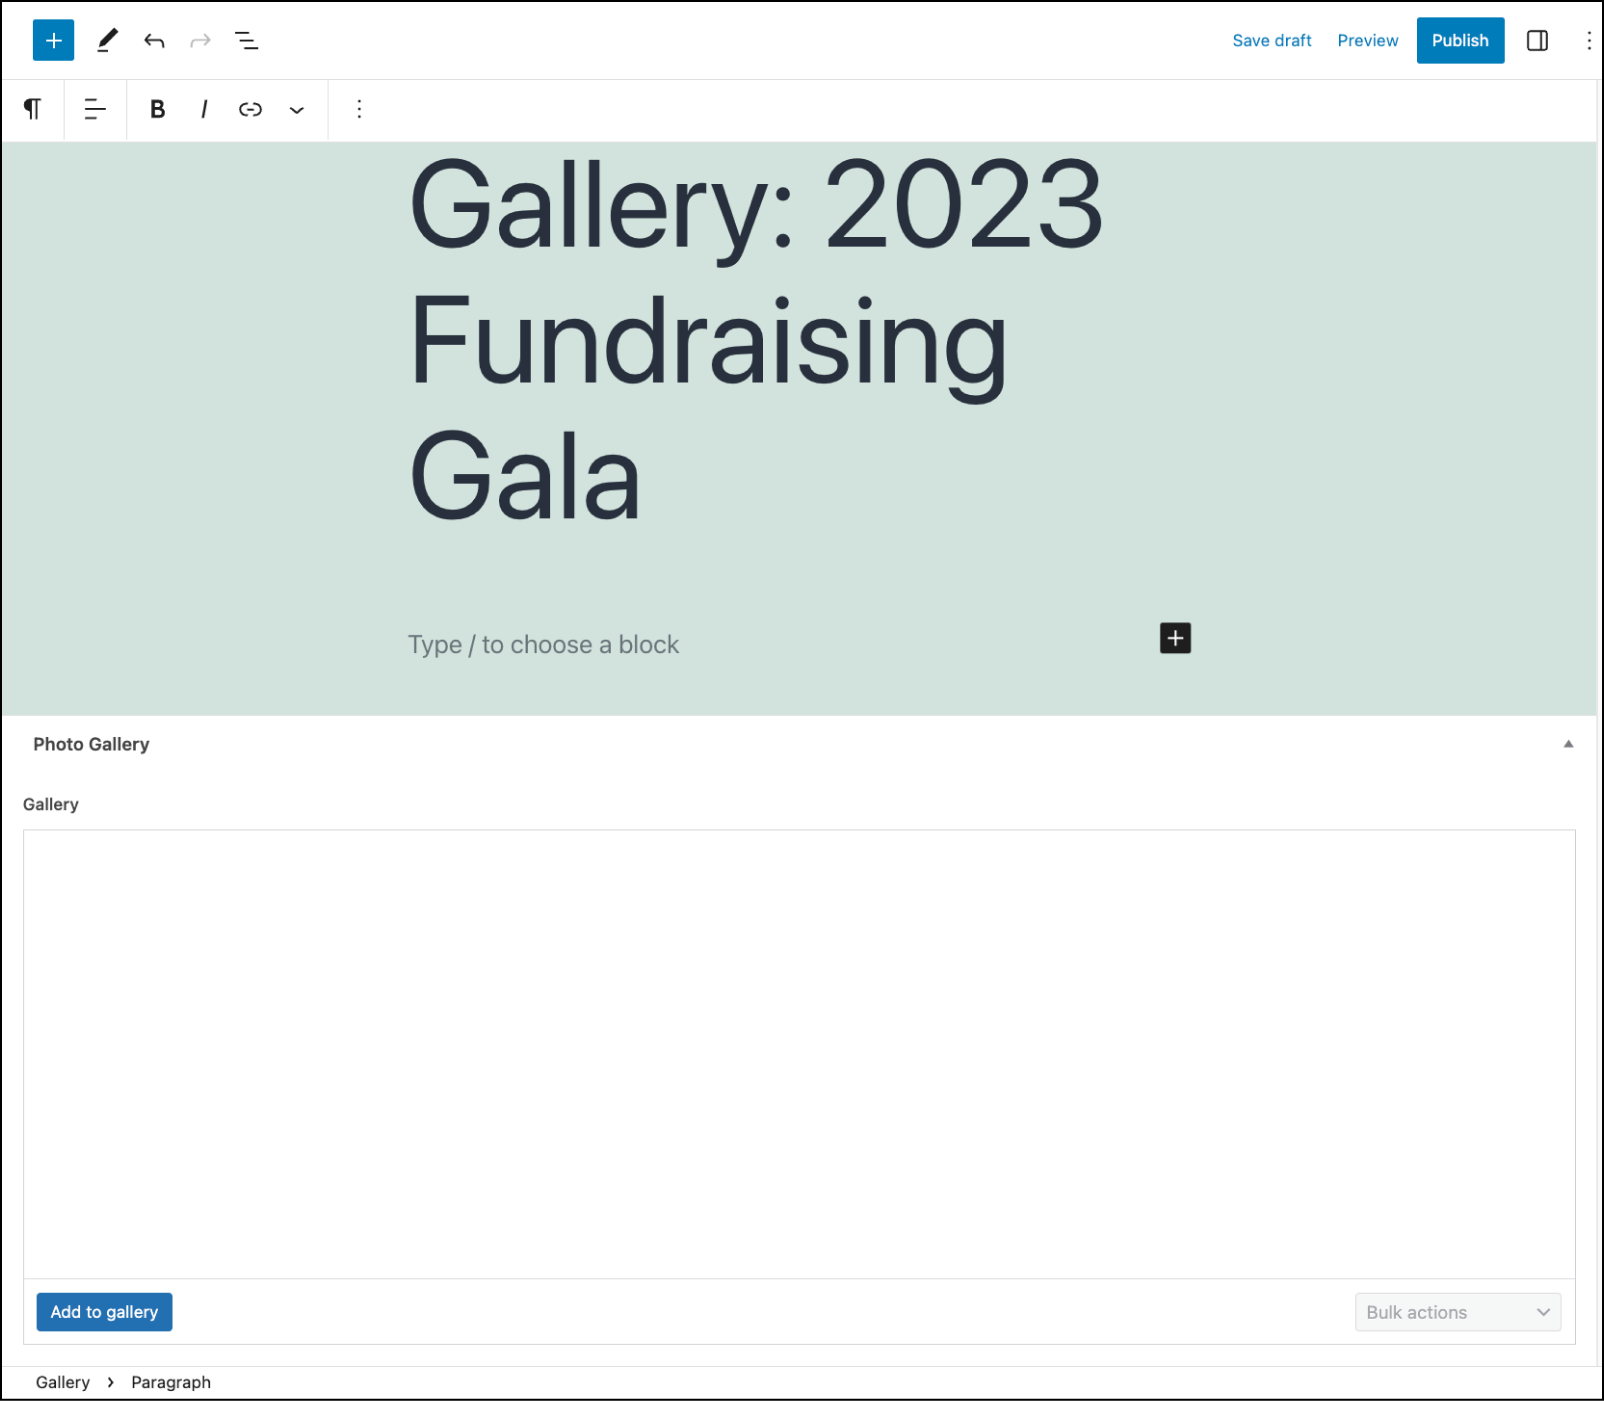
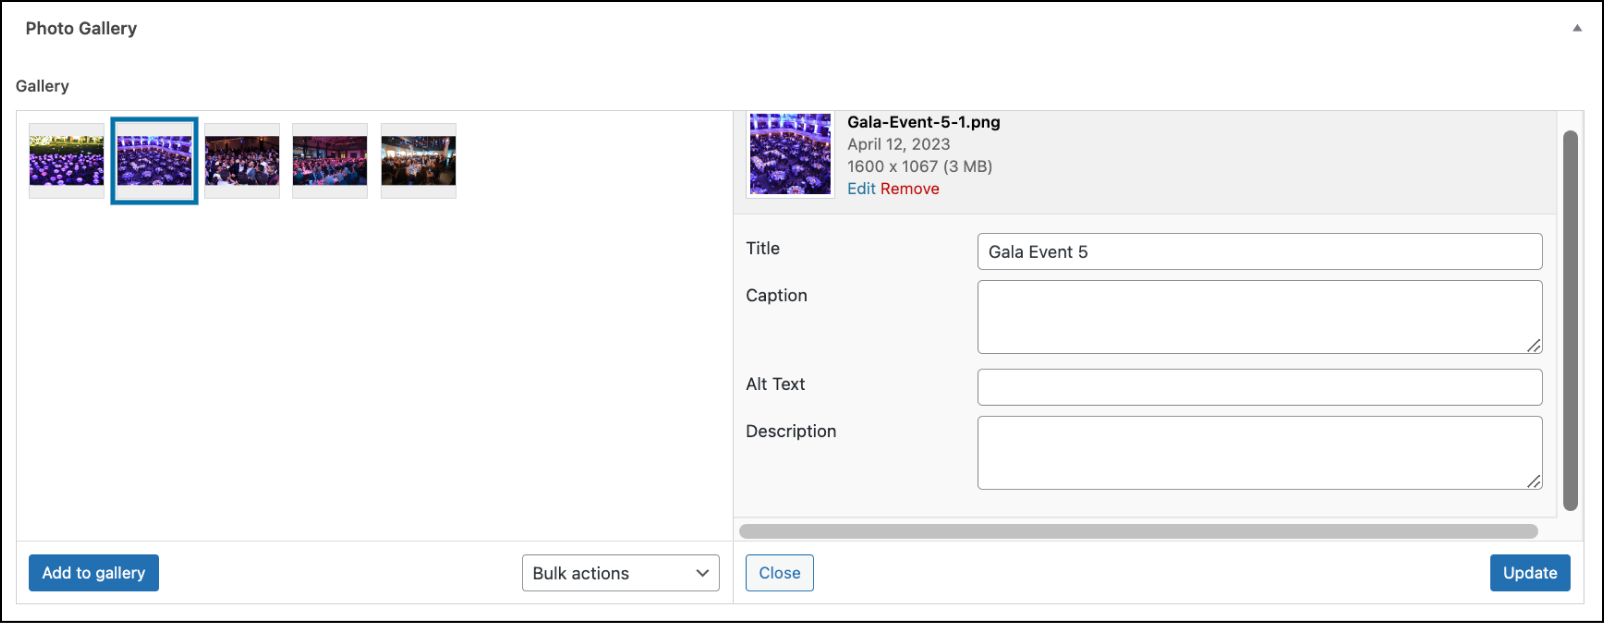
The Gallery field further improves the experience for your content editors by making it incredibly simple to upload images, arrange them in the preferred order, and assign them the right metadata.
When a content editor clicks Add to gallery, a modal opens with a choice between uploading new images or selecting existing ones from the Media Library. As mentioned previously, the Gallery field can be set so it will only allow galleries to be created from images uploaded to the post.
Once the content editor has selected the images they want to use, ACF checks them against the Validation rules you configured when you created the Gallery field. It will reject any that do not match the specs, with a notification showing why that image cannot be used.
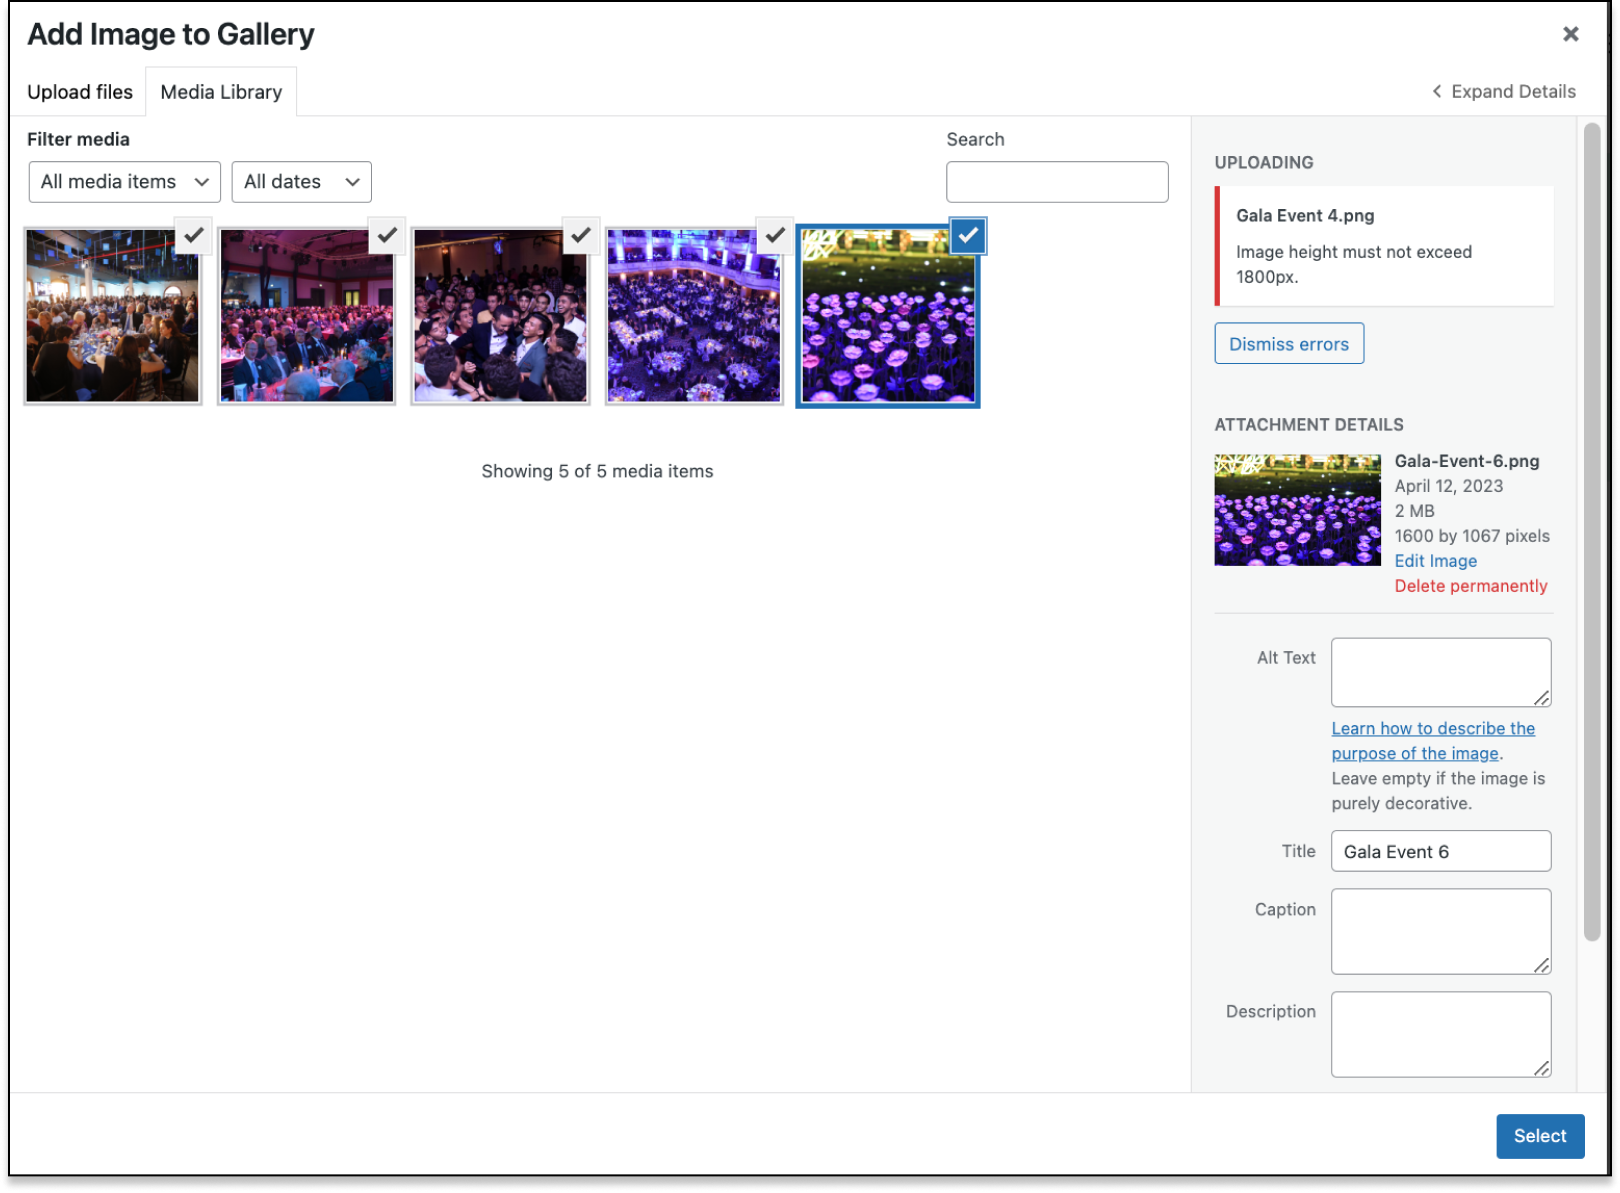
Finally, the content editor clicks Select to close the modal and return to the post editing screen. At this point, they can rearrange photos manually by clicking and dragging, or use Bulk Actions to sort by date, title, etc. Content editors can click on any image to adjust its alt text, description, and caption.
Output Logic for Templates
By this point, everything is set up on the backend to allow our content editors to easily create stunning image galleries that are in line with the site owner’s standards and image specifications. They won’t be visible on the frontend until we create a new template or modify an existing one.
We’ve included an example page-gallery.php file on GitHub that displays a Gallery field designed for our fictitious tech company, Qorp.
Let’s break down some of what’s in that file. We start with the usual bric-a-brac included at the top of a WordPress template file.
<?php
/**
 * Page: Gallery
 *
 * @package WordPress
 * @subpackage QORP
 */

get_header();
Almost everything else we need to include goes inside The Loop. We use get_template_part to call content-single.php and use that as the basis for our posts. Next, we use the style tag to set colors, margins, and other display information.
/* Start the Loop */
while ( have_posts() ) :
    the_post();

    get_template_part( 'template-parts/content/content-single' );
    ?>

    <style>
        .acf-gallery {
            display:grid;
            grid-gap:1.5rem;
            grid-template-columns:repeat(auto-fill, minmax(8ch, 1fr));
            margin:var(--wp--preset--spacing--lg) auto;
            max-width:var(--wp--style--global--content-size);
        }
        .acf-gallery a img {
            display: block;
            filter: grayscale(100%);
            height: auto;
            transition: filter 0.7s ease;
            width: 100%;
        }
        .acf-gallery a:hover img {
            filter: grayscale(0);
        }
    </style>
At this point, we need to hook up the logic to grab and display our post metadata. We can utilize ACF’s get_field() function to retrieve our field data, loop through each field and grab each field’s pertinent attributes ($image[‘ID’], $image[‘url’]) to add to our final markup.
    <div class="acf-gallery">
        <?php
        // ACF - Gallery fields.
        $images = get_field( 'gallery' );

        if ( $images ) :
            // Grab each image.
            foreach ( $images as $image ) :
                $image_id      = $image['ID'];
                $image_src     = $image['url'];
                $image_caption = $image['caption'];
                ?>
                    <a href="<?php echo esc_url( $image_src ); ?>" title="<?php echo esc_html( $image_caption ); ?>" class="thickbox">
                        <?php echo wp_get_attachment_image( $image_id, 'thumbnail' ); ?>
                    </a>
                    <?php
            endforeach;
        endif;
        ?>
    </div><!-- .acf-gallery →
Finally, our template ends The Loop and gets the footer for our page.
    <?php
endwhile; // End of the loop.

get_footer();
Using the WordPress Thickbox With Gallery Fields
For the sake of simplicity, we’ll leverage WordPress core’s existing ThickBox dependency to provide our users with a modal pop-up. However, there are endless possibilities for how you can output your images. If you prefer a slider, check out Swiper.js.
Add the code block below to your theme’s functions.php if you want to incorporate WordPress’s ThickBox with your Gallery fields. Again, feel free to hook up a different third-party dependency (such as Swiper.js) by replacing the calls for wp_enqueue_script() and wp_enqueue)_style() with your preferred presentational dependency.
This is the code used to create the modal seen in the video walkthrough. Please see the complete file on GitHub for insight into how it’s used in a template.
/**
 * Enqueue Thickbox dependencies for lightbox.
 *
 * @link https://developer.wordpress.org/reference/functions/add_thickbox/
 *
 * @return void
 */
function qorp_enqueue_thickbox() {
    // Only on the 'gallery' page.
    if ( is_page( 'gallery' ) ) {
        wp_enqueue_script( 'thickbox' );
        wp_enqueue_style( 'thickbox' );
    }
}
add_action( 'wp_enqueue_scripts', 'qorp_enqueue_thickbox' );
Conclusion
The Gallery field offers benefits to developers, designers, site owners, and content editors. The options to create carousels, lightboxes, sliders and other types of image galleries is almost limitless, leading to a great deal of flexibility in terms of design and layout.
Setting the right rules means the images uploaded are always consistent with the site’s policies, and content editors can easily integrate the processes into existing workflows.
Like our articles on how to use the Repeater field and how to build layouts with the Flexible Content field, think of this tutorial as a starting point for using the Gallery field rather than an exhaustive instruction manual. This is because any field in ACF–including the Gallery field and other fields in ACF PRO–can be used together in nearly limitless combinations.
Feel free to message us on Twitter and let us know how you’ve used the Gallery field. We’re certain you’ll surprise us.
Supercharge Your Website With Premium Features Using ACF PRO
Speed up your workflow and unlock features to better develop websites using ACF Blocks and Options Pages, with the Flexible Content, Repeater, Clone, Gallery Fields & More.
Related
- Guides: How to Create an Options Page
- Content: Gallery
- ACF Blocks: ACF Blocks FAQ
- Guides: Building Layouts With the Flexible Content Field in a Theme
- Content: Image
