
Overview
Options pages are setting pages in the WordPress admin area containing fields with the ability to control global options. This allows builders or clients to make one change and update content that appears in many places throughout the site: contact information, calls-to-action, or notifications about sales and special events.
A more advanced options page could even allow clients to switch between entirely different site designs with just a few clicks. The biggest challenge with options pages is coding them, as it’s often time consuming and tedious.
The Options Page feature released in ACF PRO 6.2 gives you a way to register new options pages in the WordPress admin without breaking your workflow or writing a single line of code. This is an extremely powerful tool with almost limitless applications, but it’s important to understand the basics first. In this tutorial, we’ll show you how to use ACF PRO to create an options page that functions as a sitewide notification bar.
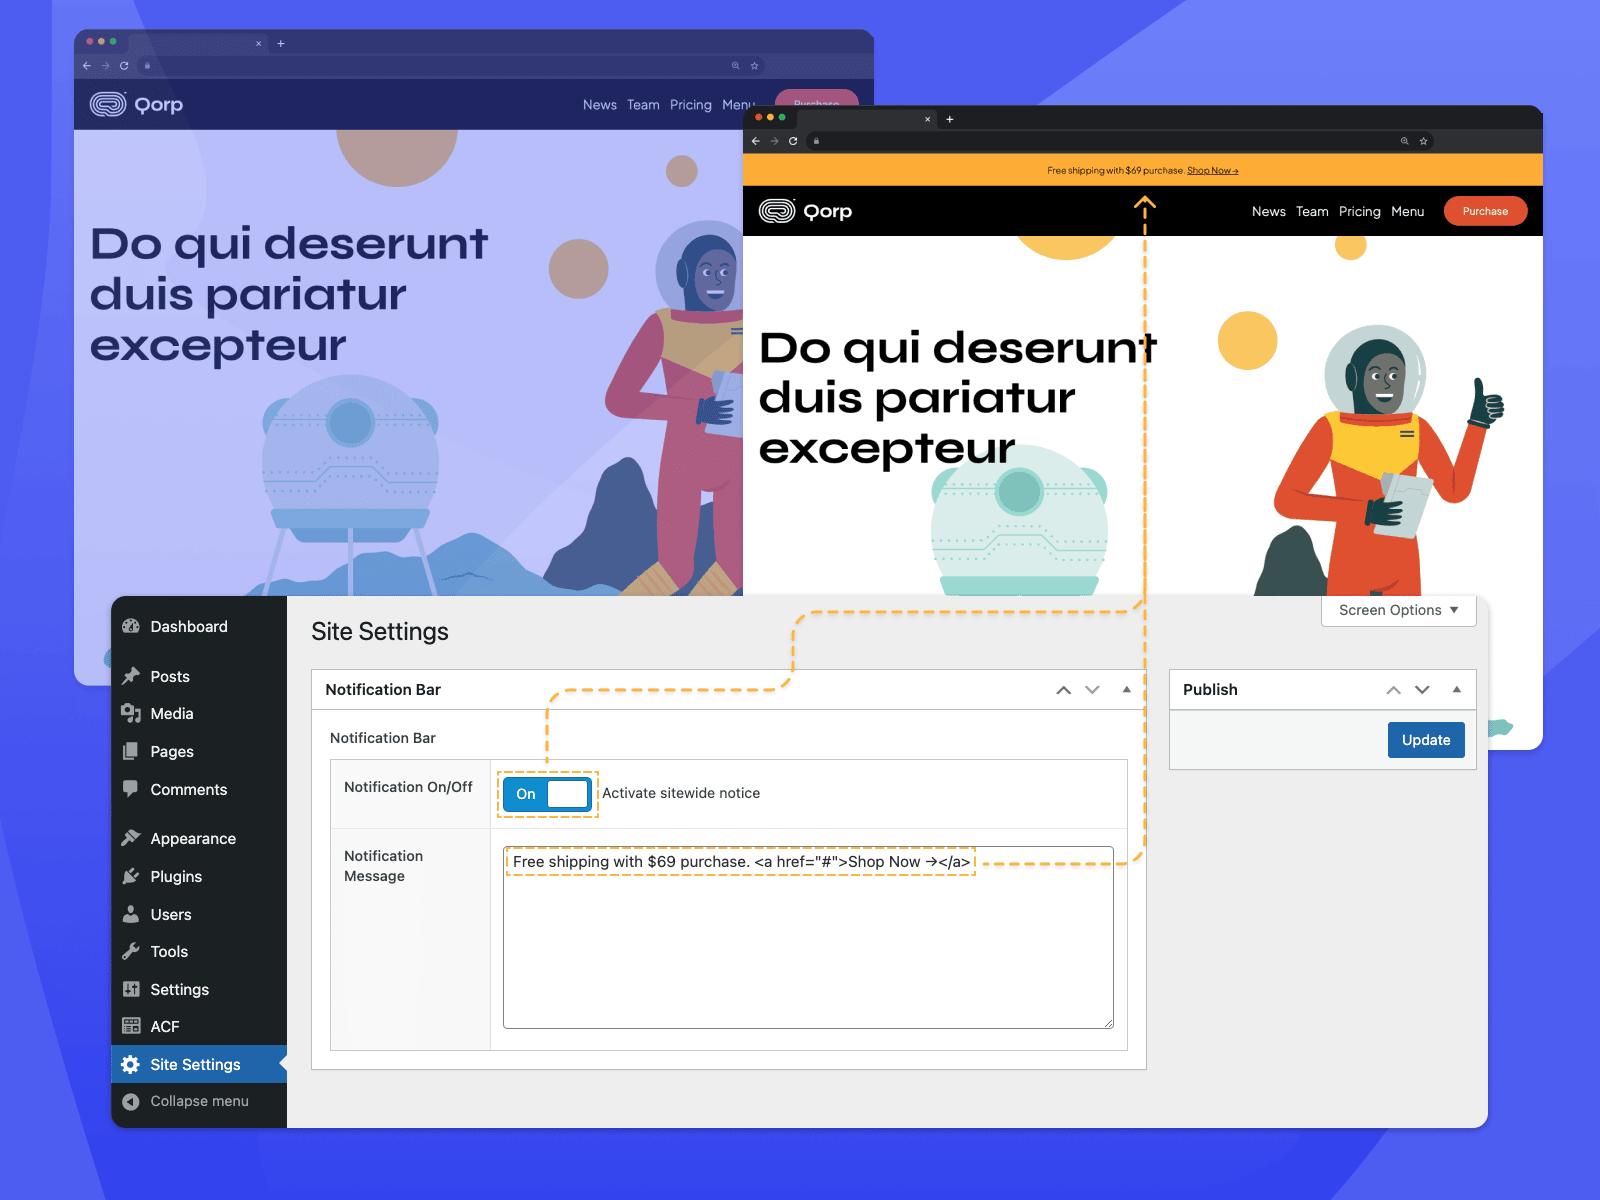
The notification bar will be displayed across the top of the entire site, so it’s an ideal example of something you’d want controlled from a custom “Site Settings” page. We’ll include features to allow our editors to toggle the bar on or off, as well as add a custom message.
Here is a breakdown of the steps to set up our sitewide notification bar:
- Create a new options page
- Create a new field group
- Verify the field group is assigned to the options page
- Add code to handle display logic (shown if active and hidden if inactive)
The video below will give you a look at the steps we’ll take and the final outcome.
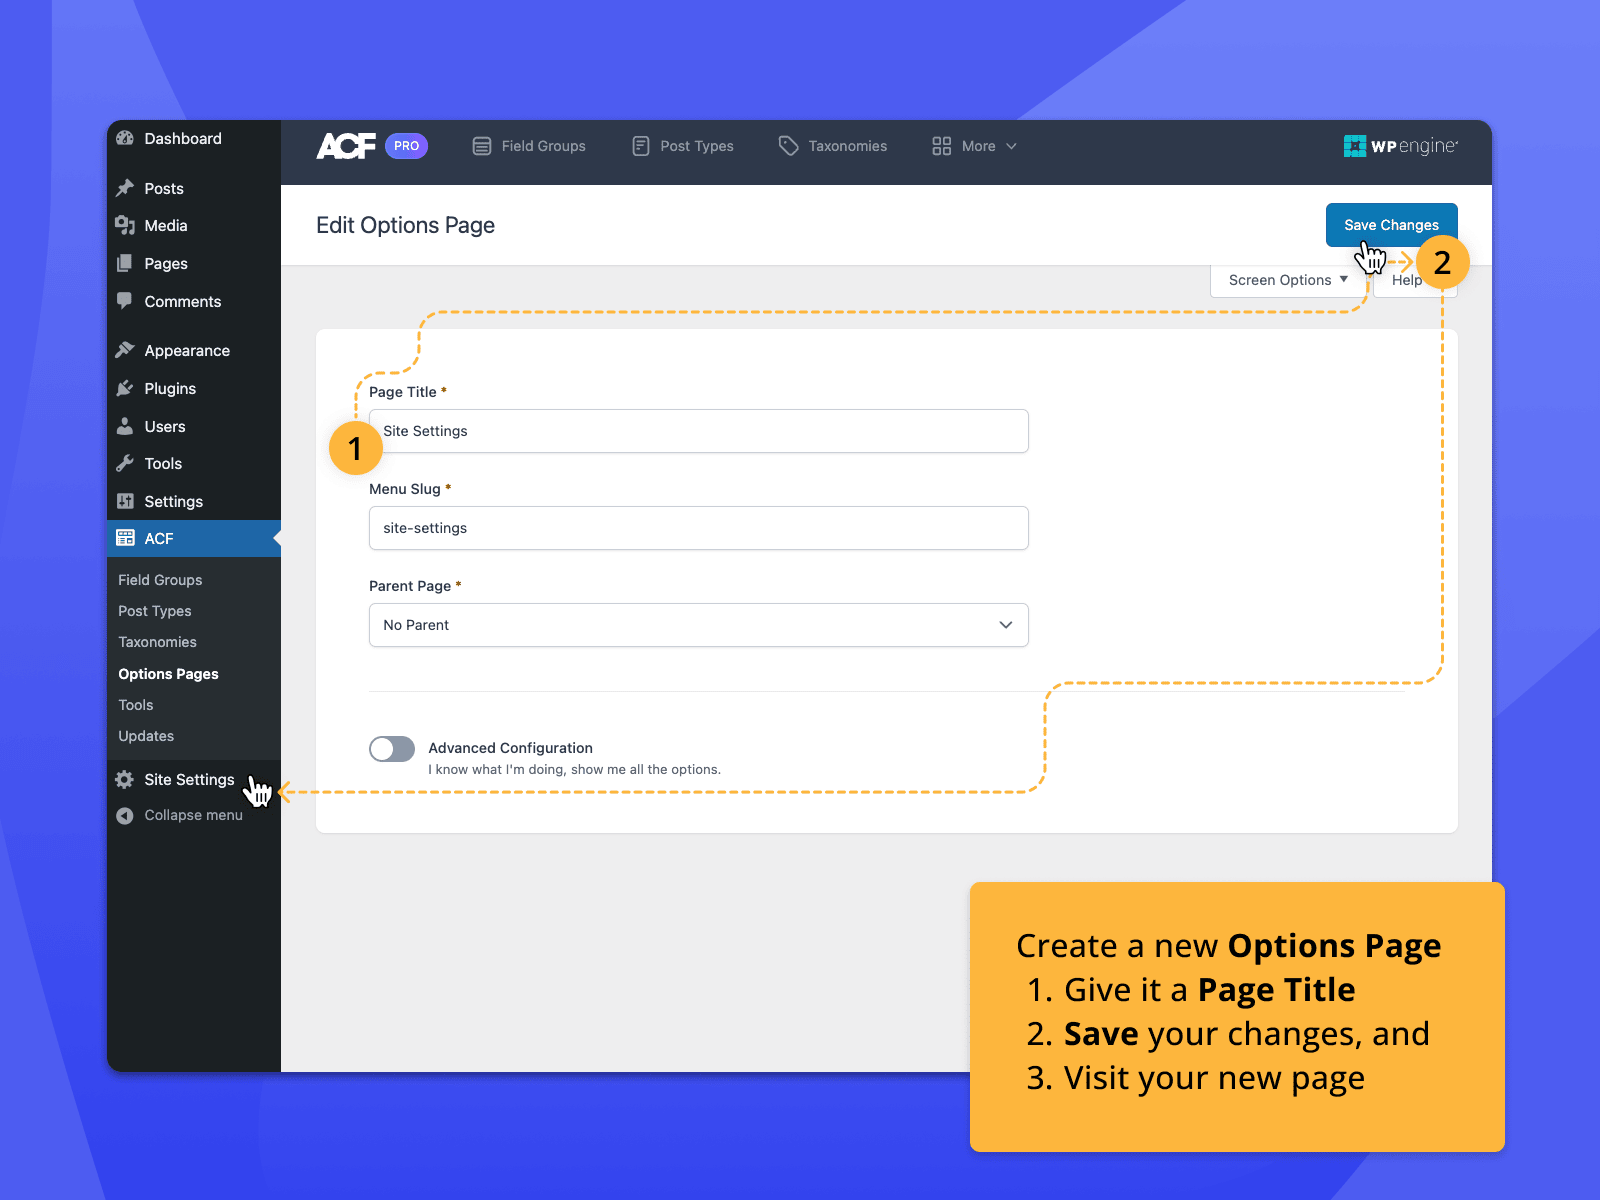
Create a New Options Page
First, we need to create a new options page called “Site Settings”. Under ACF’s menu, choose Options Pages, and then click Add New to create a new options page. Click under Page Title and use the default “Site Settings”. Next, click under Menu Slug, and again use the default “site-settings”.
Leave “Parent Page” set to “No Parent” for now. We’ll look at how to create a child options page in a later section. Be sure to save your changes.

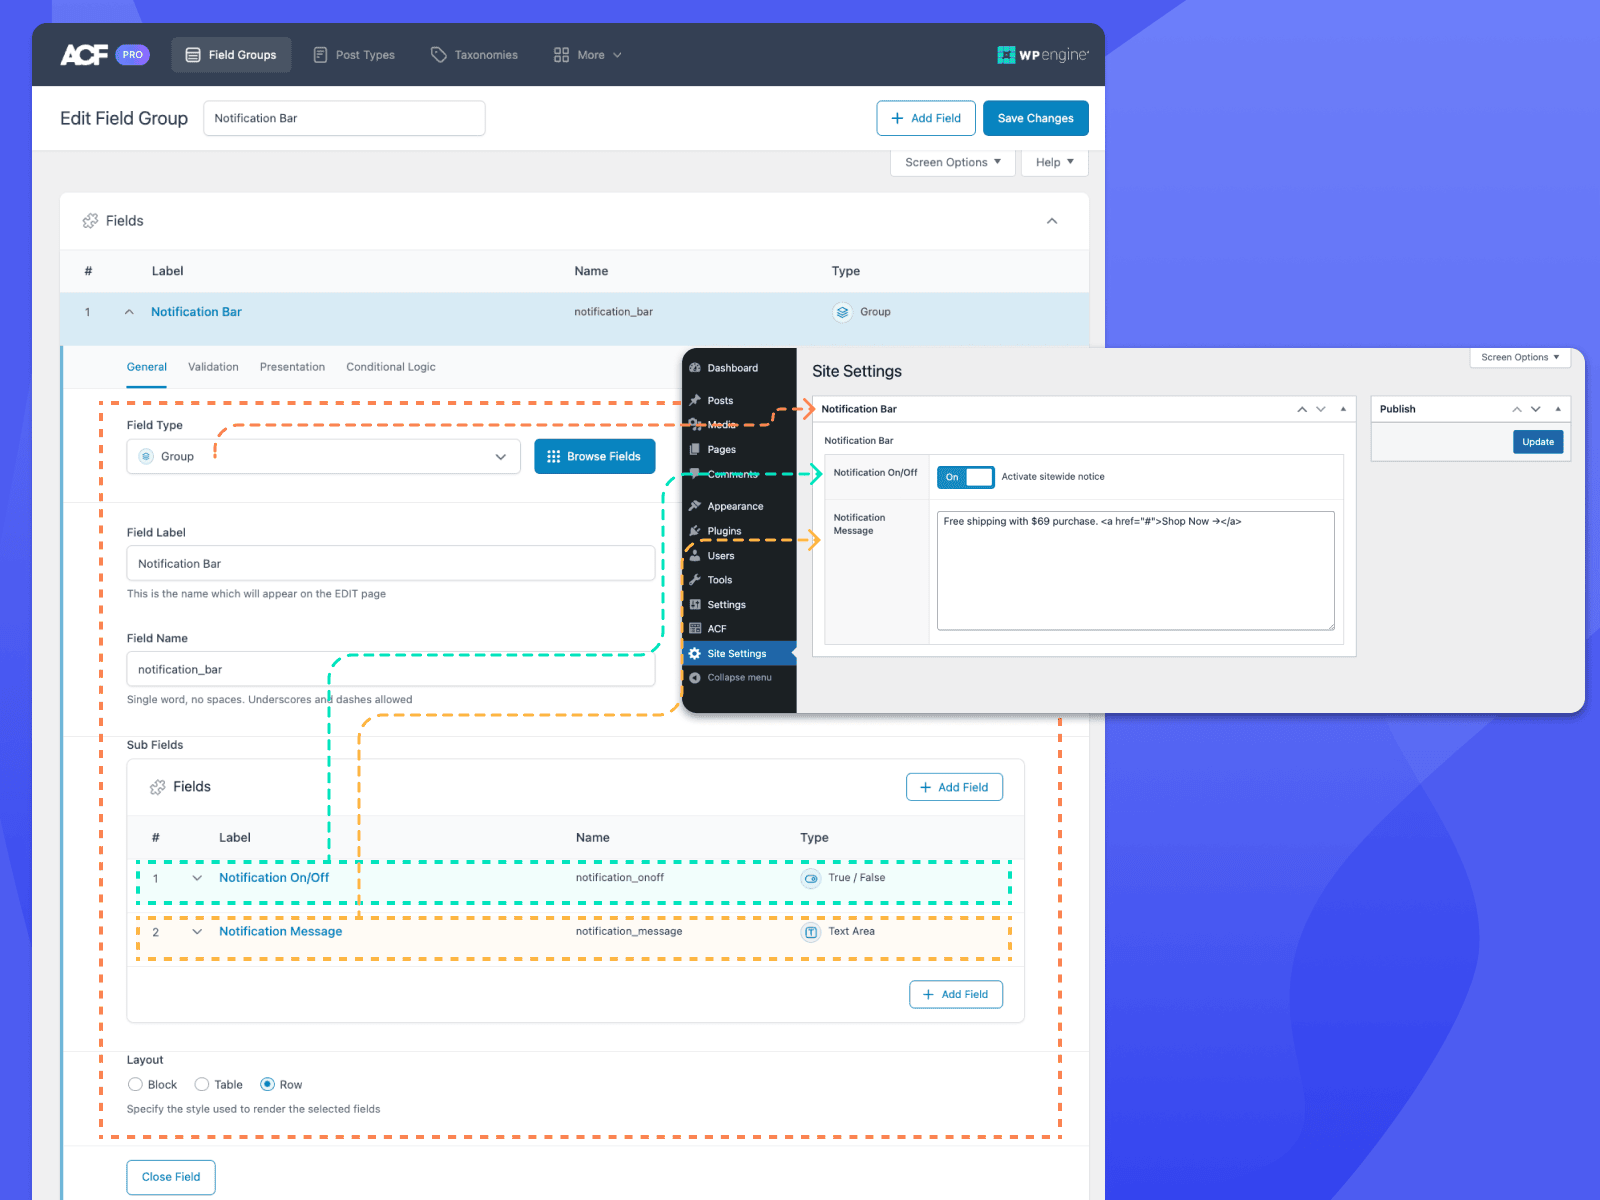
Create a New Field Group
Now that we have our Site Settings options page, we need to assign some fields. We’ll start with a Group field, and then add a True/False field and a Text Area field under the Group field’s “Sub Fields” setting. Here is what our field group setup will look like for our notification bar:
- Group field to organize our other fields.
- Field Label: Notification Bar
- Field Name:
notification_bar - The “Layout” setting (along the bottom) controls how the Group field displays the fields within it. In this case, we’ll choose Row.
- True/False field for toggling the notification bar on and off.
- Field Label: Notification On/Off
- Field Name:
notification_onoff - Under the “Presentation” tab, enable Stylized UI, and then set the text to “On” and “Off”.
- Text Area field to allow editors to add a custom message when the notification bar is displayed.
- Field Label: Notification Message
- Field Name:
notification_message - Click the Conditional Logic tab and toggle it on. Set the values for ”Show this field if” to Notification On/Off, Value is equal to, and Checked. This will make the Text Area visible to editors only when the notification bar is toggled on.
Save your changes and proceed to the next step.
Set the Location Rules for an Options Page
You can associate any field group with an options page on the “Location Rules” tab, located under “Settings” at the bottom of the field group editor. Under “Show this field group if”, select Options Page, is equal to, and then the page you would like your field group to be associated with.
Lucky for us, we used ACF’s seamless fields flow to automatically associate our field group on creation, directly after initializing our new Site Settings options page. This automatically creates a rule to only show the field group on our Site Settings page. You can create additional rules using the “and” and “or” buttons to finetune the conditions under which your field group will display.
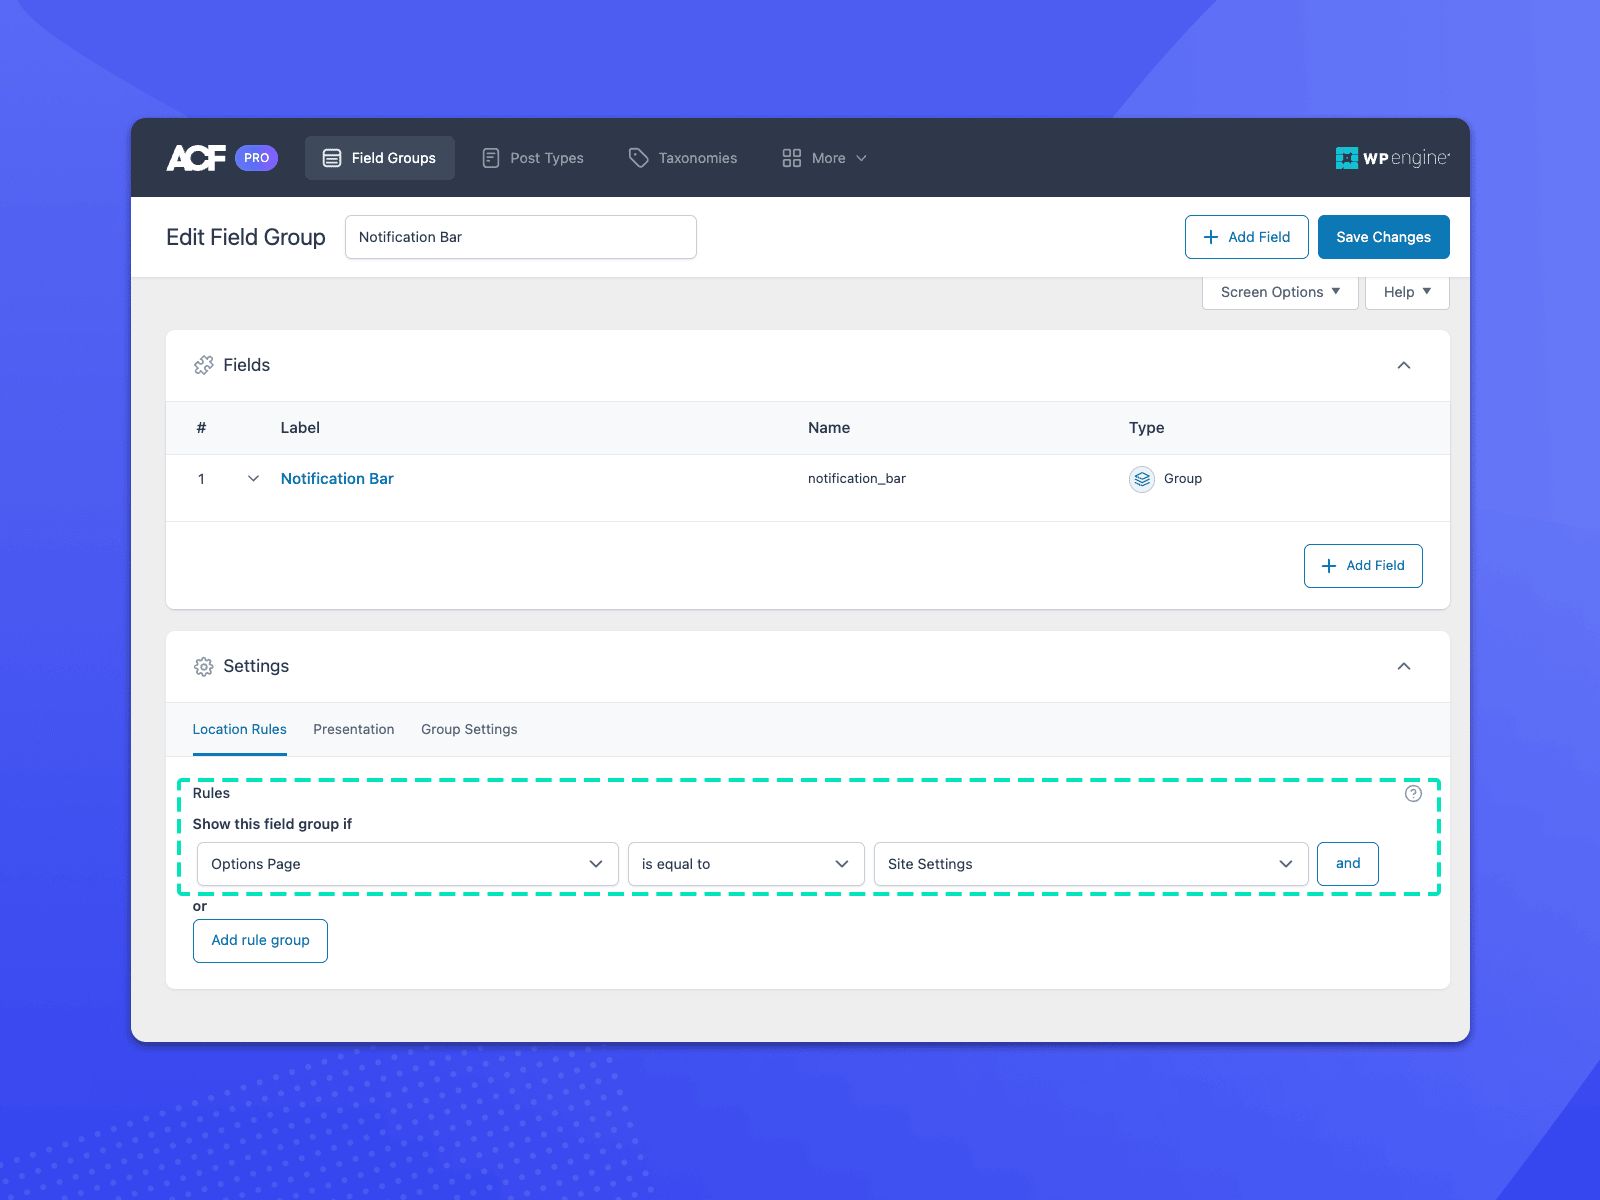
Be sure to save your changes. Now, when you click on your new Site Settings page in the WordPress admin, you should see your notification bar field group.
Add Display Logic Code
We’ll utilize WordPress’s handy wp_body_open action to hook up and display our notification bar at the top of our page. Here are the few lines of code we need:
<?php
/**
 * Get the site notice message, and display it.
 *
 * @return void
 */
function demo_acf_output_notification() {
    $has_notice = get_field( 'notification_bar', 'options' );

    if ( ! $has_notice || ! $has_notice['notification_onoff'] ) {
        return;
    }
    ?>

    <div class="notification-bar">
        <div class="notification-bar__wrapper">
            <p class="notification-bar__text"><?php echo wp_kses_post( $has_notice['notification_message'] ); ?></p>
        </div>
    </div>
    <?php
}
// Notification to be placed after opening body tag.
add_action( 'wp_body_open', 'demo_acf_output_notification' );
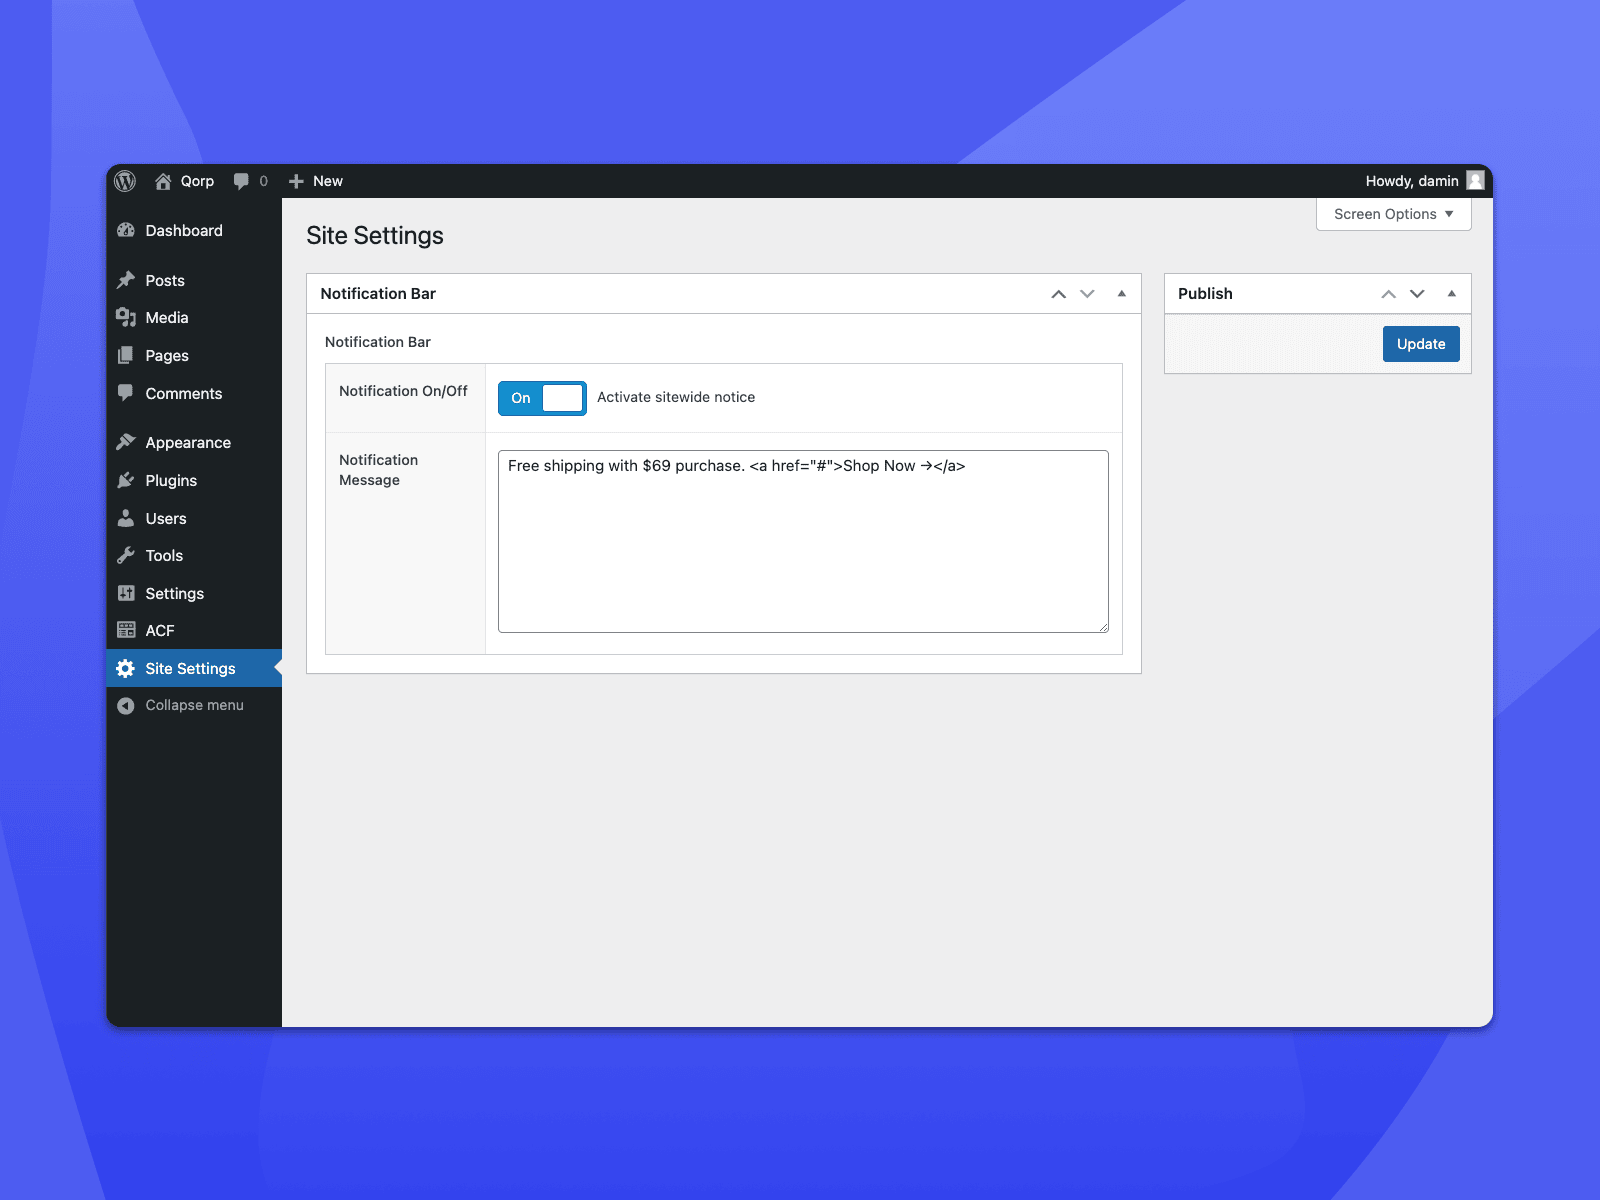
Once you place your display logic code, you should see your notification bar on the frontend of your site (if it is enabled). Of course, you can apply your own CSS to get the appearance to your liking.
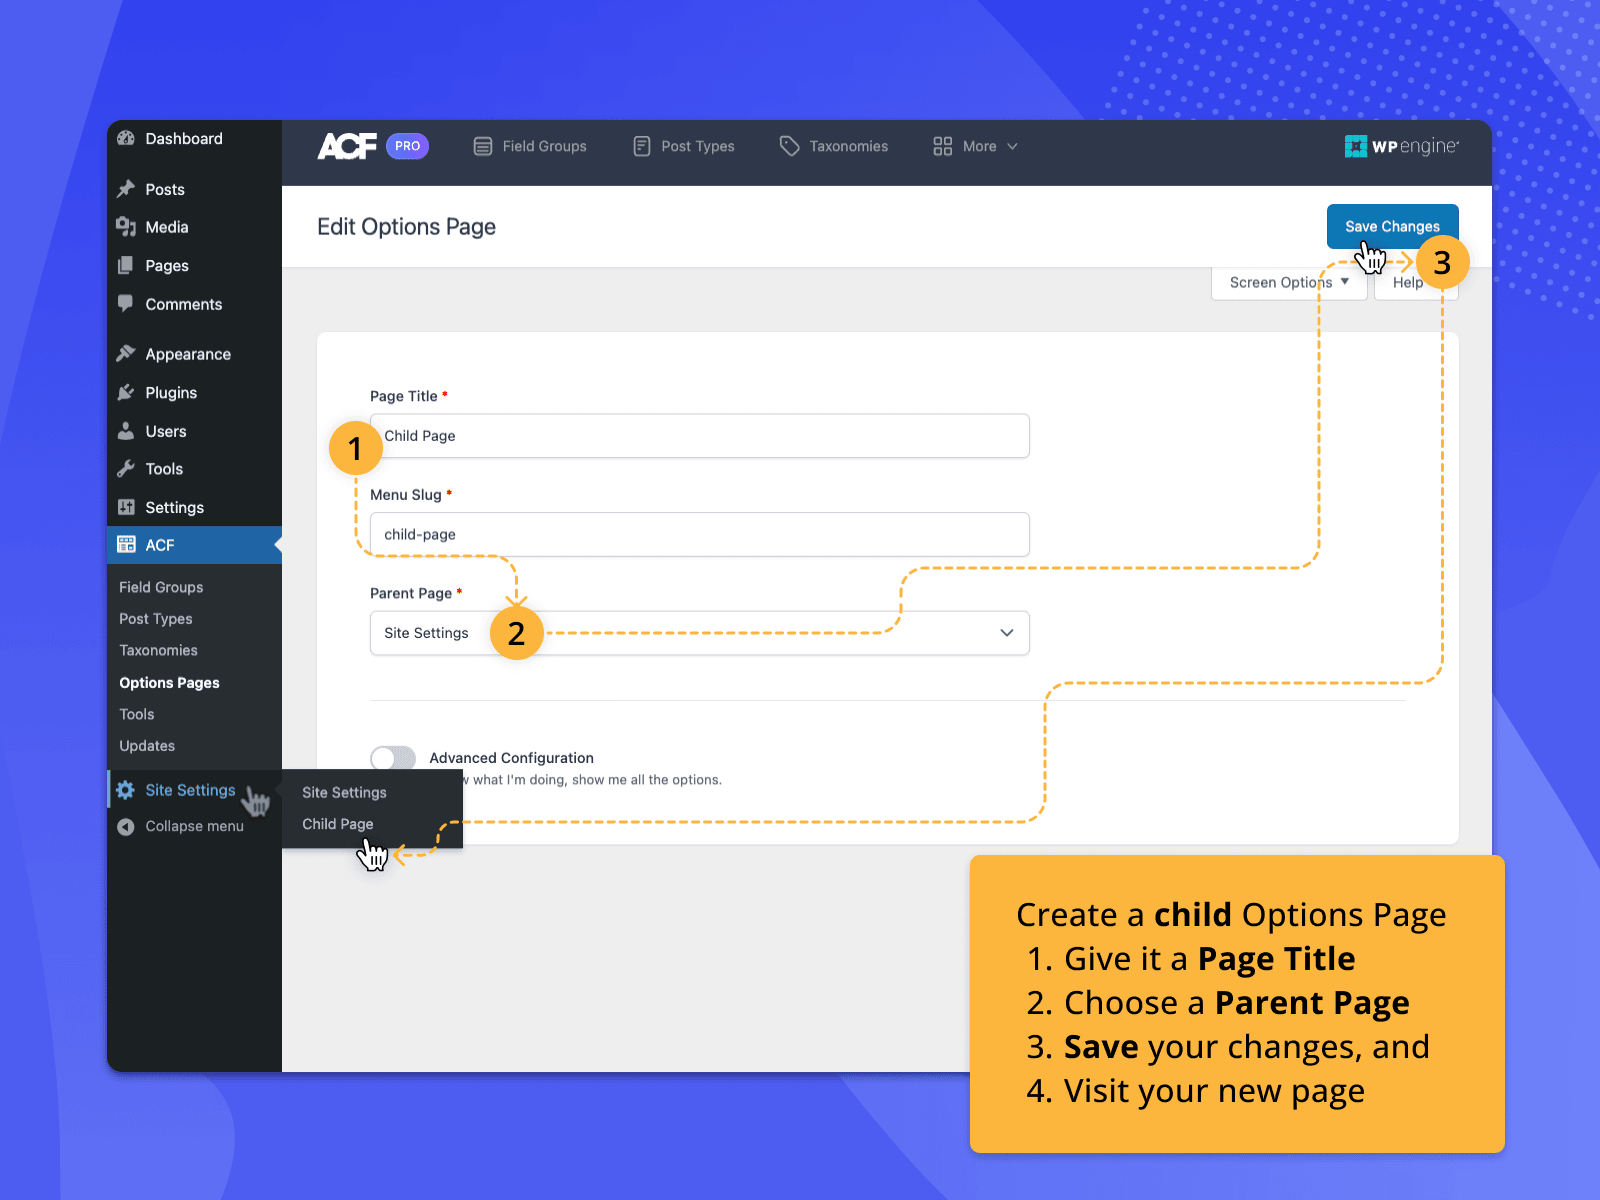
Create a Child Options Page{#create-child-options-page}
You don’t have to stop there. You can create additional options pages and even nest child pages within parents. Options pages can be designated as children during creation or at any later time by clicking the area under “Parent Page” on the “Add New Options Page” or “Edit Options Page” screens. This allows you to designate the options page as a child of any part of the WordPress admin. This includes any options pages you have already created with the “Parent Page” set to No Parent.
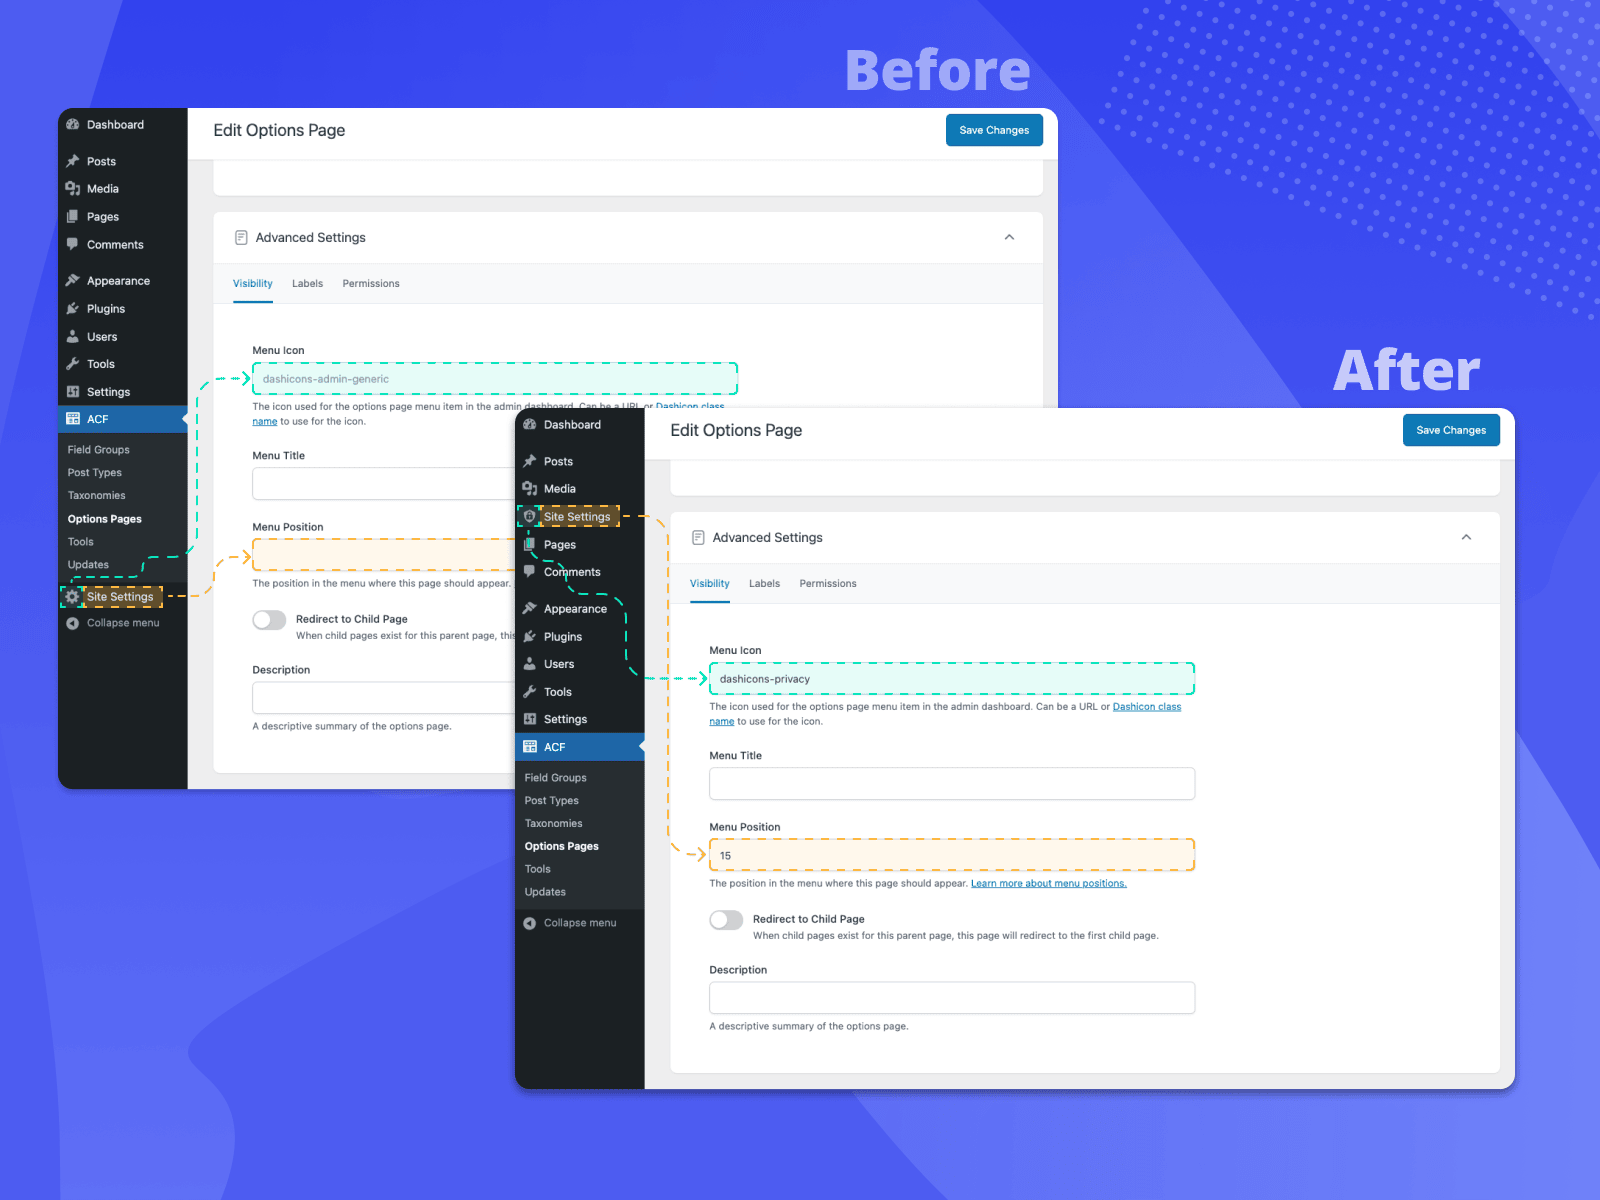
So far, we’ve covered everything you need to create new options pages in the ACF PRO UI, but this is by no means the end of the available options. Toggling on Advanced Configuration gives you access to powerful customizations affecting the options page’s visibility, labels, and permissions.
Change an Option Page’s Menu Position
For example, you can take things even further by prioritizing your option page’s menu position within the WordPress admin area, and even assign a custom icon using Dashicons. Both of these settings are found under the “Visibility” tab.
To change the menu’s position, enter a numerical input that matches the Menu Structure used by WordPress.
Conclusion
The Options Pages feature in ACF PRO allows you to give editors a centralized area to control sitewide features. It’s a simple concept with wide-ranging applications. Make sure to message us on Twitter and let us know how you’ve used ACF PRO’s Options Page feature. We’re certain you’ll surprise us.
Get the best results from ACF PRO fields and features with our tutorials on how to create your first ACF Block, how to use the Repeater field, how to build layouts with the Flexible Content field, and how to use the Gallery field.
Supercharge Your Website With Premium Features Using ACF PRO
Speed up your workflow and unlock features to better develop websites using ACF Blocks and Options Pages, with the Flexible Content, Repeater, Clone, Gallery Fields & More.
Related
- Features: Options Page
- Functions: acf_add_options_sub_page()
- Functions: acf_add_options_page()
- Videos: ACF Unlocks the True Power of WordPress
- Guides: Register multiple options pages
